OSX迁移基础配置
一、资料打包迁移:
定期整理到~/Migrations, 备份到外接硬盘。
主要为了避免存档大文件自动保存到iCloud
后期未整理的内容可以放在文档里面,同步在iCloud上
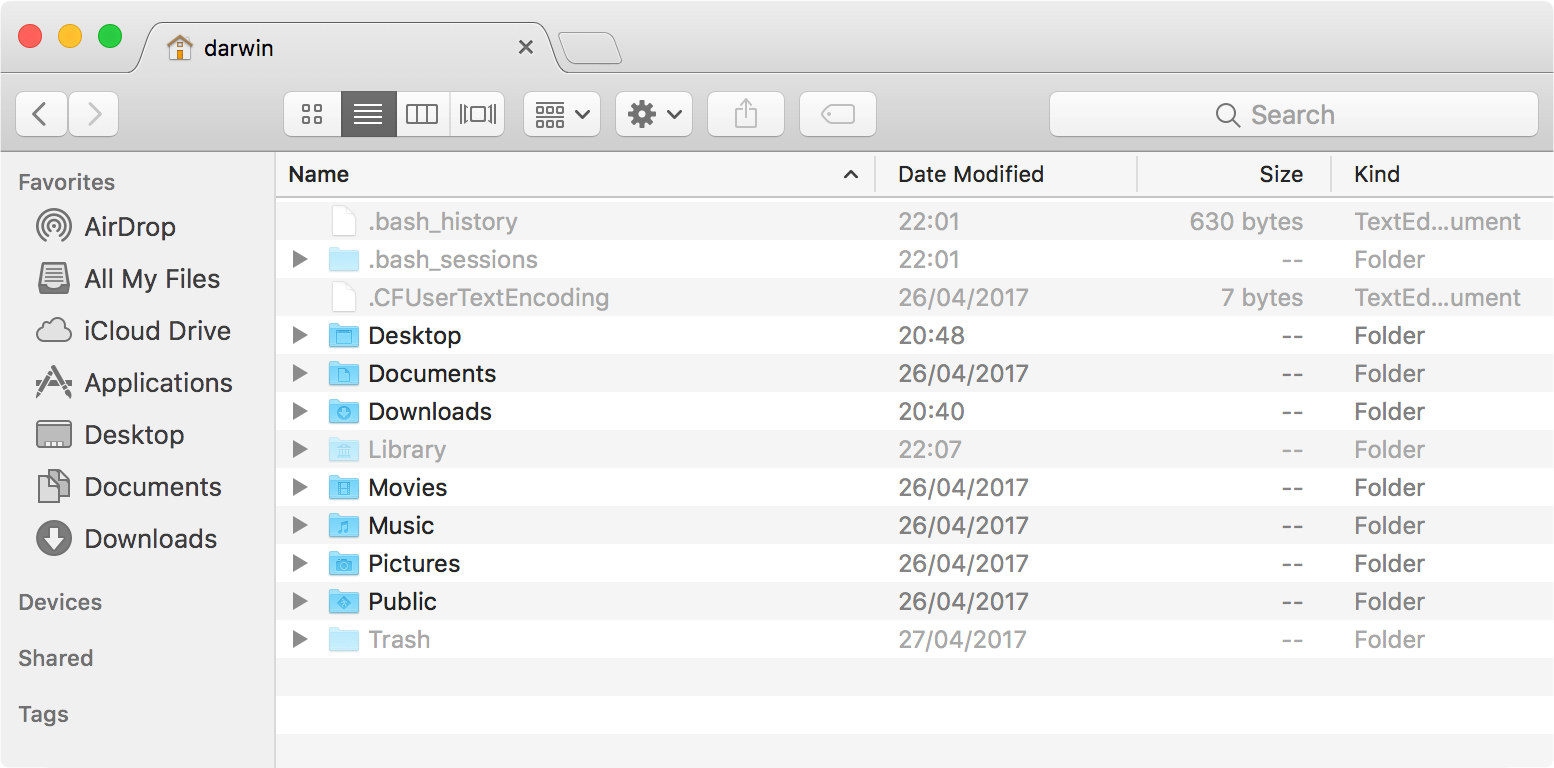
在Finder左侧添加Migrations快捷路径
代码:github/gitee/gitlab
app自存储:
wechat: 备份数据之后再恢复
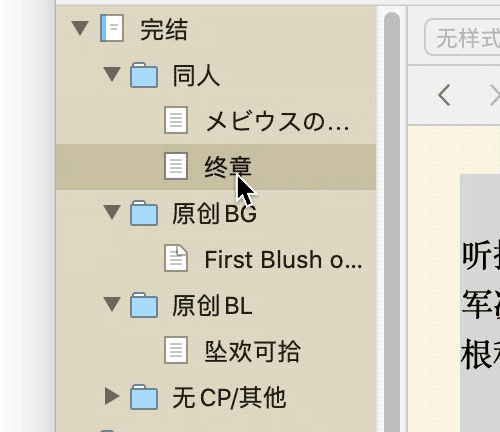
DT:
本地数据库配置
- 安装后登陆网站激活
- 配置css显示:Preferences >> Web >> Style Sheet >> 选择dt_extras里面的样式表
- Menu >> File >> Open Database...
- 打开~/Migrations/DEVONThink_Databases
- 打开iCloud同步:Preferences >> Sync >> check iCloud(CloudKit)
这将会合并在线数据库与步骤3导入的数据库,耗时较长
PDF Expert: 作为dt中pdf的外置阅读器
typora:作为dt中md的外置阅读器
- picGo上传配置: Upload Images - Typora Support
- PicGo
- 快捷键配置及配置文件同步: Shortcut Keys - Typora Support
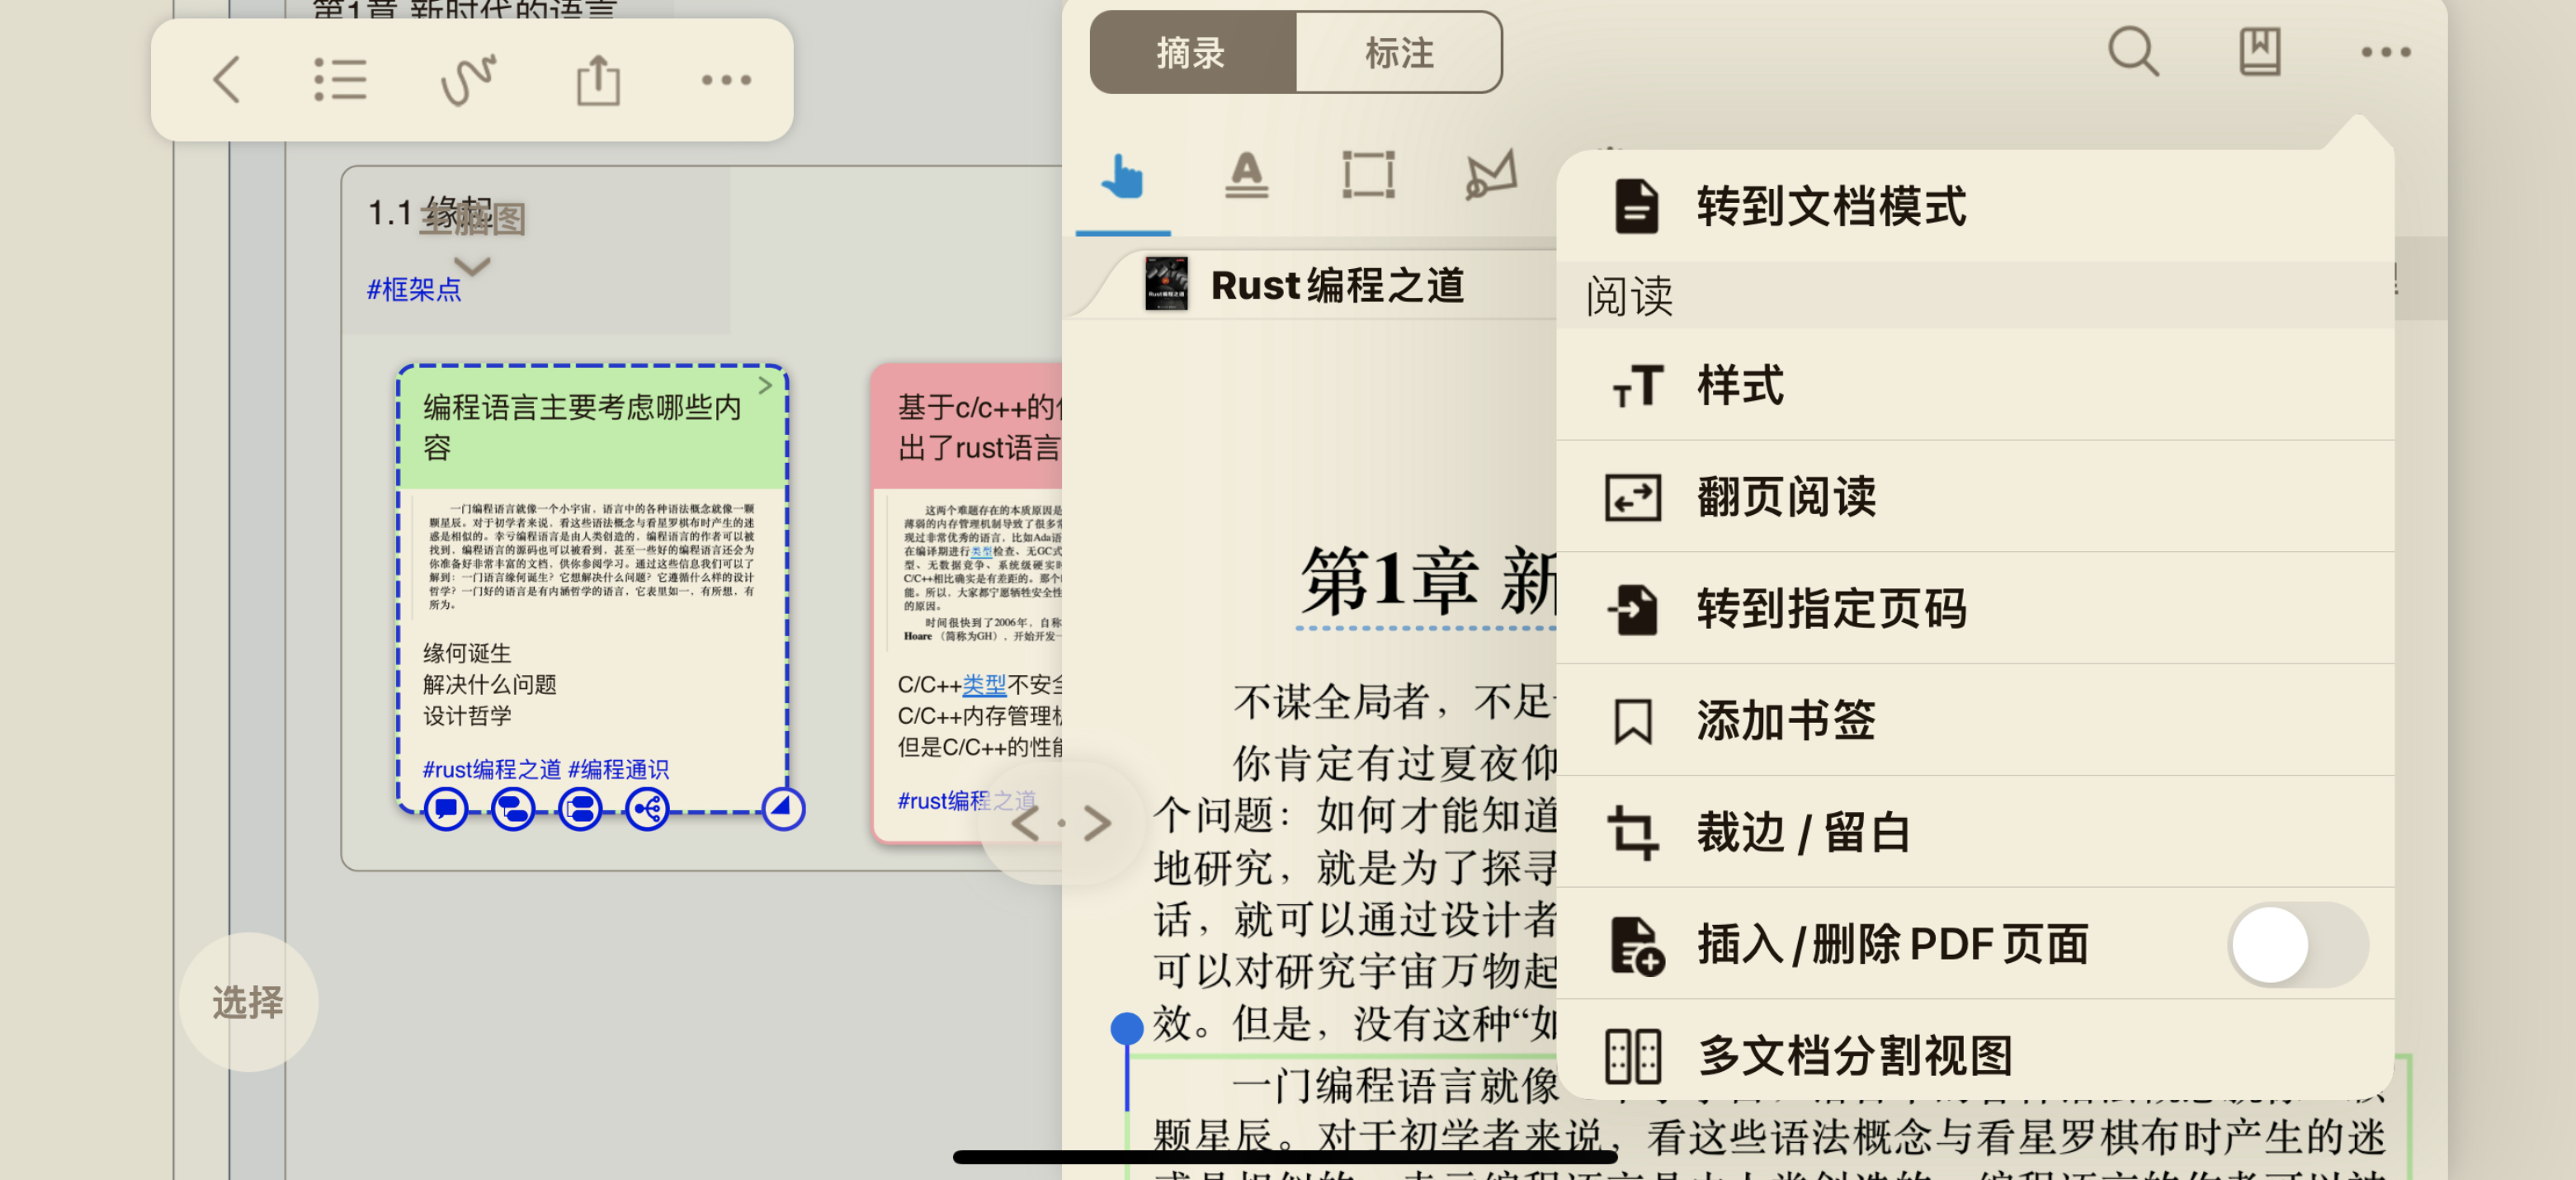
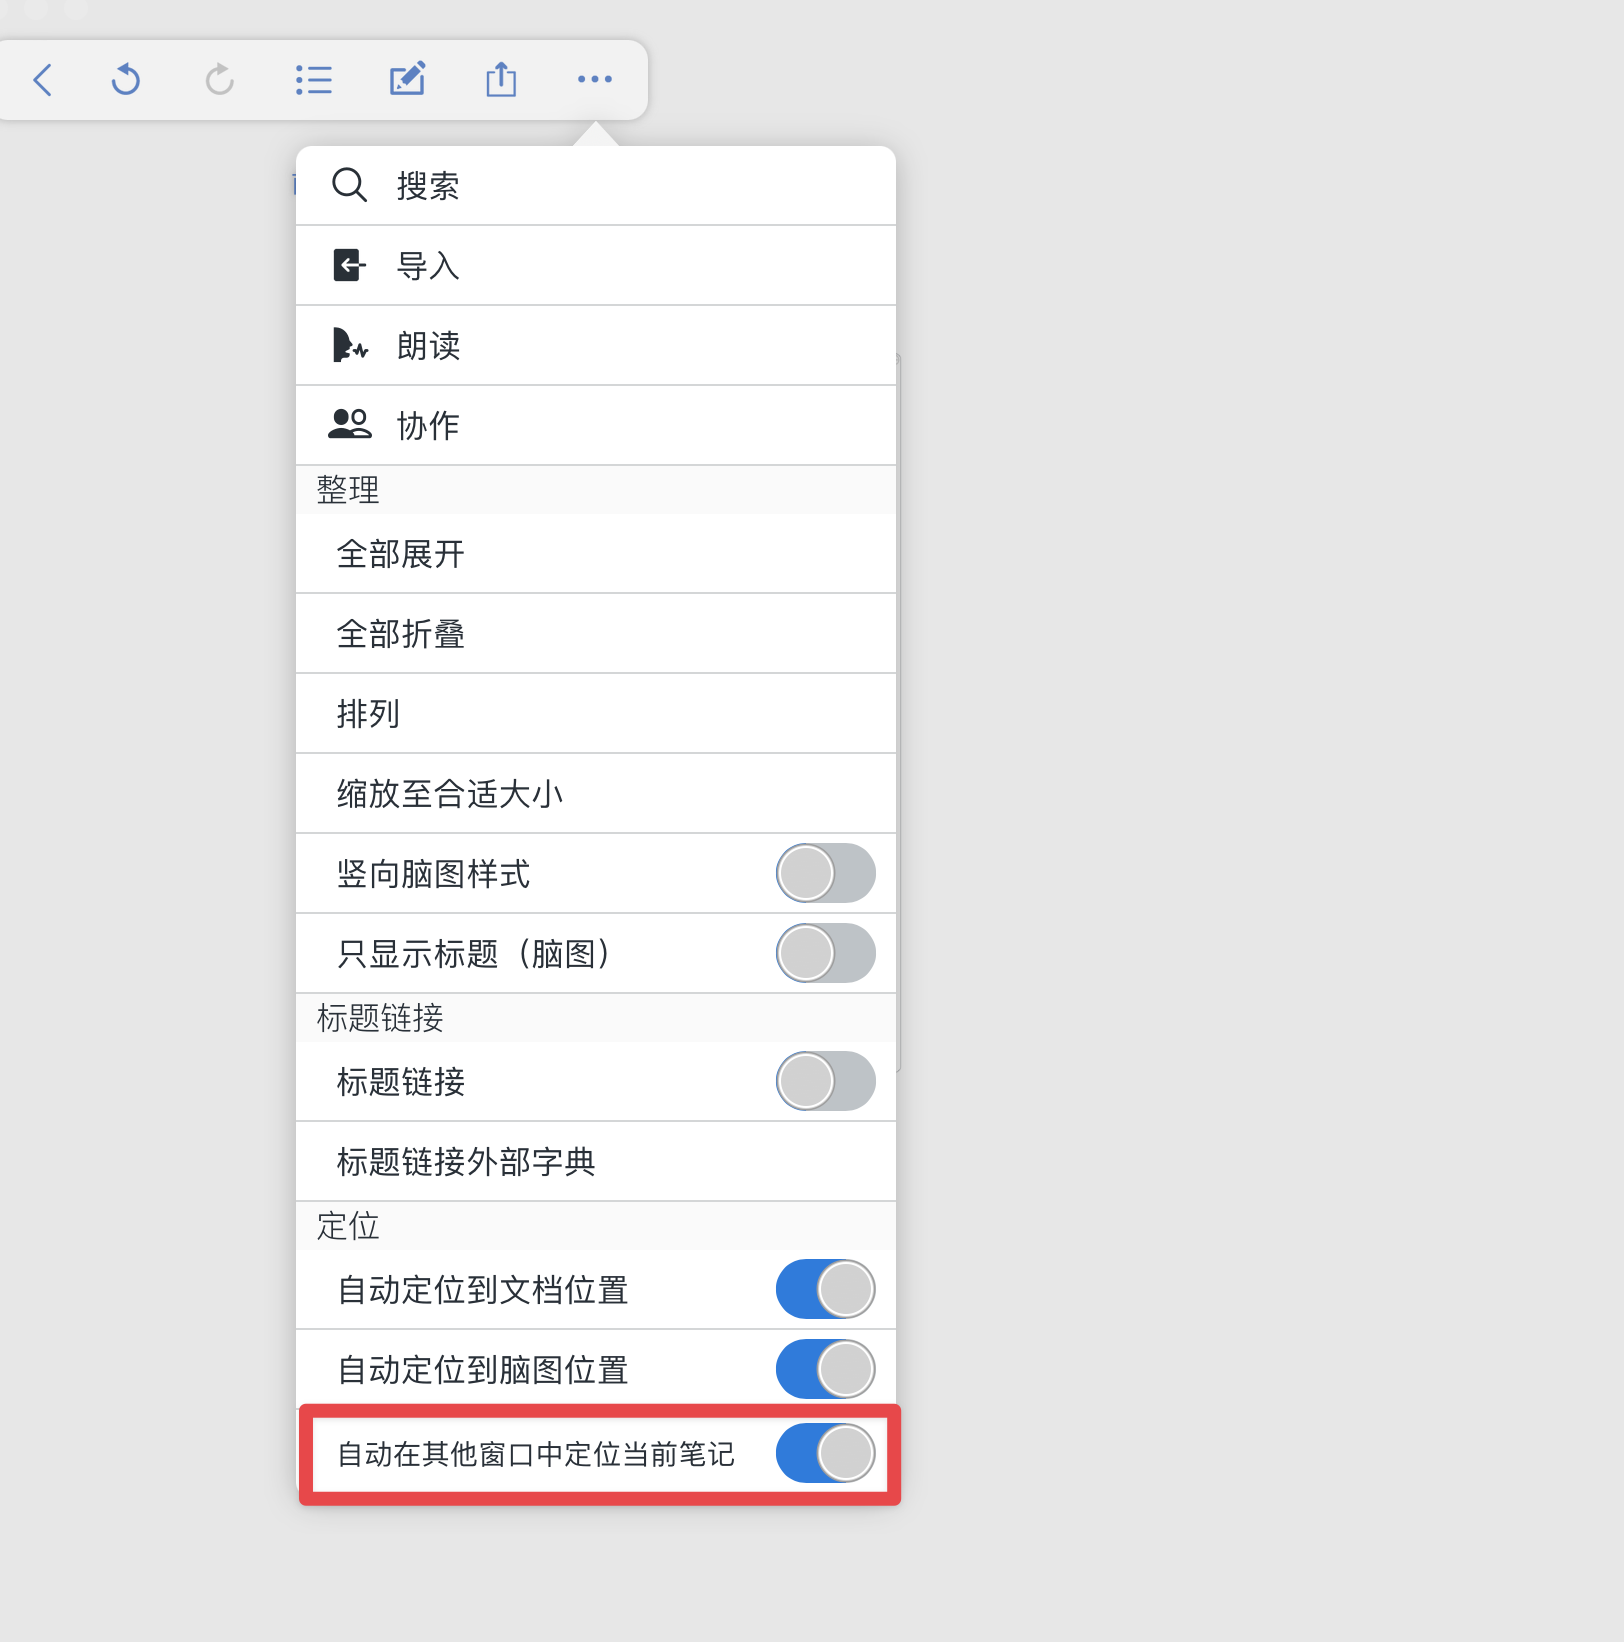
自动化脚本
- dt_md_export: dt_extras/scripts
tell application id "DNtp"
	set theSelection to the selection
	if theSelection is {} then error "Please select some documents."
	set md_result to ""
	repeat with this_record in theSelection
		set md_link to (("[" & name of this_record as string) & "]" & "(" & reference URL of this_record as string) & ")"
		set md_result to md_result & "- " & md_link & return & return
	end repeat
	--display dialog md_result
	set the clipboard to md_result
end tell
SingleFile: 可以将网页保存为单独文件后存入dt
- gildas-lormeau/SingleFile: Web Extension for Firefox/Chrome/MS Edge and CLI tool to save a faithful copy of an entire web page in a single HTML file
- 这个方式可以完美保存网页,将所有图片、代码都放在一个文件中
Eagle: 本地数据库配置
- 保存路径:~/Migrations/Eagle_Libraries
xmind/mindnode/drafts/marginnote:iCloud
分类打包:
- 图片、视频: ~/Documents/media
- pdf等电子书: 有用的放dt,没用的删除
- 项目资料:按照项目整理,~/Documents/Projects
- logins: 放在~/.ssh/logins里面的登陆用脚本
二、系统重装
关机 >> 重启的同时按住cmd+R >> 磁盘工具 >> 抹除 >> 重装
重启MAC,按住cmd+R直到屏幕上出现苹果的标志和进度条,进入Recovery模式;
三、系统设置
-
触控板拖移:系统偏好设置 >> 辅助功能 >> 指针控制 >> 触控板选项:启动拖移 > 三指拖移
-
系统自带配置目录:
cd ~/.config
里面至少有下列配置文件夹:
- clash
- karabiner
- iTerm2
四、最优安装顺序
1. ClashX
2. iTerm2
详见iterm2
3. github/gitlab ssh key
ssh-keygen -t rsa -C "your_email@example.com"
4. vim config
KuanHsiaoKuo/vim_config: my custom vim configurations
5. karabiner
- 首先GUI配置两个按键切换:caps_lock -> left_control; right_command -> escape
- 然后会自动生成配置文件:
~/.config/karabiner/karaginer.json
- 将karabiner.md里面的配置文件复制进去即可
6. manico/moom/popclip/Alfred
- manico: 配置快捷键
iTerm2: shift+space
Appstore: option+a
- moom:设置快捷建cmd+m
- alfred: 依次安装alfred_workflows中的workflow
7. iTerm2 Around:
- iterm2/iterm2_around.sh
8. DT/Marginnote3/xmind
9. Jetbrains Sync
包含:IDEA、Pycharm、Webstorm、Goland等 Jetbrains有两种同步配置方式, 都是插件,首次安装时自带:
- IDE settings sync: 使用jetbrains账号同步,可以直接同步插件
- settings repository: 使用git同步配置,不包含插件。
注意,二者只能激活其一,其中第二种激活后会自动覆盖第一种方式。
推荐第一种方式,同步更全面无痕。
第二种是idea默认开启,需要主动去关闭:
Preferences >> Plugins >> search "Settings Repository" >> unabled
osx系统设置
- 指定后缀名打开方式 找一个对应后缀名的文件 >> cmd + i >> 弹窗里面修改打开方式
github开源
tproxy: TCP 连接分析工具
kevwan/tproxy: A cli tool to proxy and analyze TCP connections.
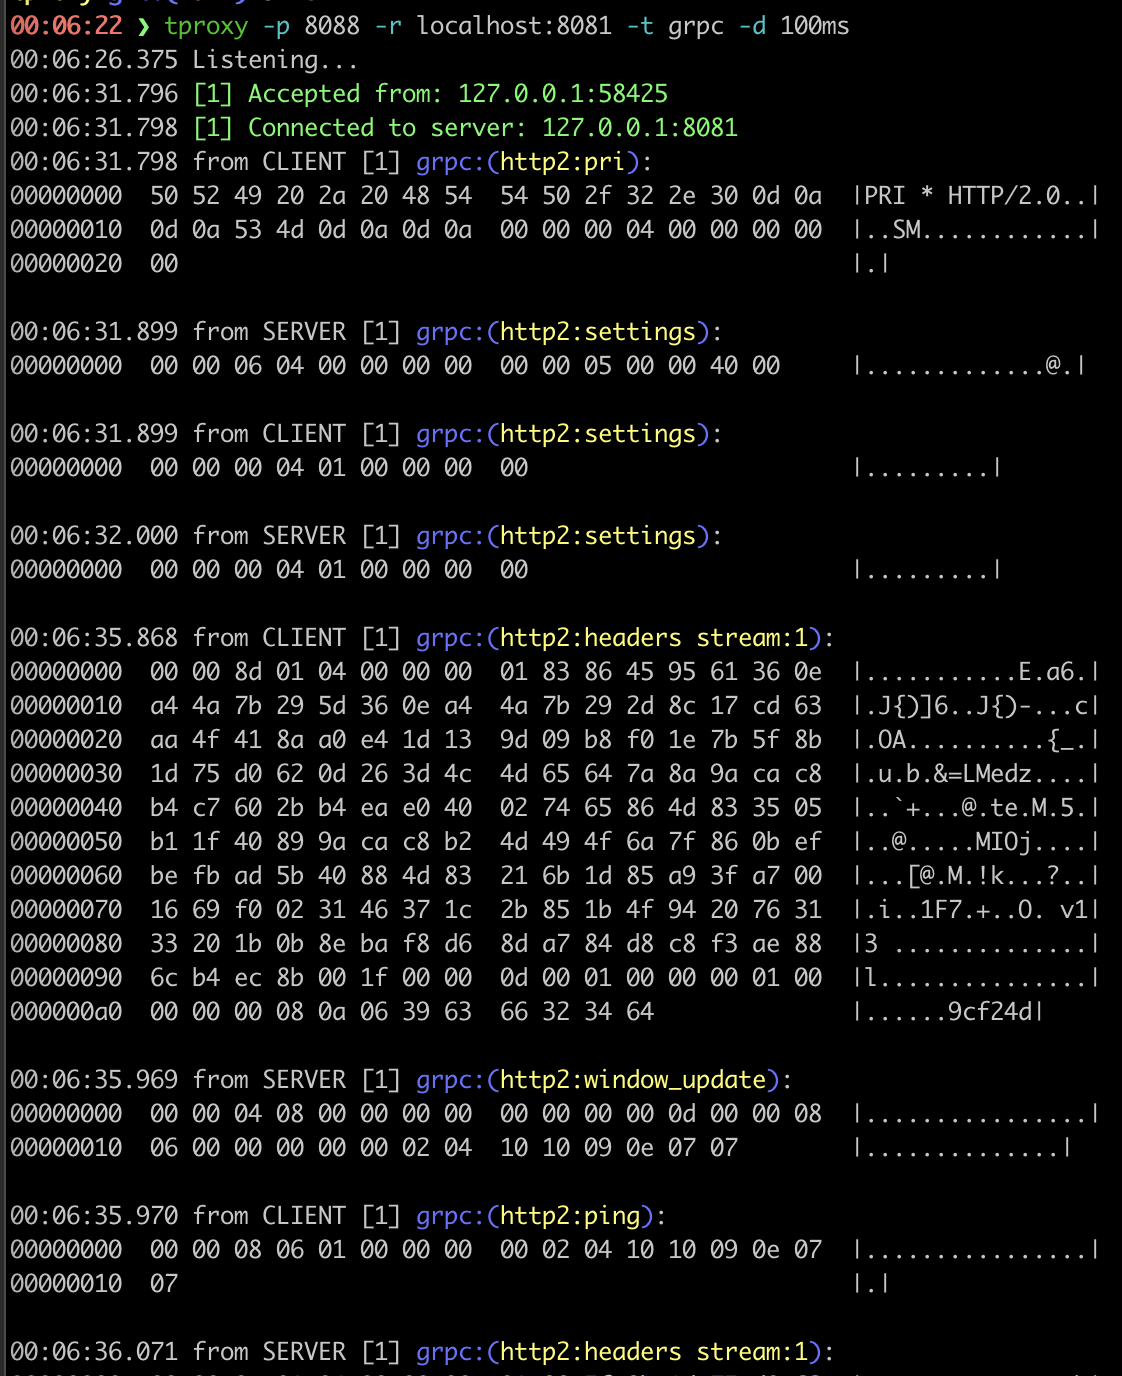
这是go-zero框架的一个配套网络链接分析工具。
作者在开发后端服务时,经常需要监控项目的网络流量,因此他做了这么一款工具,主要辅助他完成如下工作:
-
监控 gRPC 连接,何时连接、何时重连;
-
监控 MySQL 连接池,找出生命周期策略;
-
实时监控任何 TCP 连接。
开发相关
Another Redis Desktop Manager
Another Redis Desktop Manager | 更快、更好、更稳定的Redis桌面(GUI)管理客户端,兼容Windows、Mac、Linux,性能出众,轻松加载海量键值
ClashX: 梯子
Code: 代码导出图片化工具
Dash: 文档查阅工具
Dash for macOS - API Documentation Browser, Snippet Manager - Kapeli

OSX Docker
Github Desktop
GitHub Desktop | Simple collaboration from your desktop
iTerm2: 终端神器
iTerm2 - macOS Terminal Replacement
IDEA: Fleet出来之前的选择
IntelliJ IDEA:JetBrains 功能强大、符合人体工程学的 Java IDE
Fleet: 期待的下一代Jetbrains综合编辑器
JetBrains Fleet:由 JetBrains 打造的下一代 IDE
JsonHero: 一款json全功能工具

- jsonhero-io/jsonhero-web: JSON Hero is an open-source, beautiful JSON explorer for the web that lets you browse, search and navigate your JSON files at speed. 🚀
- JSON Viewer - JSON Hero
Navicat: 数据库工具
Navicat Premium | Connects to multiple databases on a single GUI
OpenVPN: vpn工具
Paw:Mac平台上接口测试神器,比postman更好
Paw – The most advanced API tool for Mac
PicGo: 本地上传图床工具
PicGo: A simple & beautiful tool for pictures uploading built by vue-cli-electron-builder
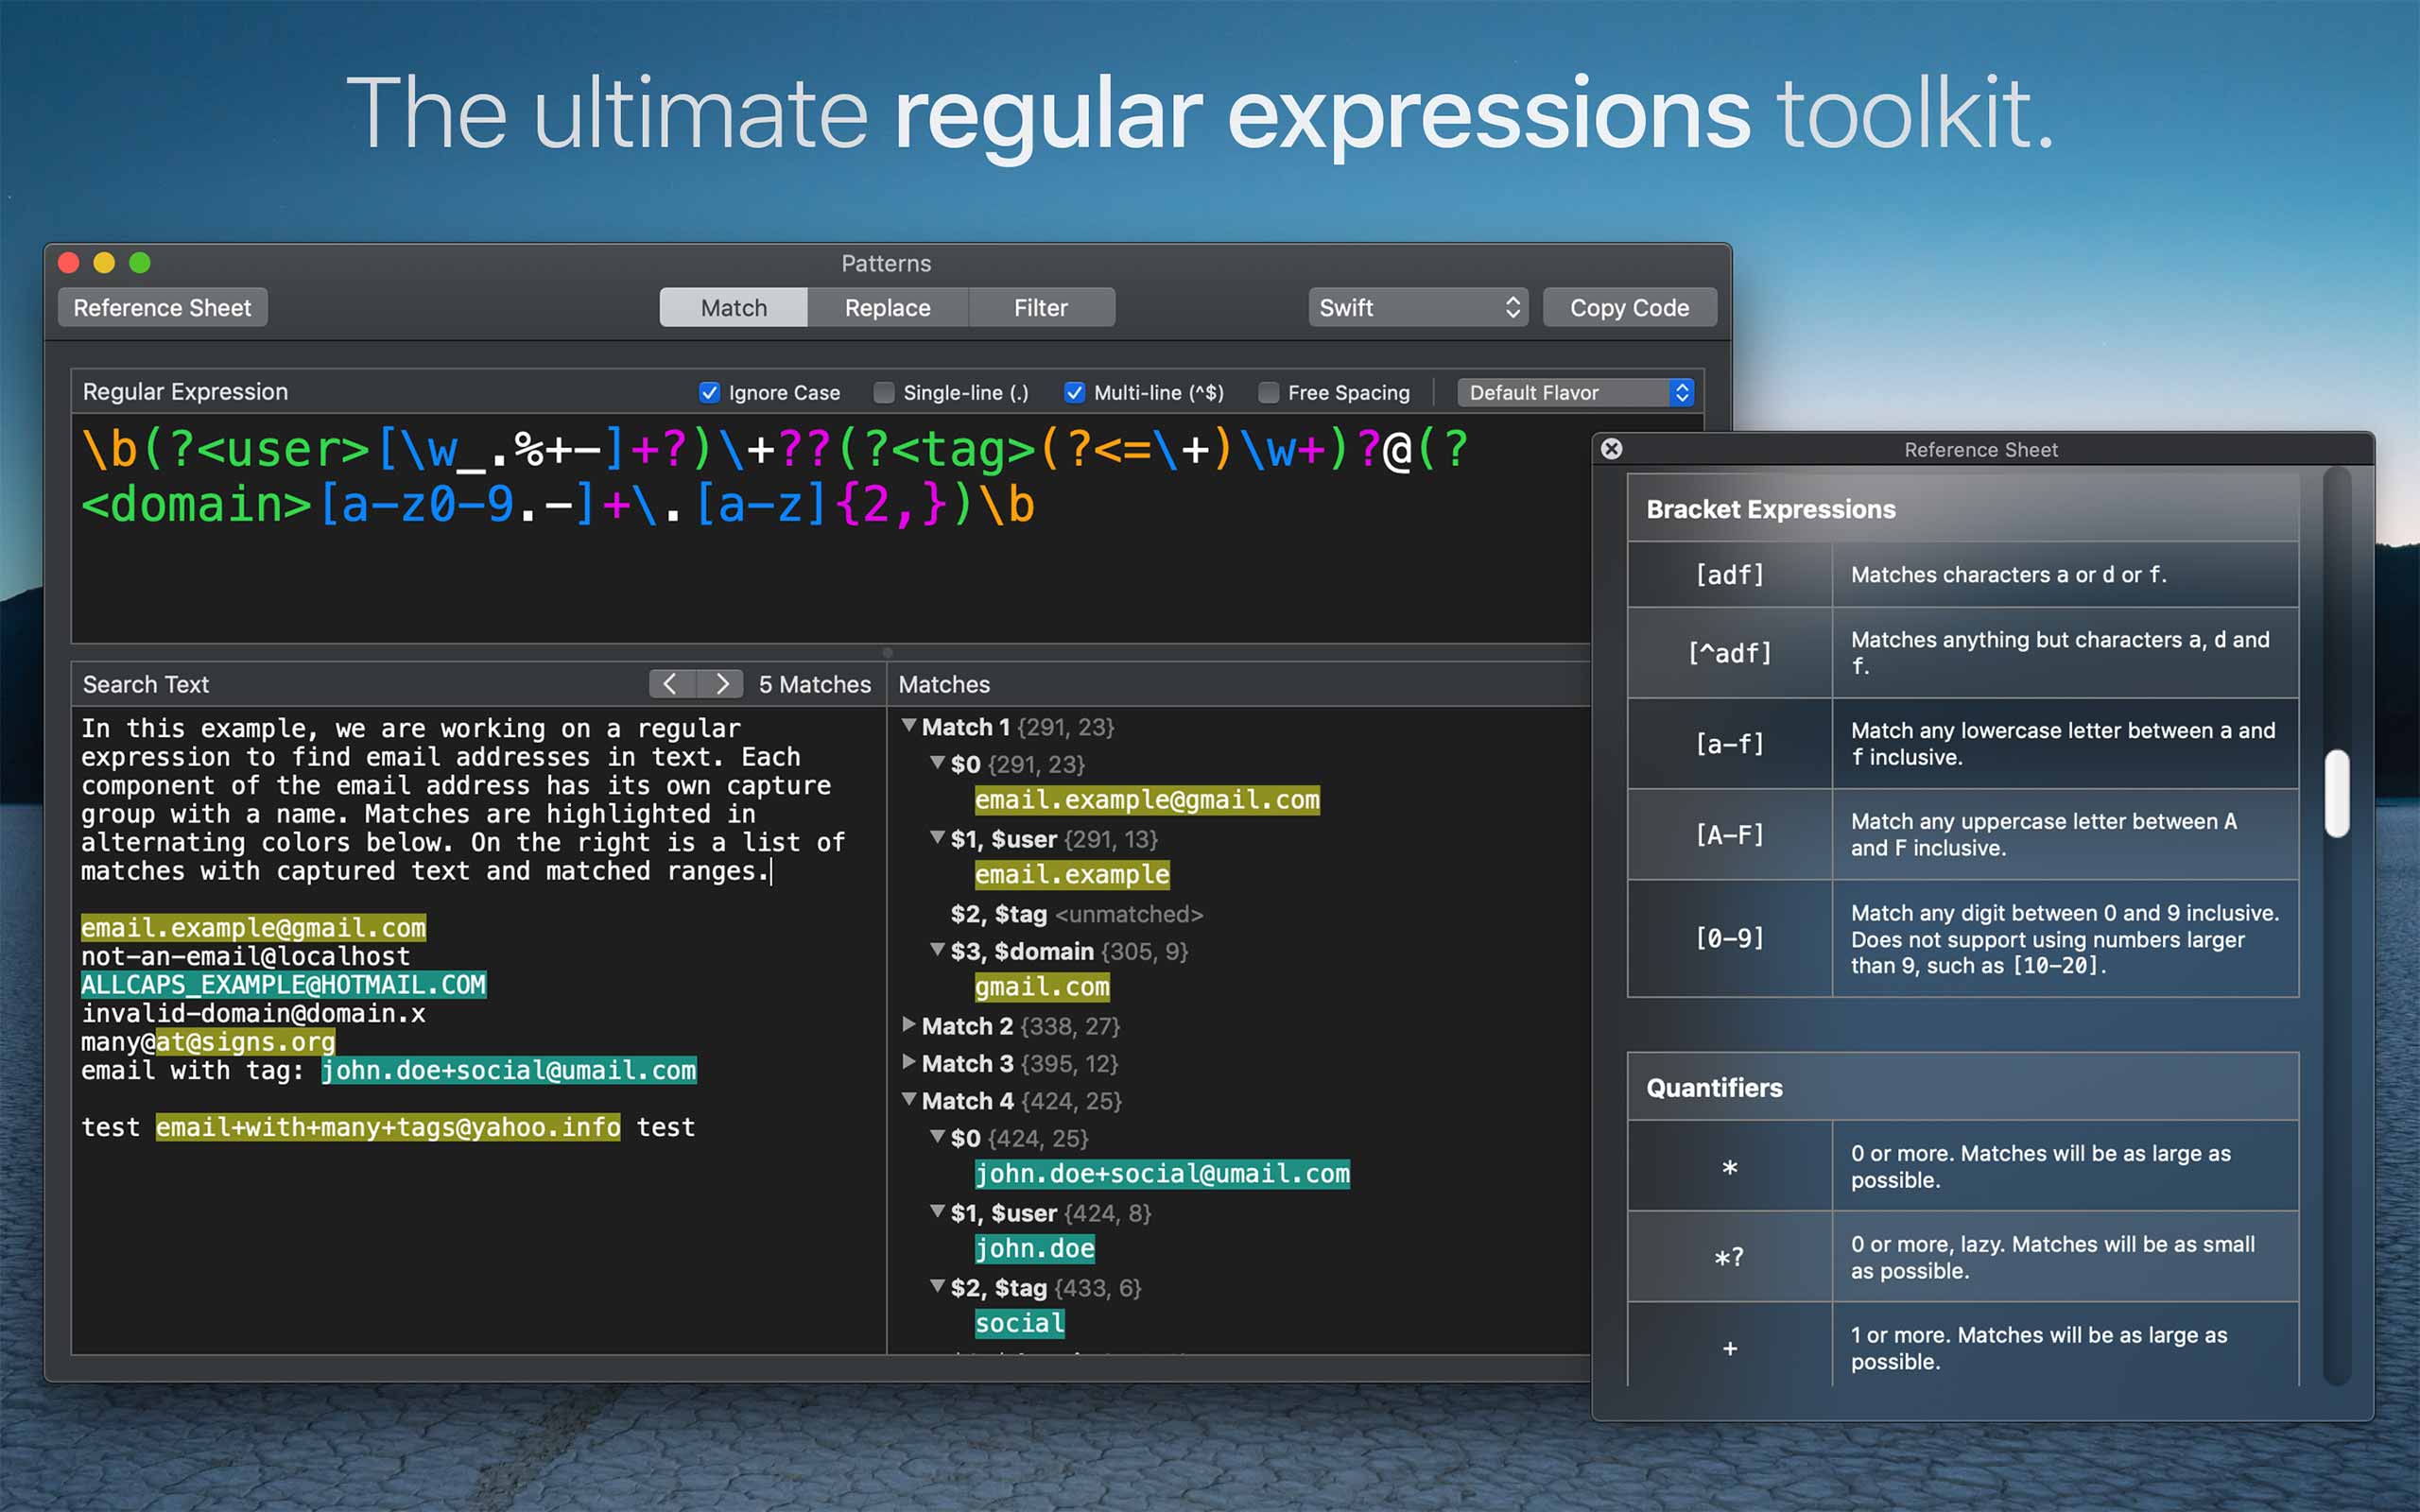
Patterns: 正则表达式测试工具
SnippetsLab:脚本片段管理工具
SnippetsLab - Keep Your Code At Your Fingertips
Script Debugger: AppleScript 编辑器
Script Debugger是Macintosh计算机的源代码编辑器和调试环境,适用于AppleScript编程语言以及其他基于Apple Inc.的开放脚本体系结构的语言。它是Late Night Software的产品。
Termius: ssh连接app
 Termius - SSH platform for Mobile and Desktop

这个app是ios/osx都有的,配置信息、Snippets还可以随着账号同步。虽然付费,不过也能在有些时候解决问题. 当然,还有一点很重要,我因为订阅得早,所以一年订阅费很低。
Warp: 观望中的终端工具,少了很多自定义
Warp: The terminal for the 21st century
效率相关
Karabiner-Elements: 改键神器
Amphetamine: mac防休眠
Alfred: 正如其名,Mac老管家
Alfred - Productivity App for macOS
CleanShot X: 截图标注工具
需要登陆网站 >> License Manager >> 获取下载链接
Downie: 视频下载神器,youtube等通吃
Downie - YouTube Video Downloader for macOS - Charlie Monroe Software
Focus: 专注效率工具
Focus - Time Management on the App Store
GIF Brewery 3: gif制作工具
「GIF Brewery 3 by Gfycat」をApp Storeで
Manico: 应用快速切换快捷键配置工具,类似hook
Moom: 窗口管理工具
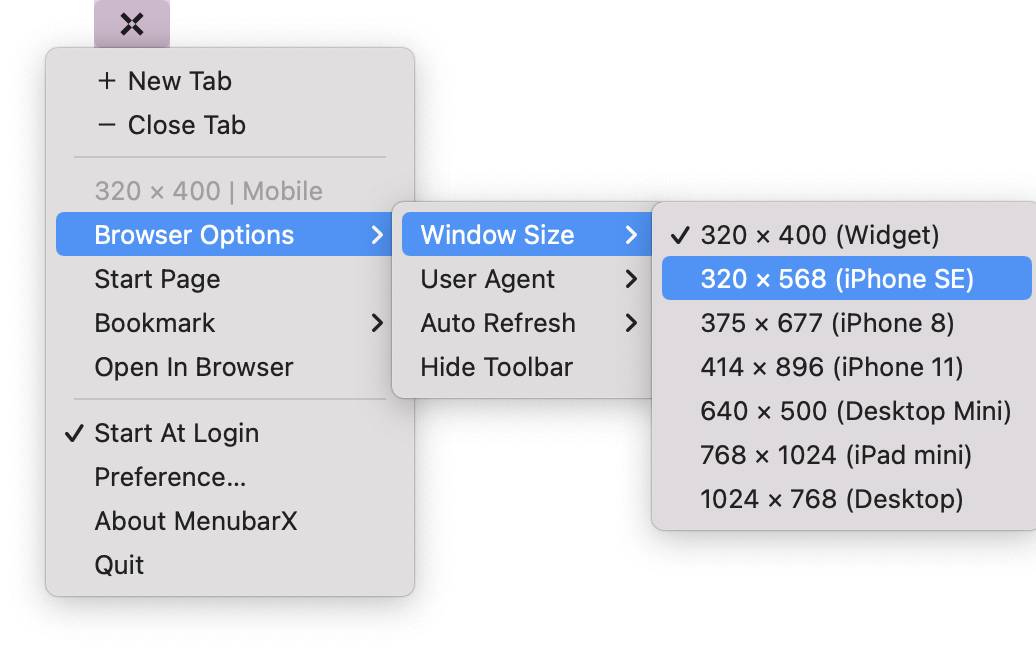
Menubar X: 在菜单栏快速查看指定网站
MenubarX - Productivity App for macOS
MenubarX is a powerful menu bar browser. You can add any web pages to the menu bar just like Native Apps. It will open up a new world for Web Apps.
-
Awarded on ProductHunt Daily and Weekly
-
Reviewed as the most worthy menu bar App (@monograph)


WebCatalog: 类似Menubar
WebCatalog for Mac and PC | Turn Any Websites into Real Desktop Apps | WebCatalog
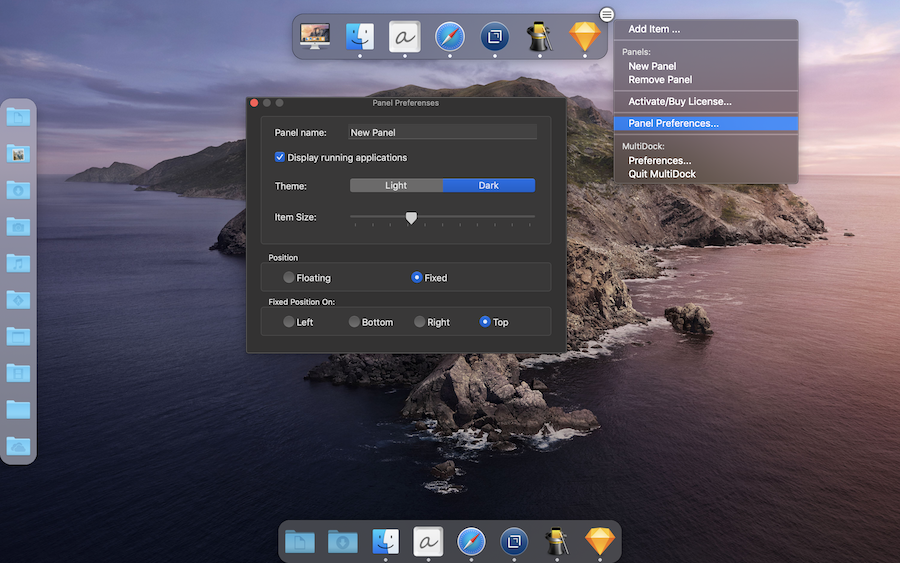
MultiDock: 浮动常用工具栏
可以自定义工作流相关工具,并漂浮在屏幕顶层,方便随时点击
MultiDock is a simple application that allows you to organize frequently used applications, documents and folders using small panels (Dock's). MultiDock evolved as a new version of ActiveDock was being created. Some these new features might be available in the next version of ActiveDock.
PopClip: 剪贴板效率工具
Paste: 剪贴板管理工具
Paste - Clipboard manager for Mac, iPhone, and iPad
![]()
The Unarchiver: 压缩解压缩工具
The Unarchiver | Top Free Unarchiving Software for macOS
学习工具
Anki:抽卡识记工具
Anki - powerful, intelligent flashcards
Marginnote:基于思维导图的阅读学习工具
Movist: 视频播放工具
Pdf Expert: pdf阅读工具
面向 Mac 的优秀 PDF 阅读应用 | 免费试用 | PDF 点睛
Drawboard PDF: 功能全面,尤其是笔记工具
- 主打iOS平台,iPad/iPhone的体验惊人
- 桌面端使用浏览器代替。
四、数据管理
DEVONThink: 各自数据格式一站式管理工具
DEVONtechnologies | DEVONthink, professional document and information management for the Mac and iOS
Calibre: 书籍格式转换工具
CleanMyMac: 电脑清理工具,不过我更喜欢格盘重装
CleanMyMac X: The Only Legit Mac Cleanup App. Get a Cleaner Mac in Minutes
Eagle: 图片收集管理工具
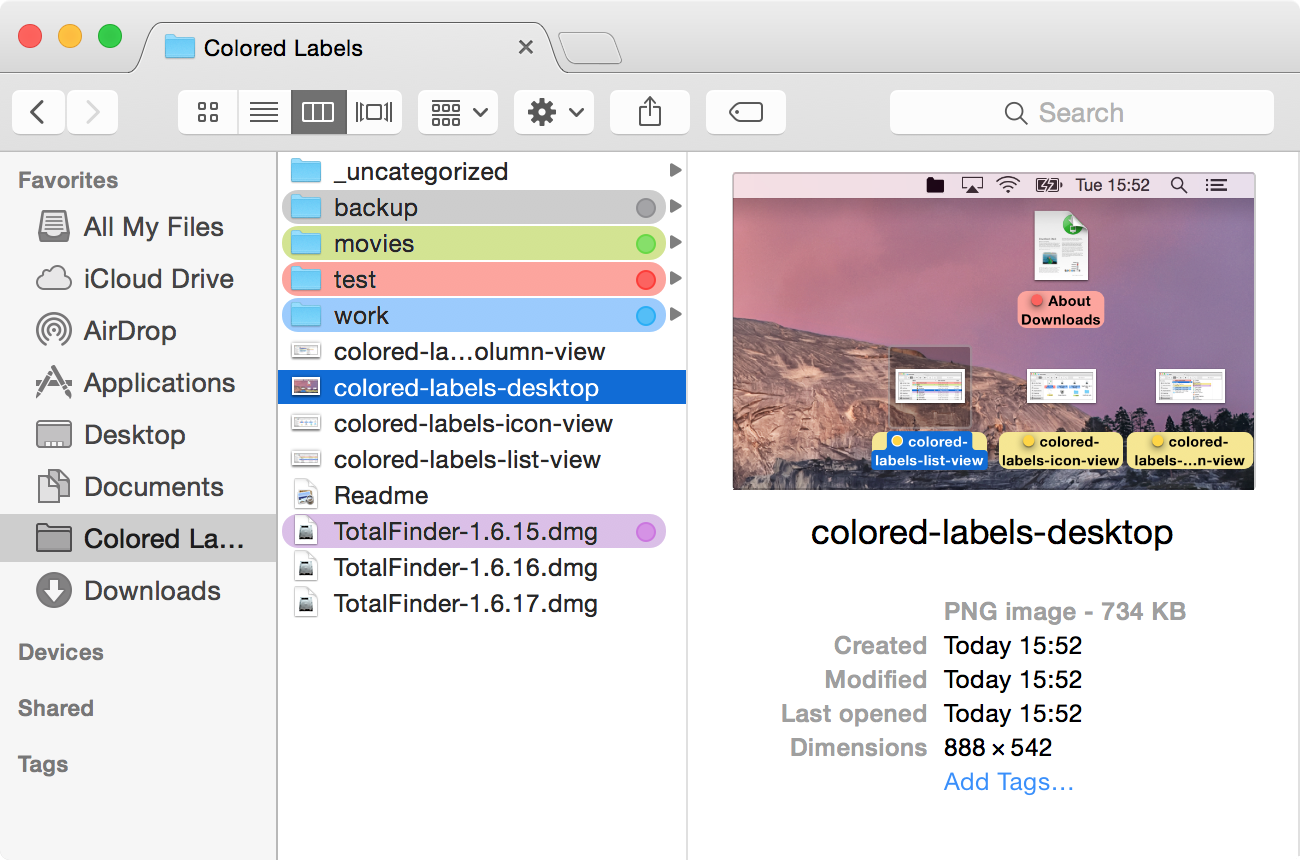
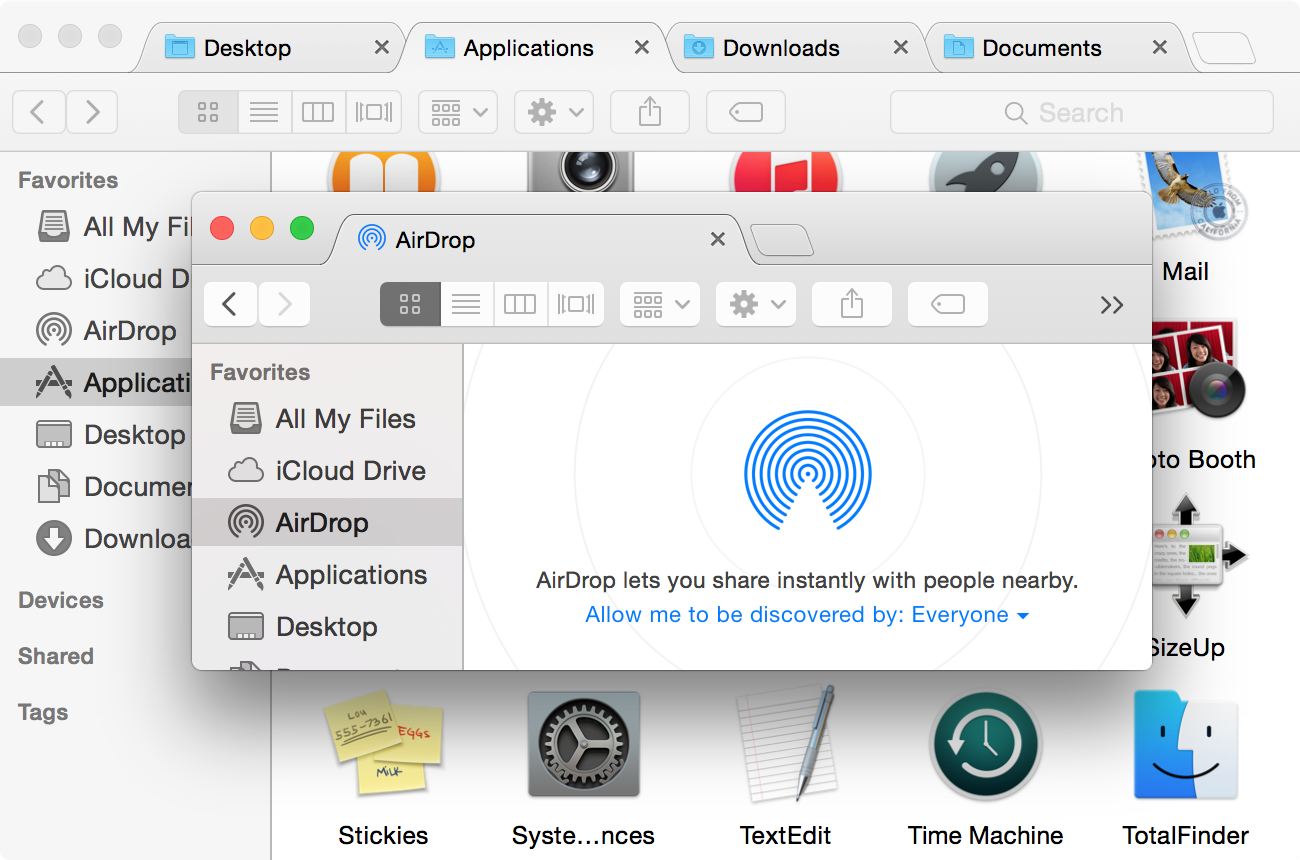
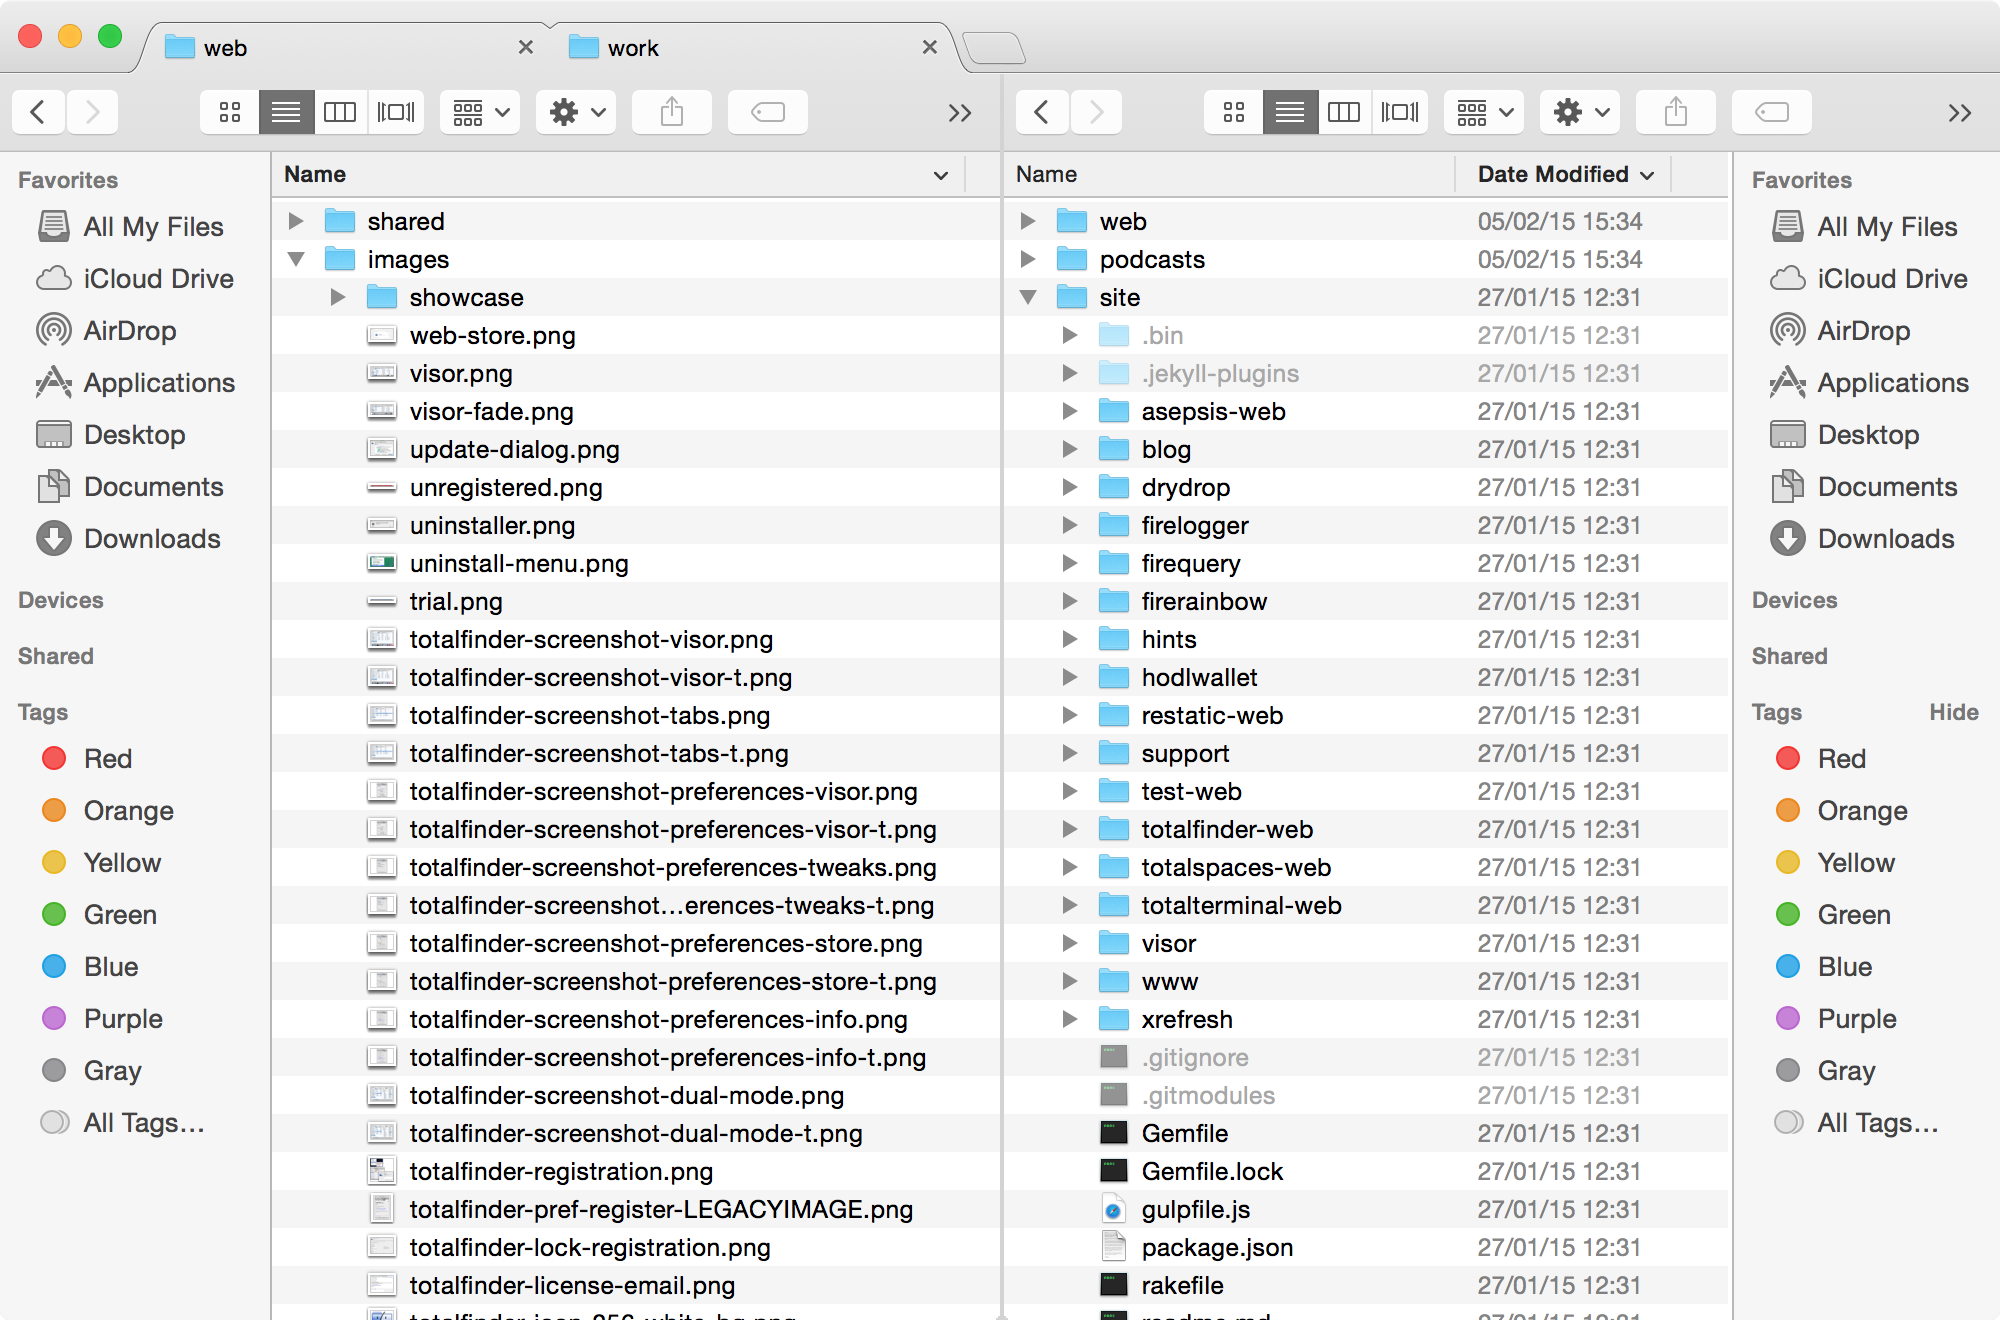
TotalFinder: Finder的完美强化插件
TotalFinder is a plugin, not a replacement
- Tabs in TotalFinder
- Dual Mode in TotalFinder
- Visor in TotalFinder
- Show System Files in TotalFinder
- Colored Labels in TotalFinder
- Folders on Top in TotalFinder

- TotalFinder Context Menus
- TotalFinder Tweaks
输出相关
Drafts: 随手记终极解决工具
Day One: 颜值与功能并举的日记工具
Your Journal for Life | Day One - Your Journal for Life | Day One
Ulysses: 颜值优先的长文书写工具
Typora: 将Markdown玩透的笔记工具
drawio: UML图解决方案
jgraph/drawio-desktop: Official electron build of diagrams.net
GoodNotes: 找回书写的感觉
GoodNotes | Best Note-Taking App for iPad
MindNode: 颜值不错的简单思维导图工具
Mind Map & Brainstorm Ideas - MindNode
Monodraw:ASCII图的终极解决方案
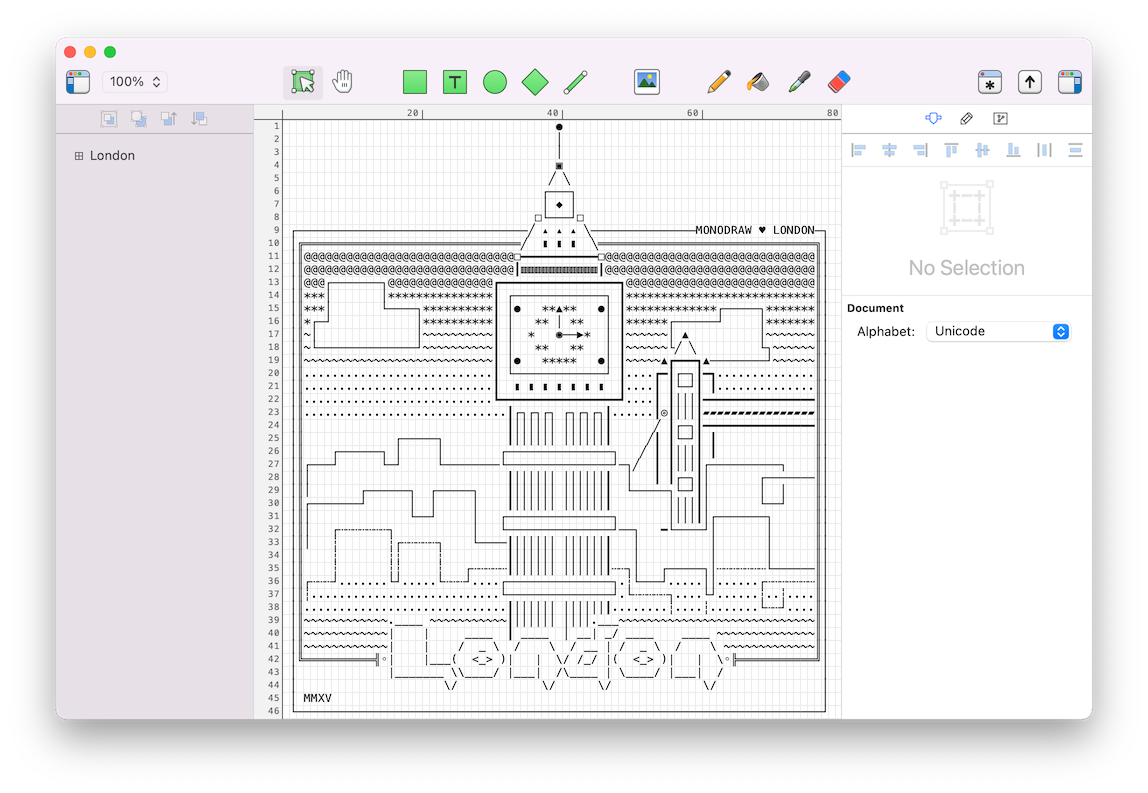
Monodraw 是一款专业强大的 ASCII 文本编辑器。可以基于纯文本轻松创建漂亮的代码说明注释、终端欢迎界面等。 支持画笔及形状,可以任意绘制。你甚至可以用它绘制纯文本图表、流程图,直观地来表示算法,数据结构,二进制格式等等。 因为它们都是文本,所以可以轻松嵌入几乎任何代码中。另外,还支持导出为图像 PNG 和 SVG 图片
两类思维导图:
Xmind:
Scapple:
与Scrivener是一家 高效学习法-利用Scapple打造10倍效率的笔记 - 知乎
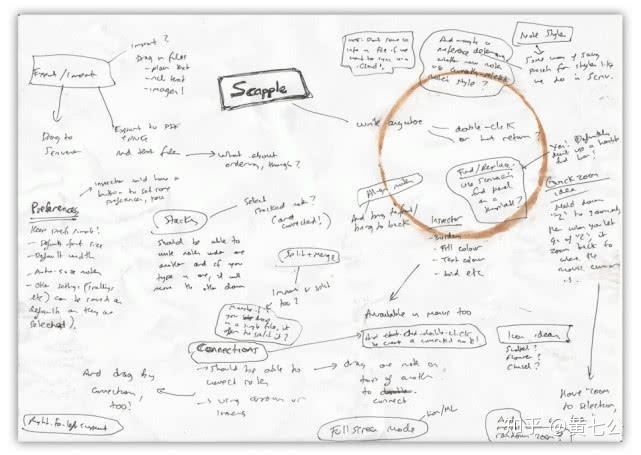
纸和软件结合 第一,先在A4纸上或者自己的笔记本上做即时性笔记——记录一些学习时的零散的关键信息点。 第二,回到家,使用Scapple,将这些零散的关键信息点誊抄在上面 第三,对照这些零散的关键信息点,进入专注模式,进行索引式回顾,并在Scapple写下这些关键信息点的详细内容 第四,构建这些关键信息点之间的联系。 纯软件, 不做任何即时性笔记。 第一,直接使用Scapple,进入发散模式,不断的思考能够记住的一些关键信息点。 第二,构建这些关键信息点之间的联系。 Scapple之所以非常适合做笔记,是因为它是就人体大脑的思维模式所设计的。 当你不断创建内容(Notes)时,你通常处在发散模式; 当你对照内容去思考深挖详细信息时,你通常处在专注模式; 当你在构建Notes间的连接时,你更可能处于发散模式。
Scrivener: 比Ulysses更长的文章书写工具
Scrivener | Literature & Latte


区分提要与便签
Graph-easy: ASCII DSL语言工具
brew install graphviz
cpan
sudo cpan Graph:Easy
沟通协作
Slack
ToDesk
ToDesk远程控制软件下载-电脑客户端,移动app官网下载-ToDesk官网
Trello
OmniGroup Series
The Omni Group
插件相关(DEVONThink、Alfred)
2. DEVONThink
Trickster - Your recently used files, at your fingertips!

Trickster 会记录您在Mac上使用过的文件,您可以通过菜单栏快速的访问它们。finder有最近文件的功能,但是太简陋了,Trickster可以对你最近打的过的文件进行归类,哪怕你不小心关闭了文件,你照样可以通过Trickster快速找到它。
Hook – Links beat searching

Hook is an easy way to copy links to files, emails, web pages and more. Paste and use them anywhere. Even bidirectionally link ("hook") items together Replace the frustration of searching your Mac with the pleasure of using contextually relevant links. Use Hook to copy robust links to anything on your Mac or elsewhere (files, emails, tasks, PDFs, web pages, etc). Paste them anywhere. Hook automatically stores your links as bookmarks and optionally syncs them in iCloud. Help – Hook
-
hook作者还是链接宣言的发起者: 让链接无处不在——《泛在链接宣言》的理论与理想 - 少数派

Zotero | Your personal research assistant
Zotero is a free, easy-to-use tool to help you collect, organize, cite, and share research.
- start [Zotero Documentation]
- DEVONthink with Zotero Workflow - DEVONthink - DEVONtechnologies Community
- How can I use Devonthink 3, PDF Expert and Zotero together? - Software - MPU Talk
3. Alfred
- alfredapp/shortcuts-workflow: Run installled macOS shortcuts
- Alfred workflows for Trickster - User Manual - Docs - Apparent Software Forum
- Get Latest Files from Trickster | Packal

More
Awesome Mac
- KuanHsiaoKuo/awesome-mac: Now we have become very big, Different from the original idea. Collect premium software in various categories.
- Releases · jaywcjlove/awesome-mac | | \ / v
- Awesome Mac application sharing recommendation - Awesome Mac
Chrome插件整理
由于Chrome的插件极其丰富,这里就单独列一篇文章
如果对某个chrome插件感兴趣,可以在插件链接后面加'/related'
工具篇
Smart TOC: 自动生成右侧TOC
Displays a table of contents for every web page, making it easier to read/navigate long articles, documentations and online books
Vimium
Omni
alyssaxuu/omni: The all-in-one tool to supercharge your productivity ⌨️


flowy: 一款用js写的自动化工具
screenity: 网页录像/截图/标注工具

animockup: 制作网页动图

学习篇
Relingo:在阅读中掌握单词

Hypothesis: 网页&PDF标注工具
一个高度可定制化的网页&PDF标注工具。具体使用可见:开源、可定制的网页批注工具——Hypothesis - 少数派
可以配合插件备份之后使用:Wayback Machine - Chrome 网上应用店
资料篇
SingleFile: 全文保存工具
Inoreader RSS Reader Extension
Zoetero Connector

开发篇
Rust 搜索插件
Rust宏可视化插件

Octotree: github侧边栏
- octotree: github侧边栏插件
github 三维展示

Jiffy Reader: Bionic Reader
- Jiffy Reader - Chrome 网上应用店
- ansh/jiffyreader.com: A Browser Extension for Bionic Reading on ANY website!
manico快捷键组合说明
一、manico
前奏
预先将karabiner安装并配置好,再来进行组合设置。
- 将rigit cmd映射为cmd + option + shift + control
- 将right option映射为 shift + control + command
具体组合
下方的right cmd/option都指上方对应的配置
- 1Password: right cmd + 1
- Anki: right option + a (right cmd + a 唤醒alfred,在alfred里面配置)
- App Store : option+a
- Chrome: right cmd + c
- Drafts: control + i
- Eagle: right cmd + e
- Finder: option + f
- IDEA: right cmd + i
- iTerm: shift + space
- marginnote: option + m
- OmniFocus: right cmd + o
- PDF Expert: right cmd + p
- Sublime: right cmd + s
- Safari: right option + s
- DEVONThink 3: right cmd + t
- Typora: right option + t
- Ulysses: cmd + u
- WeChat: right cmd + w
组合原则
- 频率高的组合键用大拇指按左/右cmd
- 尽量将组合键分摊在两只手
二、self_host
- trickster: ctrl + z
- hook: right_cmd + space
python处理脚本收集
将字幕文件转为json
spaCy自然语言处理
上面那个脚本转化的文本并没有标点符号断句等内容,所以还需要用NLP来优化。 这里的核心还在于使用spaCy对文本进行自然语言处理。
- 自然语言处理就这么简单有趣 - 知乎
- spacy Can't find model 'en_core_web_sm' on windows 10 and Python 3.5.3 :: Anaconda custom (64-bit) - Stack Overflow
- spaCy · Industrial-strength Natural Language Processing in Python
- Prodigy · An annotation tool for AI, Machine Learning & NLP
源码
import re
import json
import spacy
import sys


def parse_time(time_string):
    hours = int(re.findall(r'(\d+):\d+:\d+,\d+', time_string)[0])
    minutes = int(re.findall(r'\d+:(\d+):\d+,\d+', time_string)[0])
    seconds = int(re.findall(r'\d+:\d+:(\d+),\d+', time_string)[0])
    milliseconds = int(re.findall(r'\d+:\d+:\d+,(\d+)', time_string)[0])

    return (hours * 3600 + minutes * 60 + seconds) * 1000 + milliseconds


def parse_srt(srt_string):
    srt_list = []

    for line in srt_string.split('\n\n'):
        if line != '':
            index = int(re.match(r'\d+', line).group())

            pos = re.search(r'\d+:\d+:\d+,\d+ --> \d+:\d+:\d+,\d+',
                            line).end() + 1
            content = line[pos:]
            start_time_string = re.findall(
                r'(\d+:\d+:\d+,\d+) --> \d+:\d+:\d+,\d+', line)[0]
            end_time_string = re.findall(
                r'\d+:\d+:\d+,\d+ --> (\d+:\d+:\d+,\d+)', line)[0]
            start_time = parse_time(start_time_string)
            end_time = parse_time(end_time_string)

            srt_list.append({
                'index': index,
                'content': content,
                'start': start_time,
                'end': end_time
            })

    return srt_list


def remove_modals(total_words: list):
    modal_words = ['Yeah', 'yeah', 'Yep', 'yep', 'Uh', 'uh', 'okay', 'oh', 'Um', 'um', 'right']
    # 替换为删除线
    for index, word in enumerate(total_words):
        if word in modal_words:
            total_words[index] = f"~~{word}~~"


# 从当前位置开始,前/后找到一个有效位置
def find_valid_index(words_list: list, index, direction):
    if direction == 'pre':
        while index >= 0 and words_list[index].startswith("~~"):
            index -= 1
        if index >= 0:
            return index
        else:
            return None
    elif direction == 'after':
        while index < len(words_list) - 1 and words_list[index].startswith("~~"):
            index += 1
        if index < len(words_list):
            return index
        else:
            return None
    else:
        sys.exit('方向不对')


# 去除三个以内的重复词
def delete_duplicate(words_list: list):
    for index, word in enumerate(words_list):
        if word.startswith('~~'):
            continue
        # 以index为中心点向两边找
        pre_word_third, pre_word_secondary, pre_word, word_secondary, word_third = '', '', '', '', ''
        pre_index = find_valid_index(words_list, index - 1, 'pre')
        if pre_index:
            pre_word = words_list[pre_index]
        if pre_word:
            pre_index = find_valid_index(words_list, pre_index - 1, 'pre')
            if pre_index:
                pre_word_secondary = words_list[pre_index]
        if pre_word_secondary:
            pre_index = find_valid_index(words_list, pre_index - 1, 'pre')
            if pre_index:
                pre_word_third = words_list[pre_index]
        after_index = find_valid_index(words_list, index + 1, 'after')
        if after_index:
            word_secondary = words_list[after_index]
        if word_secondary:
            after_index = find_valid_index(words_list, after_index + 1, 'after')
            if after_index:
                word_third = words_list[after_index]
        # 先判断三个词的情况:
        if [pre_word_third, pre_word_secondary, pre_word] == [word, word_secondary, word_third]:
            print([pre_word_third, pre_word_secondary, pre_word])
            words_list[index], words_list[index + 1], words_list[index + 2] = \
                f"~~{words_list[index]}~~", f'~~{words_list[index + 1]}~~', f'~~{words_list[index + 2]}~~'
        elif [pre_word_secondary, pre_word] == [word, word_secondary]:
            print([pre_word_secondary, pre_word])
            words_list[index], words_list[index + 1] = \
                f"~~{words_list[index]}~~", f'~~{words_list[index + 1]}~~'
        elif pre_word == word:
            print(pre_word)
            words_list[index] = f"~~{words_list[index]}~~"
        # print(pre_word_third, pre_word_secondary, pre_word, word, word_secondary, word_third)
    return words_list


def parse_sentence(srt_strings: list):
    raw_total_words = ' '.join([item['content'] for item in srt_strings]).split(' ')
    total_words = [item.strip() for item in raw_total_words]
    # 借助python的默认用法:容器类型(列表、字典、对象等)在函数参数是传地址,原生类型(字符串、数字等)在函数参数是传值。
    remove_modals(total_words)
    delete_duplicate(total_words)
    # python -m spacy download en_core_web_sm
    nlp = spacy.load('en_core_web_sm')
    doc = nlp(' '.join(total_words))
    # for sent in doc.sents:
    #     print(sent.text_with_ws.replace(' ', ' '))
    #     print('\n')
    # print('#' * 50)
    sents = [sent.text_with_ws.replace('  ', ' ') for sent in doc.sents]
    return sents


if __name__ == "__main__":
    # srt_filename = 'Substrate Execute Block Code Walkthrough with Joe Petrowski and Shawn Tabrizi.srt'
    srt_filename = "Intro to Substrate codebase and FRAME pallet deep-dive with Joe Petrowski and Shawn Tabrizi.srt"
    title = srt_filename.split('.')[0]
    json_out_filename = srt_filename.replace('.srt', '.json')
    md_out_filename = srt_filename.replace('.srt', '.md')
    srt = open(srt_filename, 'r', encoding="utf-8").read()
    parsed_srt = parse_srt(srt)
    # parse_txt(parsed_srt)
    sentences = parse_sentence(parsed_srt)
    # open(json_out_filename, 'w', encoding="utf-8").write(
    #     json.dumps(parsed_srt, indent=2, sort_keys=True))
    # open(txt_out_filename, 'w', encoding='utf-8').write(
    #     '\n'.join([item['content'] for item in parsed_srt])
    # )
    content = f"# {title}\n" + '\n\n'.join(sentences)
    open(md_out_filename, 'w', encoding='utf-8').write(content)
ffmpeg合并视频文件
import os
import re
import sys
import subprocess
from subprocess import CalledProcessError


# brew install ffmpeg


def supported_merge(files, target_dir, merged_name):
    """
    ffmpeg只支持默认格式合并:
    Unsupported audio codec. Must be one of mp1, mp2, mp3, 16-bit pcm_dvd, pcm_s16be, ac3 or dts.
    :param files:
    :param target_dir:
    :return:
    """
    merge_cmd = " ffmpeg -i 'concat:%s' -c copy %s/%s.mpg"
    files_arg = '|'.join(files)
    # 合并mpg
    merge_status = os.system(merge_cmd % (files_arg, target_dir, merged_name))
    # 转为mp4
    if merge_status == 0:
        convert_status = os.system(
            f"ffmpeg -i {target_dir}/{merged_name}.mpg -y -qscale 0 -vcodec libx264 {target_dir}/{merged_name}.mp4")
    else:
        sys.exit('合并视频出错')
    if convert_status != 0:
        sys.exit('转化视频出错')
    os.system(f"rm -rf {target_dir}/*.mpg")
    # os.system(f"ffmpeg -i {target_file}.mpg {target_file}.MP4")


def mp4_to_mpg(file_list):
    """
    文件名问题:
    1. 空格
    2. 括号: 英文括号需要加'\'
    2. 竖线:需要替换
    :param file_list:
    :return:
    """
    for index, mp4 in enumerate(file_list):
        file_name = mp4.replace('.mp4', '')
        status = os.system(f'ffmpeg -i {mp4} -qscale 4 {file_name}.mpg')
        print(f"{index + 1}/{len(file_list)}: {status} {file_name}.mpg")


def subprocess_run(cmd: str):
    try:
        subprocess.run(cmd, shell=True, check=True, capture_output=True)
    except CalledProcessError as e:
        sys.exit(f'执行{cmd} 失败: {e}')
    except Exception as e:
        sys.exit(e)


def get_title_pic(title, pic_path):
    """ffmpeg加文字水印
    drawtext:绘制文本,也就是文字水印,相关参数第一个似乎要写=,其它参数写:。默认字体 Sans
    fontfile:字体文件
    > [Mac 电脑查看字体文件位置 | 温欣爸比的博客](https://wxnacy.com/2019/04/03/mac-fonts-path/)
    text:文字水印内容
    fontsize:水印字体大小,直接填数字
    box --是否使用背景框,默认为0
    boxcolor --背景框的颜色
    borderw --背景框的阴影,默认为0
    bordercolor --背景框阴影的颜色
    """
    target_pic_path = pic_path
    if not pic_path.endswith('.jpg'):
        pic_format = pic_path.split('.')[-1]
        jpg_pic_path = pic_path.replace(pic_format, 'jpg')
        convert_cmd = f"ffmpeg -i {pic_path} {jpg_pic_path}"
        subprocess_run(convert_cmd)
        print(convert_cmd)
        target_pic_path = jpg_pic_path
        rm_convert_jpg_cmd = f"rm {target_pic_path}"
    else:
        rm_convert_jpg_cmd = None
    output_path = f"{'/'.join(pic_path.split('/')[:-1])}/{title}_video_cover.jpg"
    # x=w-tw-th:y=h-th, 文本的位置,放置图片右下方位置;w、h 表示原图的宽、高;tw、th 表示文本宽高;在减去th 作为间距
    drawtext_config = {
        # "fontfile": "MiSans-Normal.ttf",
        "fontfile": "/System/Library/Fonts/PingFang.ttc",
        "text": title,
        "x": "110",
        "y": "250",
        "fontsize": "38",
        "fontcolor": "black",
        "shadowy": "0"
    }
    drawtext = ':'.join([f"{key}={value}" for key, value in drawtext_config.items()])
    insert_cmd = f'ffmpeg  -i {target_pic_path}  -vf drawtext={drawtext} -y {output_path}'
    subprocess_run(insert_cmd)
    print(insert_cmd)
    if rm_convert_jpg_cmd:
        subprocess_run(rm_convert_jpg_cmd)
    return output_path


def get_cover_video(video_path):
    mp3_path = video_path.replace('.mp4', '.mp3')
    extract_mp3_cmd = f"ffmpeg -i {video_path} -f mp3 -vn {mp3_path}"
    subprocess_run(extract_mp3_cmd)
    video_name = video_path.split('/')[-1]
    video_dir = '/'.join(video_path.split('/')[:-1])
    title = '-'.join(video_name.split('.')[:-1])
    pic_path = video_path.replace(".mp4", ".jpg")
    cover_path = get_title_pic(title, pic_path)
    cover_video = f"{video_dir}/{video_name}_covered.mp4"
    convered_mp4_cmd = f"ffmpeg -loop 1 -i {cover_path} -i {mp3_path} -c:a copy -c:v libx264 -shortest {cover_video}"
    subprocess_run(convered_mp4_cmd)
    print(convered_mp4_cmd)
    subprocess_run(f"rm {mp3_path}")
    subprocess_run(f"rm {cover_path}")
    return cover_video


def merge(target_dir, covered=False):
    print('*' * 20, target_dir)
    os.popen(f"rm -rf {target_dir}/*.mpg")
    cmd_res = os.popen(f'ls {target_dir}/*.mp4').read()
    output_file = target_dir.split("/")[-1]
    file_list = [file for file in cmd_res.split('\n') if file]
    if covered:
        file_list = [get_cover_video(file) for file in file_list]
    pattern = re.compile(r'(\d+)')
    file_list.sort(key=lambda x: int(pattern.findall(x)[-2]))
    try:
        mp4_to_mpg(file_list)
    except Exception:
        sys.exit('转化分视频出错!')

    mpg_cmd_res = os.popen(f'ls {target_dir}/*.mpg').read()
    mpg_file_list = [mpg_file for mpg_file in mpg_cmd_res.split('\n') if mpg_file]
    mpg_file_list.sort(key=lambda x: int(pattern.findall(x)[0]))

    try:
        supported_merge(mpg_file_list, target_dir, output_file)
        if covered:
            subprocess_run(f"rm {target_dir}/*_covered.mp4")
    except Exception:
        print("使用前记得调整一下文件名: 空格、括号等")


def main():
    # if len(sys.argv) == 1:
    #     sys.exit("请传入待合并视频文件夹📁目录")
    # else:
    #     target_dir = sys.argv[1]
    # target_dirs = [target_dir]
    target_dirs = ['']
    for item in target_dirs:
        merge(item, covered=True)


if __name__ == "__main__":
    main()
IINA与ffmpeg给视频添加章节
ffmpeg
ffmpeg -i part1.mp4 -f ffmetadata part1.txt
ffmpeg -i part1.mp4 -i part1.txt -map_metadata 1 -codec copy part1_insert.mp4
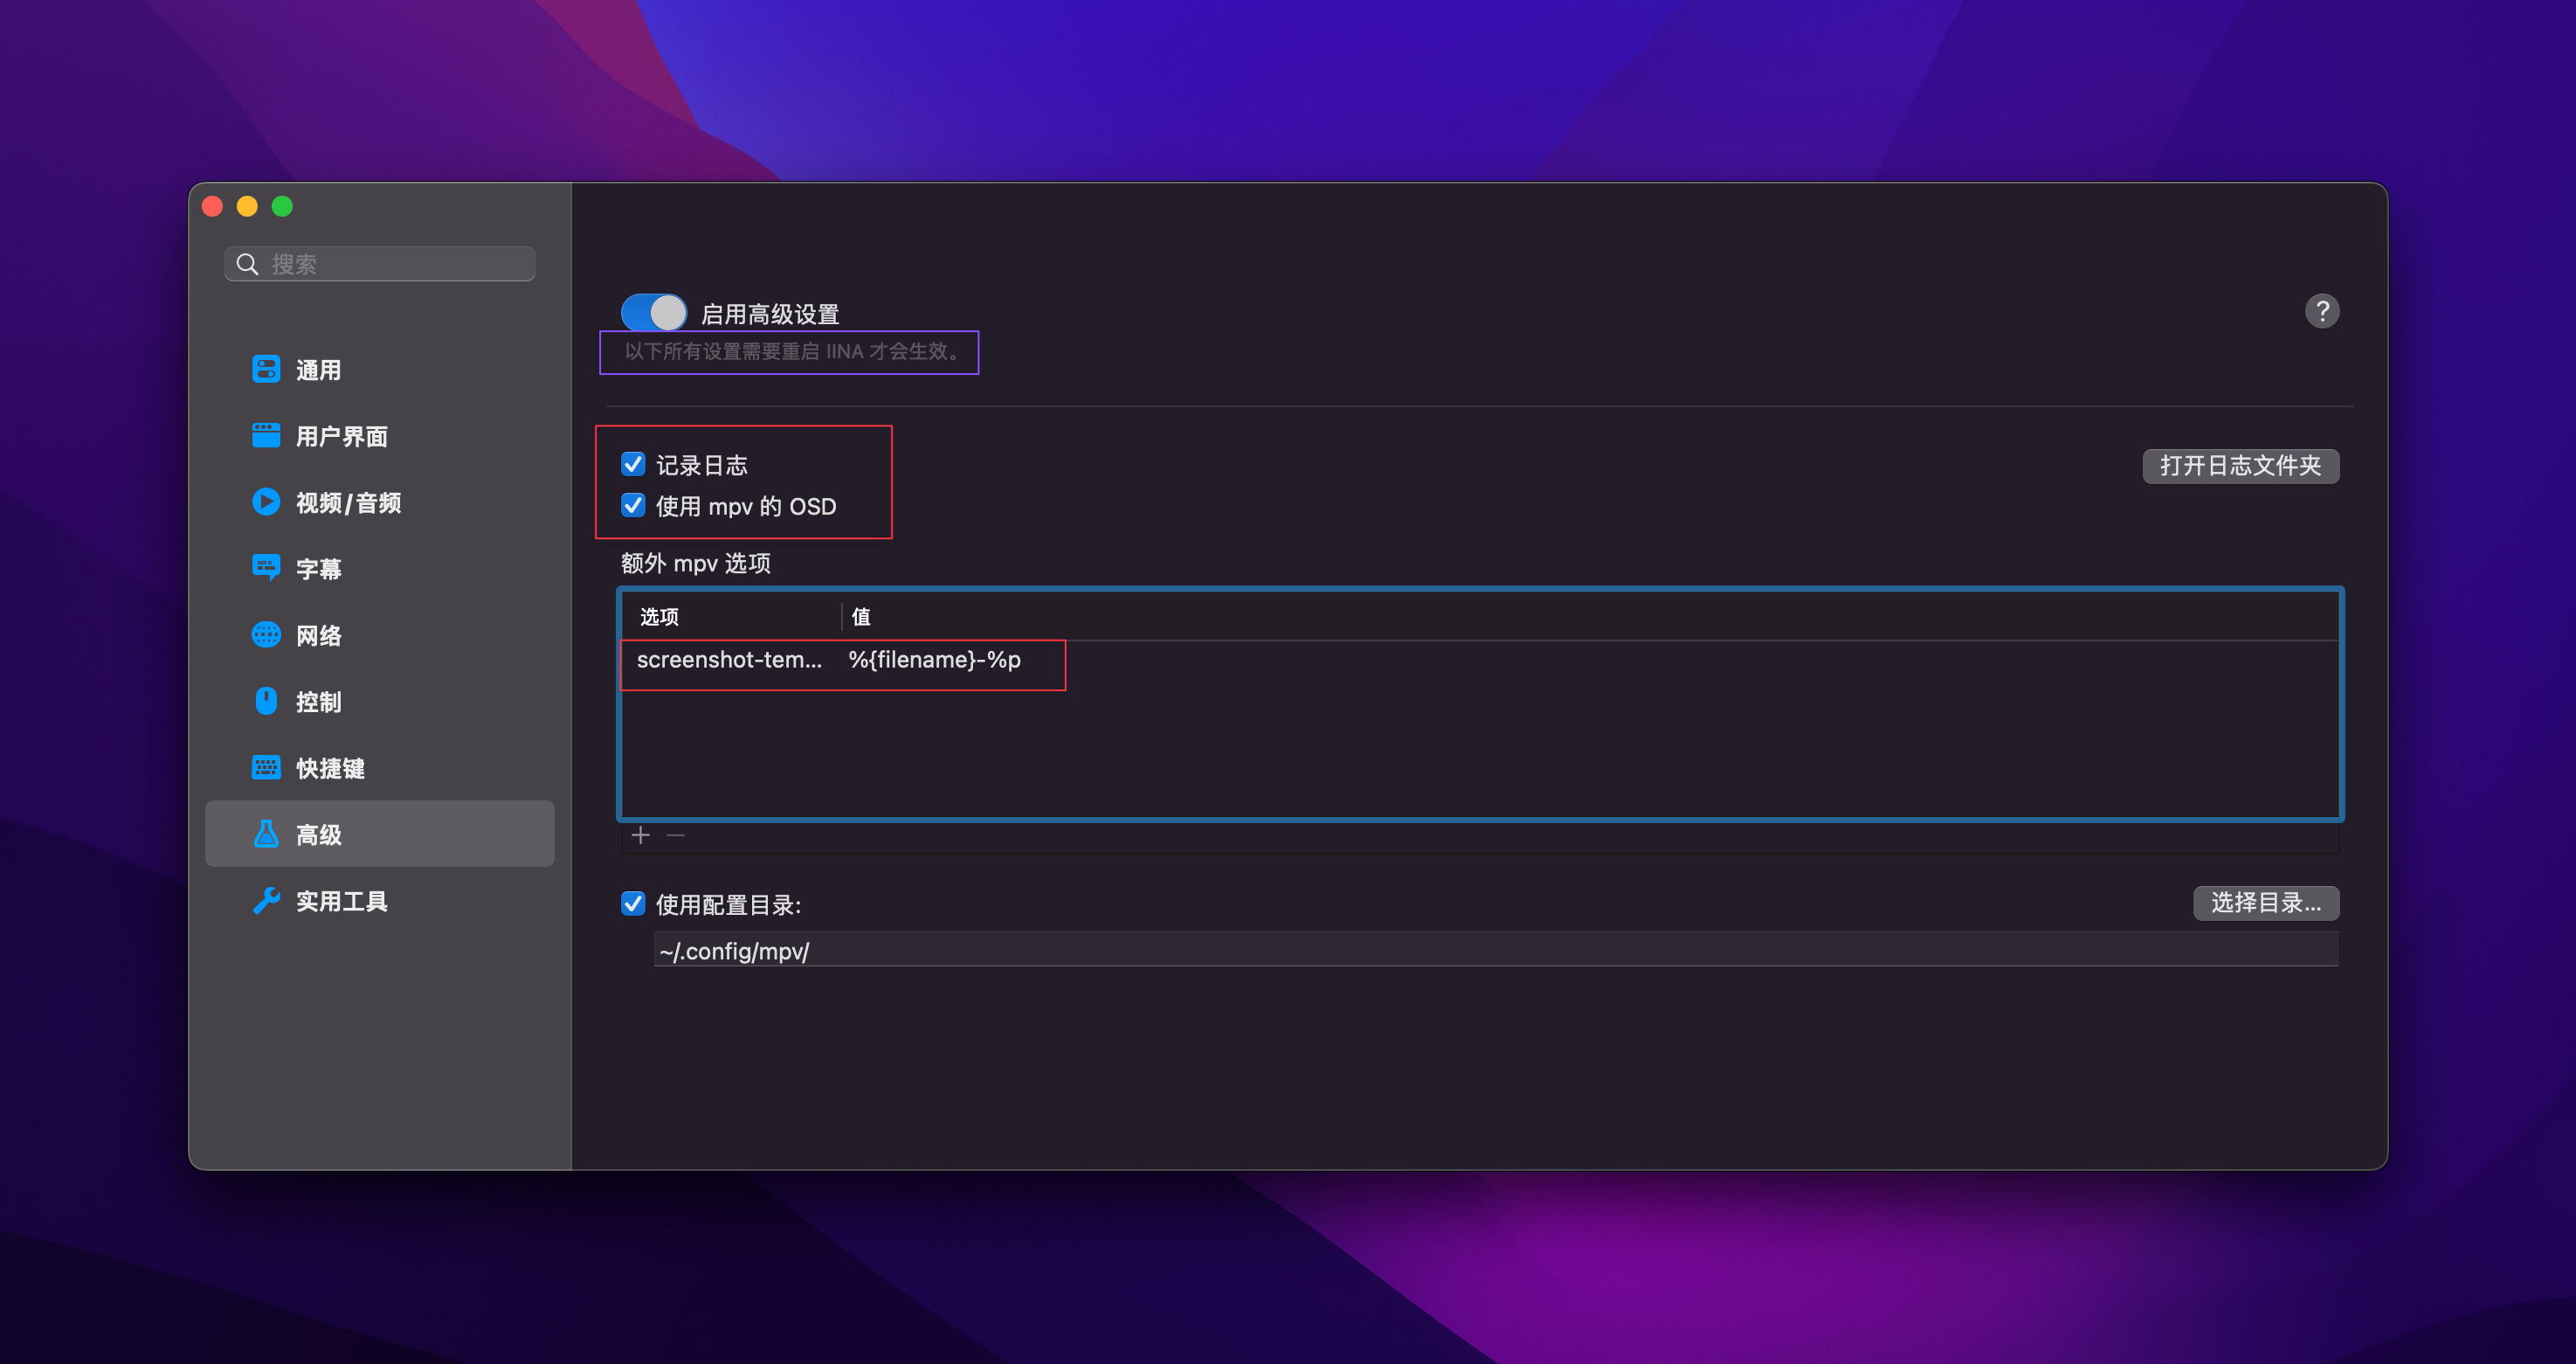
mpv screenshot template
screenshot-template: %{filename}-%p
- 按照视频文件名先分段,方便统一存放
本来打算用screenshot-directory参数,但是要报错,就算了
- %p: 截屏的时间,可以排序。这样方便后续按时间插入新章节。
思路
@startuml
title
    视频教材化
    主要结合IINA、MPV和FFMPEG给视频文件添加章节
end title
participant mpv[
    =MPV内核
]
actor 手工操作 as mannual
participant iina[
    =IINA播放器
]
participant ffmpeg[
    =ffmpeg工具
    ----
    python脚本
    主要处理视频
    添加章节书签
]
mpv -> iina: mpv内核指令
iina -> iina: 修改截图格式
note left
    偏好设置
    高级
    启用高级设置
    勾选记录日志、使用mpv的OSD
    额外mpv选项:screenshot-template %n%f-%p
    注意每次修改格式都要重启
end note
mannual-> iina: 使用快捷键截图1
mannual-> iina: 使用快捷键截图2
mannual-> iina: ...
mannual-> iina: 使用快捷键截图n
mannual-> mannual: 手动添加章节名称
iina -> ffmpeg: 开始处理截图文件夹
note right
1. 遍历文件夹,获取文件列表
2. 将文件名依次处理,提取出时间,生成时间表
3. 手动给时间表添加标题
end note
ffmpeg -> ffmpeg: 处理文件夹的文件,生成对应视频文件的章节时间表
note left
0:23:20 Start
0:40:30 First Performance
0:40:56 Break
1:04:44 Second Performance
1:24:45 Crowd Shots
1:27:45 Credit
end note
ffmpeg -> ffmpeg: 根据时间表生成视频章节文件
note left
;FFMETADATA1
major_brand=isom
minor_version=512
compatible_brands=isomiso2avc1mp41
encoder=Lavf59.16.100

[CHAPTER]
TIMEBASE=1/1000
START=1
END=448000
title=The Pledge
end note
ffmpeg -> ffmpeg: 将章节文件压入视频文件,生成新视频文件
note left
ffmpeg -i part1.mp4 -i part1.txt -map_metadata 1 -codec copy part1_insert.mp4
end note

@enduml
源码
"""
给视频文件添加章节书签
"""

import re
import os
import sys
import subprocess
from subprocess import CalledProcessError

def times_chapters(time_path: str, save_path: str):
    """
    1. save_path: 保存在视频文件目录中。
    :param time_path:
    :param save_path:
    :return:
    """
    chapters = list()

    with open(time_path, 'r') as f:
        line_pattern = re.compile(r"(\d):(\d{2}):(\d{2}) (.*)")
        for line in f:
            if line.strip():
                hrs, mins, secs, title = line_pattern.findall(line.strip())[0]
                hrs, mins, secs = int(hrs), int(mins), int(secs)
                minutes = (hrs * 60) + mins
                seconds = secs + (minutes * 60)
                timestamp = (seconds * 1000)
                chap = {
                    "title": title,
                    "startTime": timestamp
                }
                chapters.append(chap)

    text = """;FFMETADATA1
major_brand=isom
minor_version=512
compatible_brands=isomiso2avc1mp41
encoder=Lavf59.16.100

    """

    for index, chap in enumerate(chapters):
        title = chap['title']
        start = chap['startTime']
        if index + 1 < len(chapters):
            end = chapters[index + 1]['startTime'] - 1
        else:
            end = start + 10000
        """
        [CHAPTER]
        TIMEBASE=1/1000
        START={start}
        END={end}
        title={title}

        """
        chapter = ["[CHAPTER]", "TIMEBASE=1/1000", f"START={start}", f"END={end}", f"title={title}", "\n"]
        text += '\n'.join(chapter)
    file_name = re.findall(r'(\d.*?\.mp4)', time_path)[0]
    file_name = file_name.split('/')[-1]
    chapters_path = f"{save_path}/{file_name}.txt"
    if os.path.exists(chapters_path):
        with open(chapters_path, 'r') as f:
            raw_text = f.read()
    else:
        raw_text = ''
    if text != raw_text:
        with open(chapters_path, "w") as f:
            f.write(text)
        return chapters_path
    else:
        return None


def gen_timetable(screenshots_path: str):
    """
    配合IINA的截图格式:
    screenshot-template: %{filename}-%p-
    0:23:20 Start
    0:40:30 First Performance
    0:40:56 Break
    1:04:44 Second Performance
    1:24:45 Crowd Shots
    1:27:45 Credits
    :param screenshots_path:
    :return:
    """
    info_pattern = re.compile(r'(\d.*?\.mp4)-(\d+:\d{2}:\d{2})-(.*?).png')
    ls_png_cmd = f"ls {screenshots_path}/*.png"
    try:
        png_cmd_res = subprocess.run(ls_png_cmd, shell=True, check=True, capture_output=True)
    except CalledProcessError as e:
        png_cmd_res = e
    if png_cmd_res.returncode == 0:
        png_list = png_cmd_res.stdout.decode().split('\n')
        png_infos = {}
        for png in png_list:
            png_info = info_pattern.findall(png)
            if png_info:
                video, timestamp, title = png_info[0]
                # 去掉截图归类目录
                # 例如:130-139.tokio-runtime/130-139.tokio-runtime.mp4-00:00:13-第一节-概要介绍.png
                video = video.split('/')[-1]
                if not title:
                    title = '未命名章节'
                if not png_infos.get(video):
                    png_infos[video] = []
                png_infos[video].append([timestamp, title])
        # 按照第二个时间点元素排序
        files = []
        for video, chapters in png_infos.items():
            file_path = f"{screenshots_path}/{video}.txt"
            chapters.sort(key=lambda item: item[0].split(':'))
            with open(file_path, 'w') as f:
                for timestamp, chapter_name in chapters:
                    f.writelines(f"{timestamp} {chapter_name}\n ")
            files.append(file_path)
        return files
    else:
        sys.exit(f"执行指令{ls_png_cmd}出错:{png_cmd_res.stderr.decode()}")


def categorized_screenshots(root_screen_directory):
    info_pattern = re.compile(r'(\d.*?)\.mp4-(\d+:\d{2}:\d{2})-(.*?).png')
    ls_png_cmd = f"ls {root_screen_directory}/*.png"
    try:
        png_cmd_res = subprocess.run(ls_png_cmd, shell=True, check=True, capture_output=True)
    except CalledProcessError as e:
        png_cmd_res = e
    if png_cmd_res.returncode == 0:
        png_list = png_cmd_res.stdout.decode().split('\n')
        file_titles = []
        for png in png_list:
            png_info = info_pattern.findall(png)
            if png_info:
                video_title, timestamp, title = png_info[0]
                if video_title and video_title not in file_titles:
                    file_titles.append(video_title)
        # 新建文件夹并整合截图
        for title in file_titles:
            dir_path = f"{root_screen_directory}/{title}"
            if not os.path.exists(dir_path):
                os.popen(f"mkdir {dir_path}")

            os.popen(f"mv {root_screen_directory}/{title}.*.png {dir_path}/")
    dir_res = os.popen(f"ls -d {root_screen_directory}/*/")
    dirs = dir_res.read().split('\n')
    return [item[:-1] for item in dirs]


def main(s_dir):
    timetables = gen_timetable(s_dir)
    chapter_files = []
    for timetable in timetables:
        chapter_path = times_chapters(timetable, video_path)
        if chapter_path:
            chapter_files.append(chapter_path)

    for chapter_file in chapter_files:
        video_name = re.findall(r'(\d.*?)\.mp4', chapter_file)[0]
        edit_video_path = f"{video_path}/{video_name}.mp4"
        inserted_video_path = f"{video_path}/{video_name}-chapters.mp4"
        """
        -y: 默认覆盖, 但是这里载入章节文件不可以in-place修改。
        -i: input
        -codec: 编解码
        -map_metadata 1: 只匹配头部内容,只能在第一次添加时生效
        -map_chapters 1: 匹配章节,在后续修改章节时需要加上
        """
        merge_command = f"ffmpeg -y -i {edit_video_path} -i {chapter_file} -map_metadata 1 -map_chapters 1 -codec copy {inserted_video_path}"
        delete_command = f"rm {edit_video_path}"
        mv_command = f"mv {inserted_video_path} {edit_video_path}"
        os.system(merge_command)
        os.system(delete_command)
        os.system(mv_command)


if __name__ == "__main__":
    timefile = ''
    chapter_file = ''
    if len(sys.argv) != 3:
        sys.exit('请按顺序加入截图文件夹路径和视频文件路径')
    else:
        ss_path, video_path = sys.argv[1], sys.argv[2]
    # times_chapters(timefile, chapter_file)
    screenshot_dirs = categorized_screenshots(ss_path)
    for screenshot_dir in screenshot_dirs:
        if screenshot_dir:
            main(screenshot_dir)
主力App深度使用
Alfred使用
workflows collection
直接打开本分支路径下,materials/alfred_workflows里面的内容分别双击即可安装
change log
更新到v5版本的新功能
接下来主要介绍关于任务开发的更新,其他还有许多细节可以看看官方网页
模块化
更多内置功能,并会在未来提供全新的任务开发工具

支持直接在任务中调用Shortcuts
参考资源
复制url快捷动作修改
- 用javascript写的,使用oascript执行
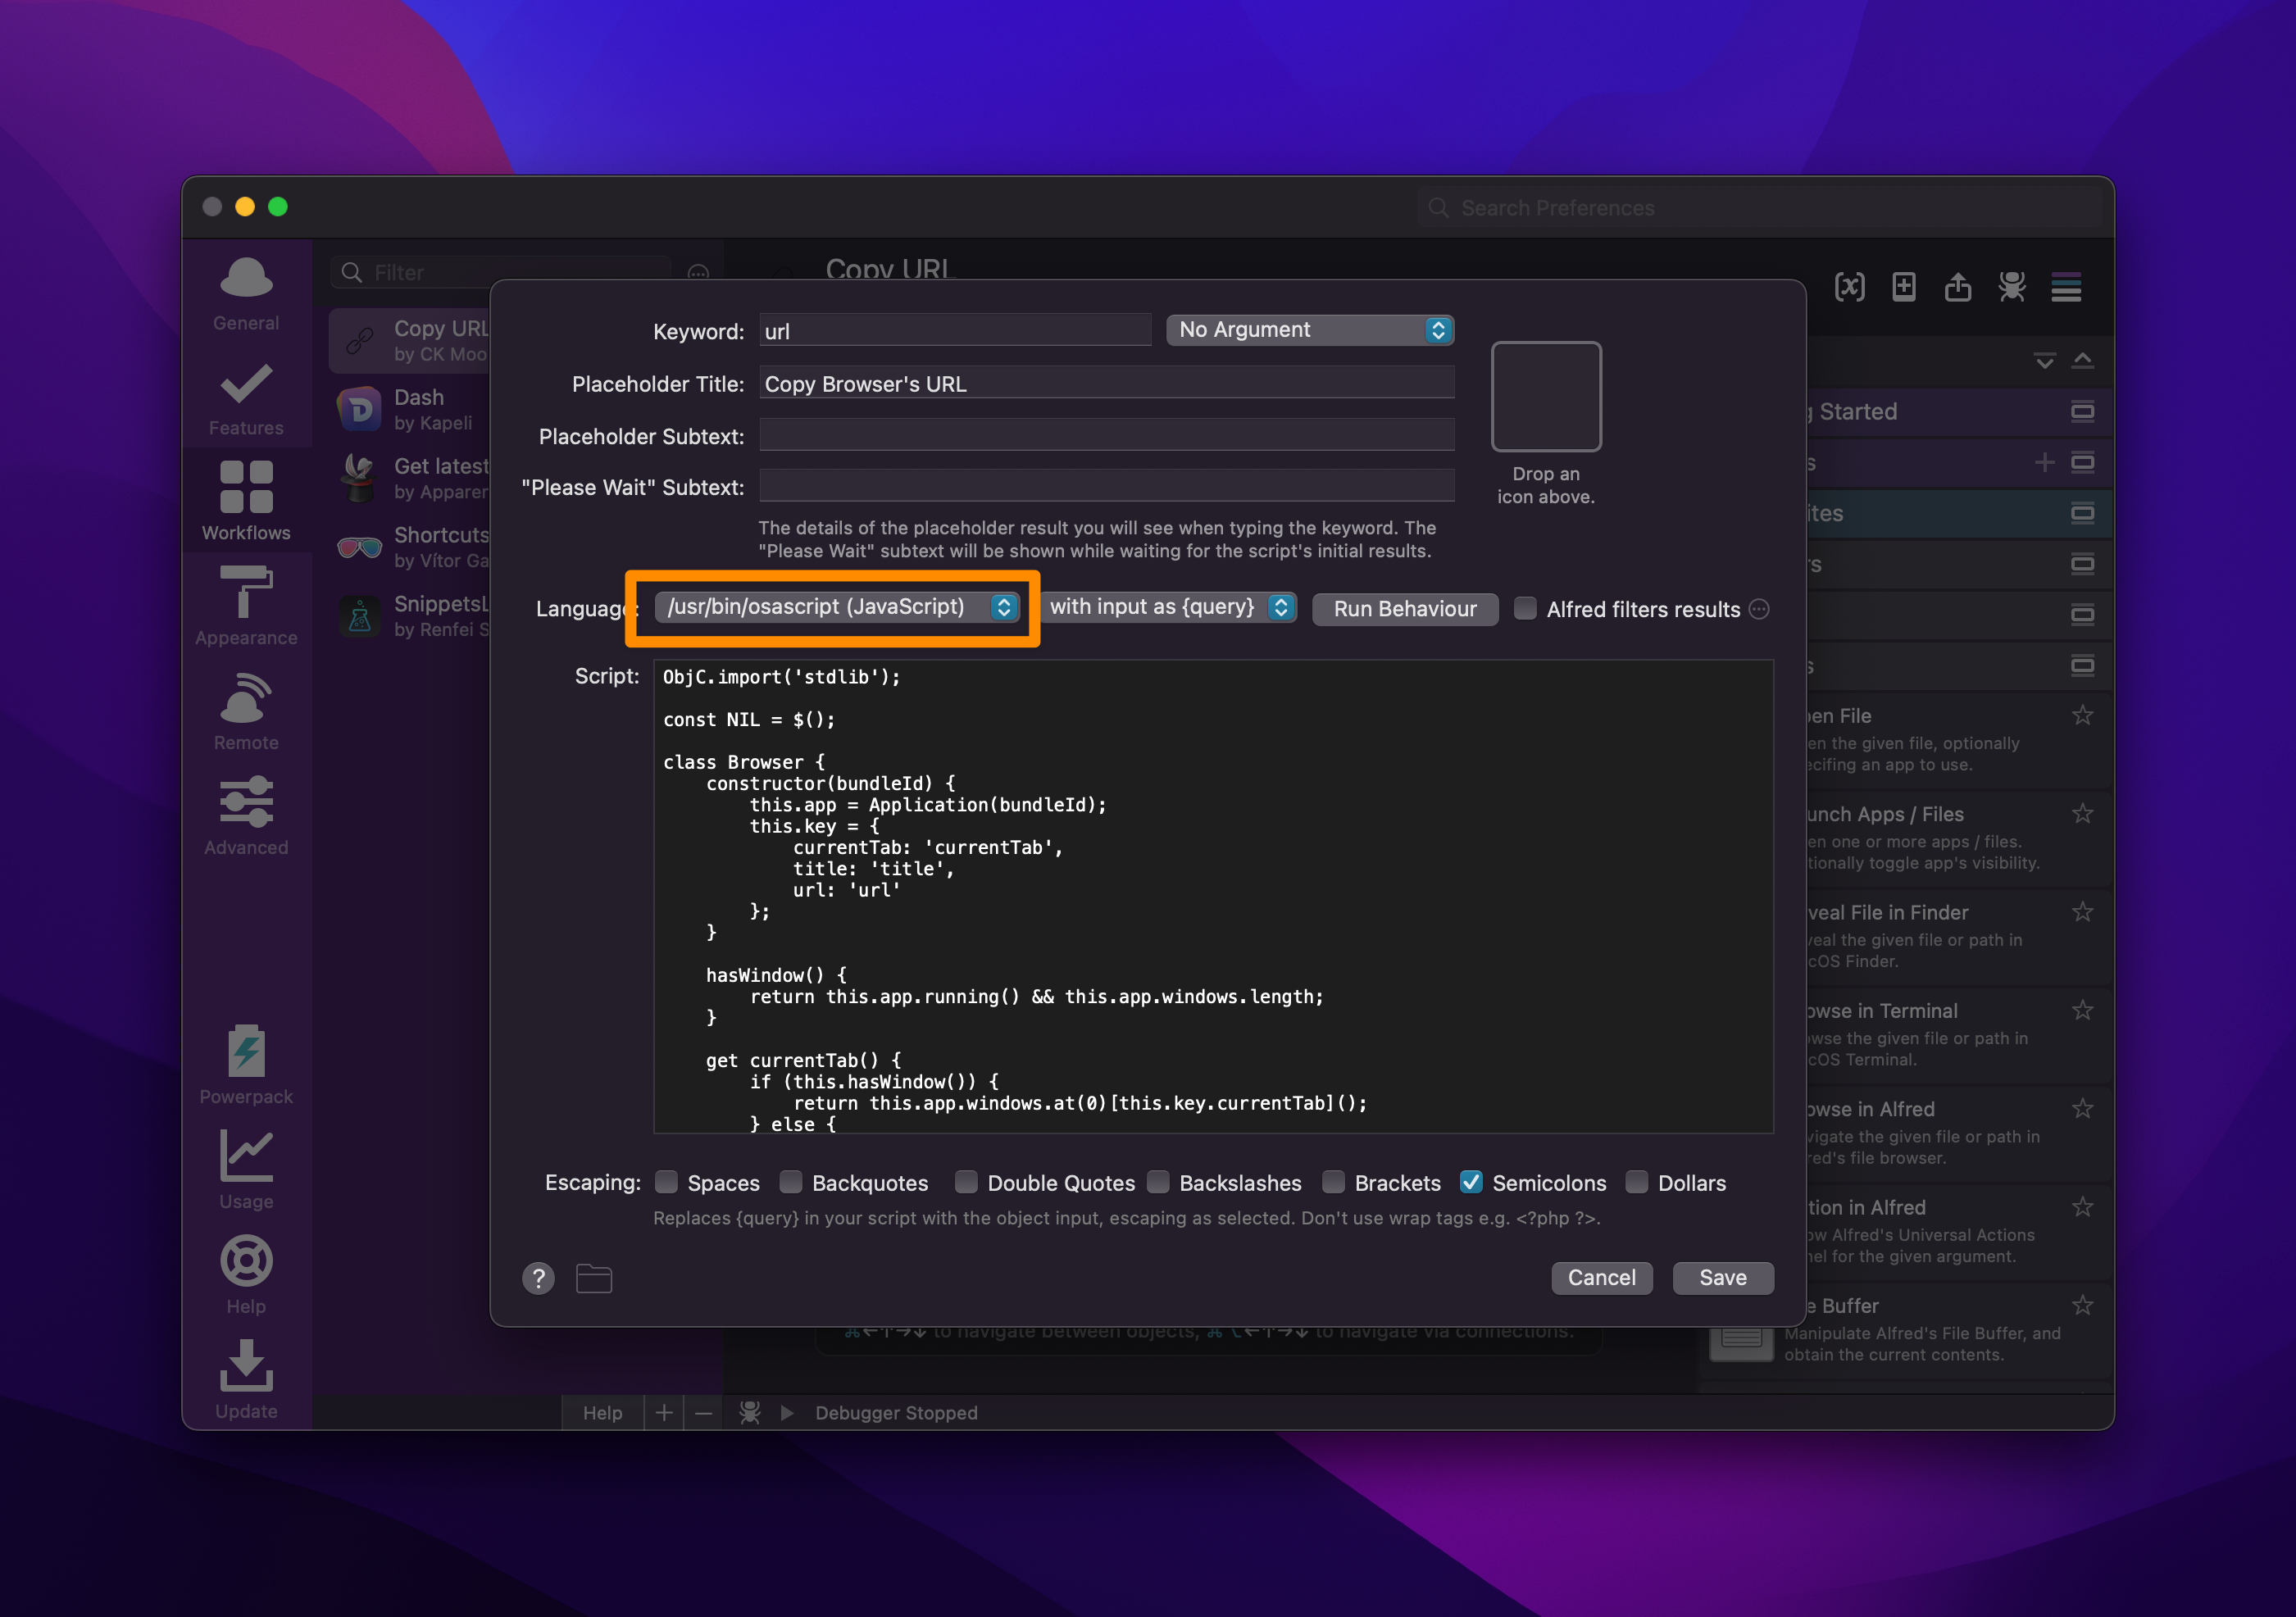
ObjC.import('stdlib');

const NIL = $();

class Browser {
    constructor(bundleId) {
        this.app = Application(bundleId);
        this.key = {
            currentTab: 'currentTab',
            title: 'title',
            url: 'url'
        };
    }

    hasWindow() {
        return this.app.running() && this.app.windows.length;
    }

    get currentTab() {
        if (this.hasWindow()) {
            return this.app.windows.at(0)[this.key.currentTab]();
        } else {
            return;
        }
    }

    get currentTabInfo() {
        var tab = this.currentTab;

        if (tab) {
            return {
                title: tab[this.key.title](),
                url: tab[this.key.url]()
            };
        } else {
            return {};
        }
    }
}

class Chrome extends Browser {
    constructor() {
        super('com.google.Chrome');
        this.key.currentTab = 'activeTab';
    }
}

class Safari extends Browser {
    constructor() {
        super('com.apple.Safari');
        this.key.title = 'name';
    }
}

class SafariPreview extends Browser {
    constructor() {
        super('com.apple.SafariTechnologyPreview');
        this.key.title = 'name';
    }
}

class Alfred {
    static get dataPath() {
        return $.getenv('alfred_workflow_data');
    }

    static generateOutput(data, templates) {
        const regExp = /\$\{([^}]+)\}/;
        let match;

        const items = templates.map(template => {
            let text = template.format;

            if (text.match(/^function/)) {
                text = eval(`(${text})`)(data);
            } else {
                while (match = regExp.exec(text)) {
                    text = text.replace(match[0], data[match[1]]);
                }
            }

            return {
                arg: text,
                subtitle: text,
                text,
                title: template.title
            }
        });

        return JSON.stringify({
            items
        });
    }
}

class App {
    constructor() {
        this.dataPath = Alfred.dataPath;
        // 这里是默认配置路径,删除之后才会执行initConfig()之后重新配置
        this.configPath = `${this.dataPath}/config.json`;
        console.log('配置路径:', this.configPath)
        if (!this.hasConfig()) {
            this.initConfig();
        }
    }

    hasConfig() {
        return $.NSFileManager.defaultManager.fileExistsAtPath(this.configPath);
    }

    initConfig() {
        var fileManager = $.NSFileManager.defaultManager;
        var config = JSON.stringify([
            {"format": "${url}", "title": "URL"},
            {"format": "${title}", "title": "Title"},
            {"format": "<a href=\"${url}\">${title}</a>", "title": "Anchor"},
            {"format": "[${title}](${url})", "title": "Markdown"},
            {"format": "[[${url} ${title}]]", "title": "Plantuml"}
            ]
        );
        console.log(config)
        var error = $();
        fileManager.createDirectoryAtPathWithIntermediateDirectoriesAttributesError(this.dataPath, true, NIL, error);
        fileManager.createFileAtPathContentsAttributes(this.configPath, config, NIL);
    }

    get data() {
        var processes = Application('System Events').processes;
        var frontmost = processes.whose({frontmost: {'=': true}}).name().toString();

        if (frontmost === 'Google Chrome') {
            return new Chrome().currentTabInfo;
        } else if (frontmost === 'Safari') {
            return new Safari().currentTabInfo;
        } else if (frontmost === 'Safari Technology Preview') {
            return new SafariPreview().currentTabInfo;
        } else {
            if (processes.byName('Google Chrome').exists()) {
                return new Chrome().currentTabInfo;
            } else if (processes.byName('Safari').exists()) {
                return new Safari().currentTabInfo;
            } else if (processes.byName('Safari Technology Preview').exists()) {
                return new SafariPreview().currentTabInfo;
            }
        }
    }

    get templates() {
        // console.log($.NSString.stringWithContentsOfFile(this.configPath).js)
        return JSON.parse($.NSString.stringWithContentsOfFile(this.configPath).js) || [];
    }

    run() {
        var data = this.data;
        var templates = this.templates;
        if (!data || !templates) {
            return;
        }

        return Alfred.generateOutput(data, templates);
    }
}

function run() {
    return new App().run();
}
Anki使用维护技巧
牌组设计理念
以主题为真实牌组
以Rust编程学习为例,这里可以将Rust作为一个牌组名称
使用标签分为子组
一个主题包含方方面面,这些方面加上标签之后,可以组合出自己想要着重学习的特色筛选牌组
- 选中某个标签,按下cmd+g创建筛选牌组
- 接着加入细节
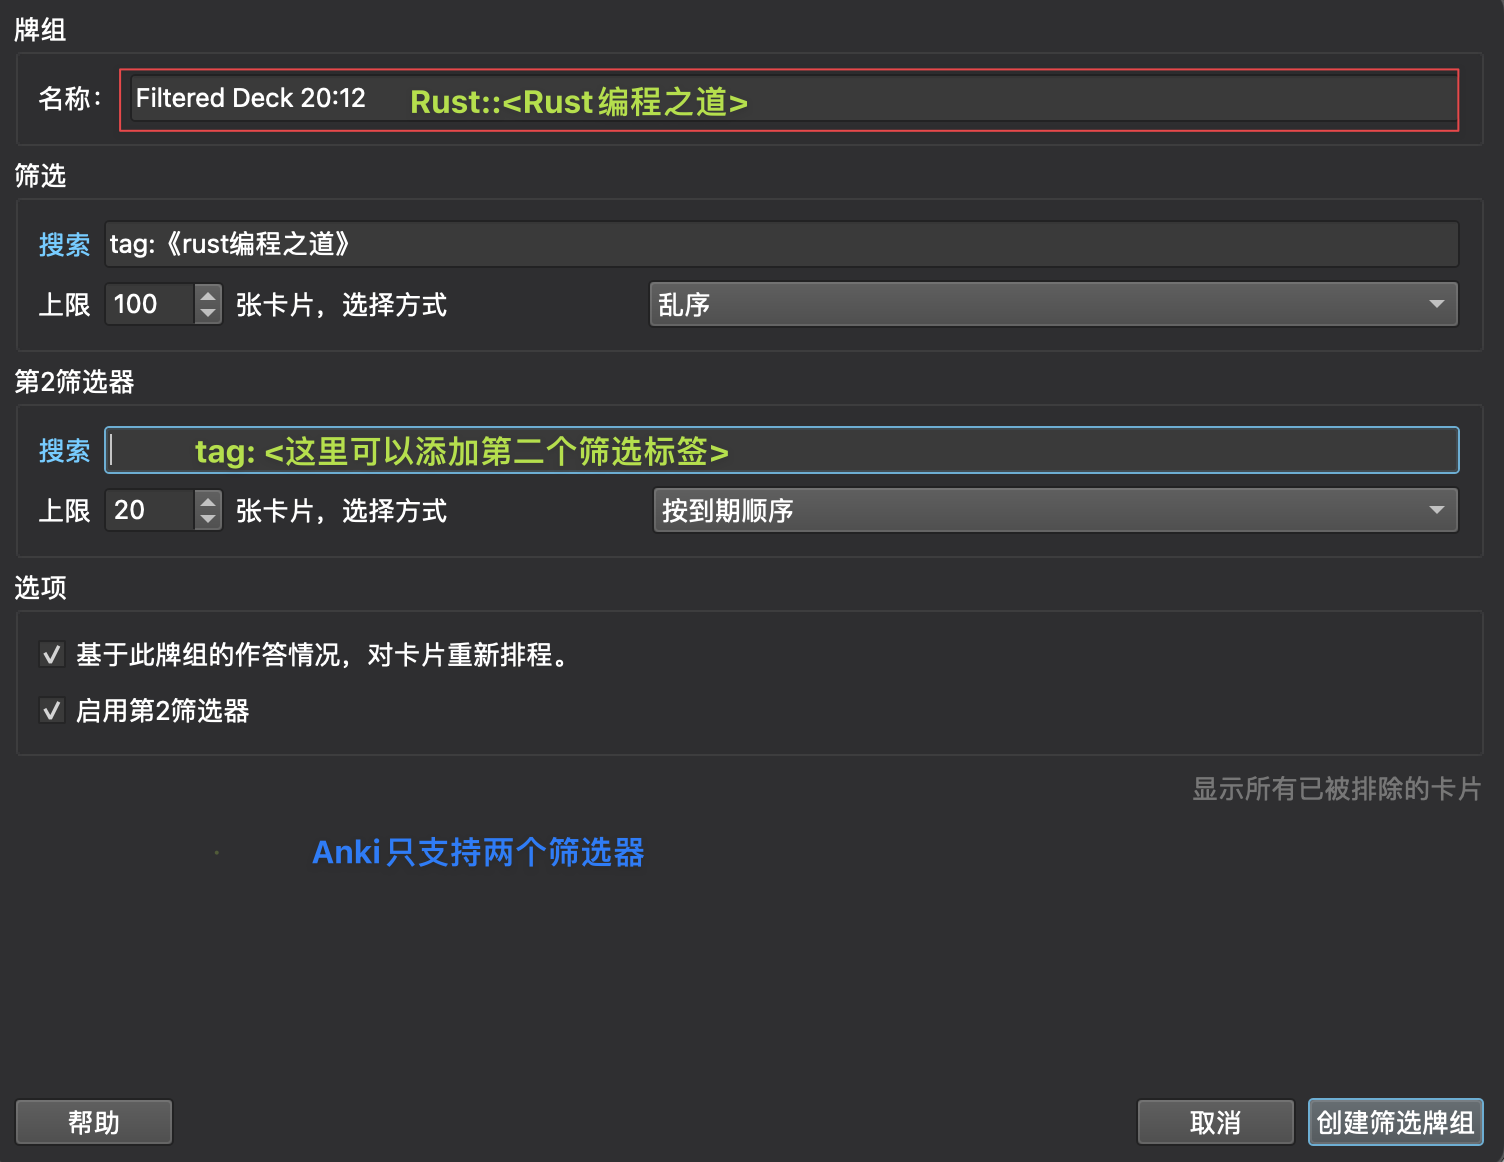
- 可以查看更多细节
自定义Anki模版
由于本人最为习惯md语法,再加上mermaid、语法高亮等需求,所以折腾一下,制作了一个anki卡片模版: showdown-hightlight-mermaid. 另外在《marginnote使用自定义模版》一文中的折腾过程,添加了一个MNLink的字段。
正面模版
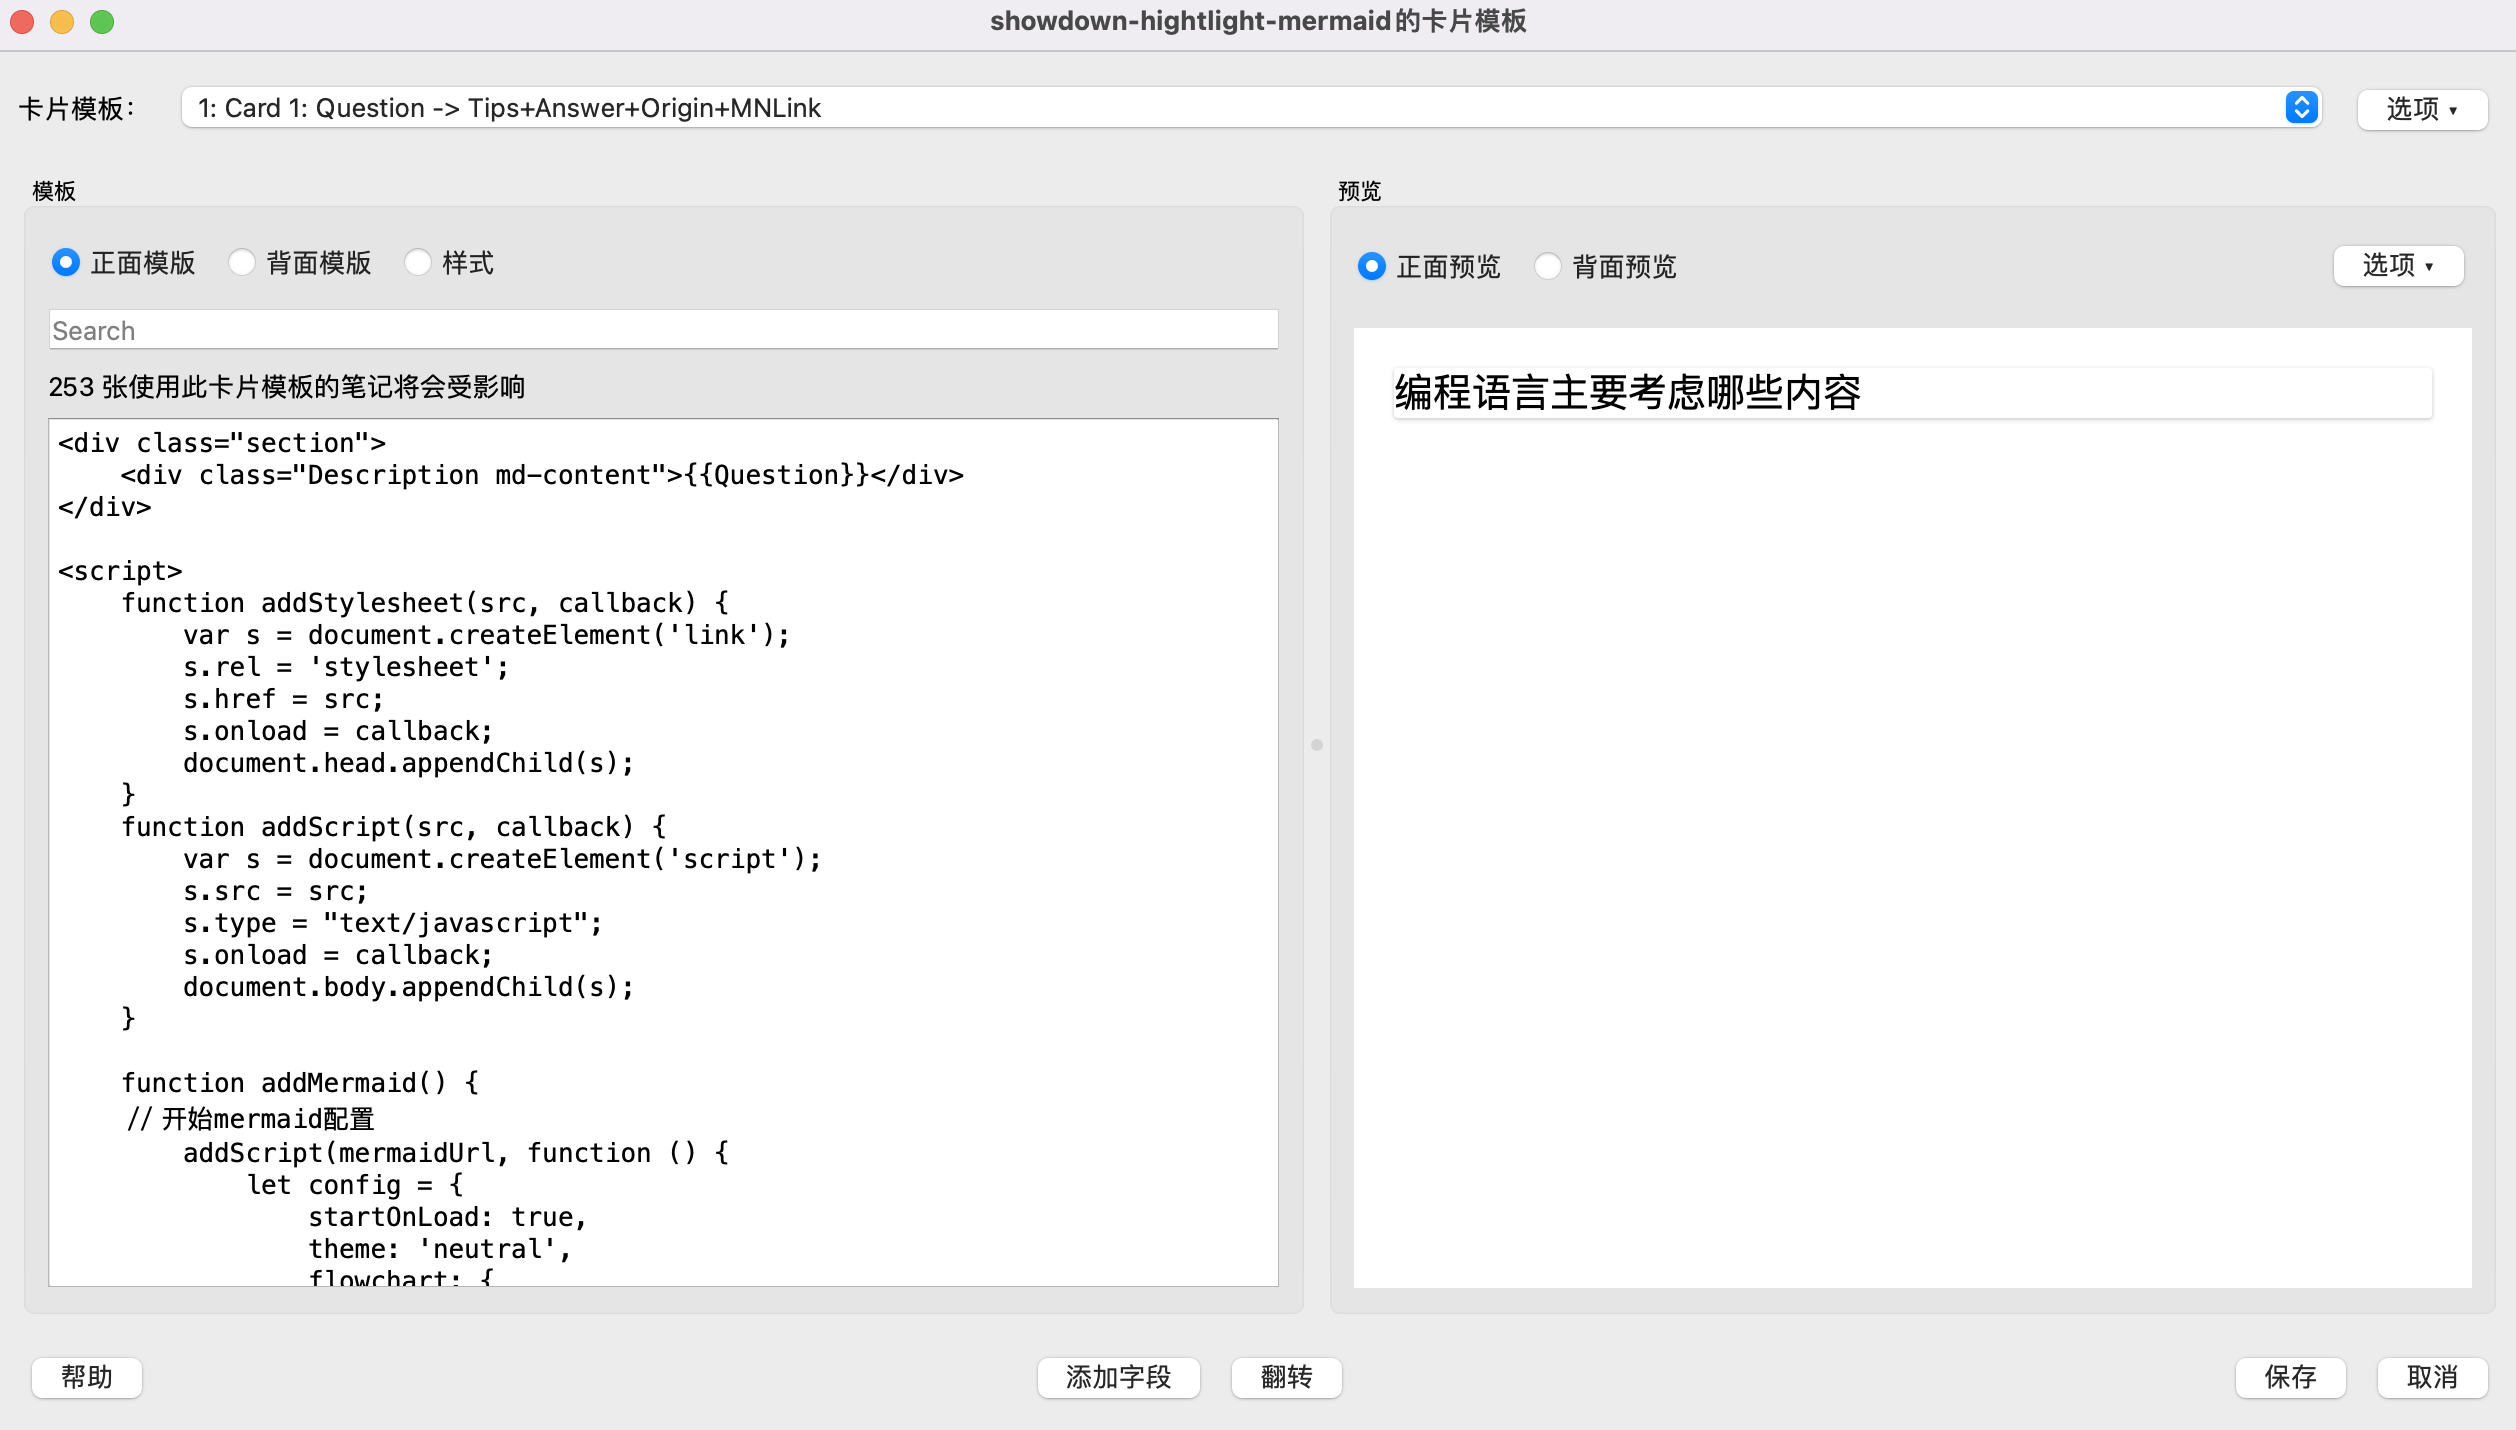
<div class="section">
    <div class="Description md-content"></div>
</div>

<script>
    function addStylesheet(src, callback) {
    var s = document.createElement('link');
    s.rel = 'stylesheet';
    s.href = src;
    s.onload = callback;
    document.head.appendChild(s);
}
    function addScript(src, callback) {
    var s = document.createElement('script');
    s.src = src;
    s.type = "text/javascript";
    s.onload = callback;
    document.body.appendChild(s);
}

    function addMermaid() {
    // 开始mermaid配置
    addScript(mermaidUrl, function () {
        let config = {
            startOnLoad: true,
            theme: 'neutral',
            flowchart: {
                useMaxWidth: true,
                htmlLabels: true,
                curve: 'Basis'
            },
            securityLevel: 'loose'
        }
        //mermaid.initialize(config)
        mermaid.init()
    });
}

    function replaceAllWhitespaceWithSpace(str) {
    return str.replace(/[\t\v\f \u00a0\u2000-\u200b\u2028-\u2029\u3000]/g, ' ');
}
    // anki本地存放多媒体文件路径: ~/Library/Application Support/Anki2/
    <account>/collection.media
        var highlightcssUrl = "_highlight.default.min.css";
        var showdownsCssUrl = "_showdowns.min.css"
        var showdownUrl = "_showdown.min.js";
        var showdownsUrl = "_showdowns.min.js";
        // https://cdn.bootcss.com/mermaid/8.0.0-rc.8/mermaid.min.js
        var mermaidUrl = "_mermaid.min.js";
        var highlightjsUrl = "_highlight.min.js";
        addStylesheet(highlightcssUrl, function () {});
        addStylesheet(showdownsCssUrl, function () {});
        addScript(showdownUrl, function () {
            addScript(highlightjsUrl, function () {
                function processShowdownDivs() {
                    var showdownConverter = new showdown.Converter({tables: true}); // 打开表格支持
                    showdownConverter.setFlavor('github');
                    document.querySelectorAll('div.md-content').forEach((div) => {
                        var rawText = div.innerText.replace(/<\/div>/g, ""); // div.innerHTML.replace(/<\/div>/g, ""); //innerText;
                        var classes = div.className.replace(/md-content/g, "");
                        var text = replaceAllWhitespaceWithSpace(rawText); //.replace(/<br>|<div>/g, "\n");
                        var html = showdownConverter.makeHtml(text);
                        var newDiv = document.createElement('div');
                        newDiv.innerHTML = html;
                        newDiv.className = classes;

                        newDiv.querySelectorAll('pre code').forEach((block) => {
                            hljs.highlightBlock(block);
                        });

                        div.parentNode.insertBefore(newDiv, div.nextSibling);
                        div.style.display = 'none';
                        addMermaid();
                    });
                };

                processShowdownDivs();
            });

        });

</script>
背面模版

<hr id=answer>

<div class="section">
    <div id="back" class="Description md-content">感悟:</br></div>
</div>

<div class="section">
    <div id="back" class="Description md-content">回答: </br></div>
</div>

<div class="section">
    <div id="back" class="Description md-content">来源: </br></div>
</div>
说明
- anki本地存放多媒体文件路径:
~/Library/Application Support/Anki2/<account>/collection.media
- 相关js文件可在github main分支的scripts/anki_md_js里面找到
drafts深度使用技巧
使用技巧
双向链接
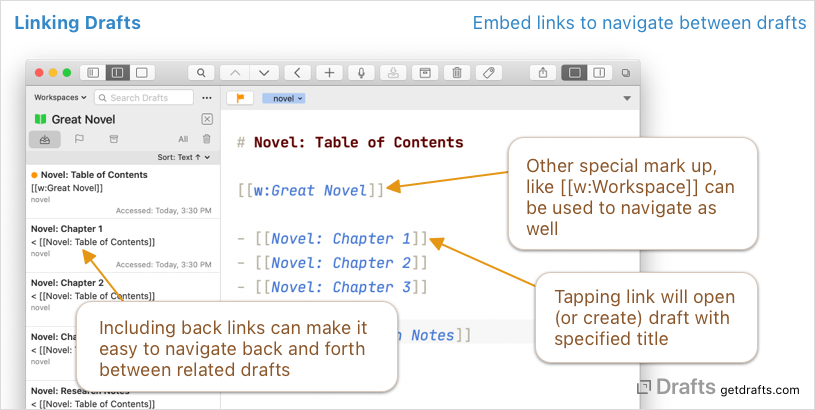
官方的叫法是 Wiki-Style Cross-Linking,这是一个很不错的功能,方便同一个主题的草稿下跳转,既可以链接文章,也可以进行关键词搜索。先在草稿中输入 [[,然后 Drafts 就会自动跳出待选的草稿标题,点击即可创建跳转链接。
相关actions
- New Linked Draft | Drafts Directory
- run shortcuts from wikilink | Drafts Directory
- Add Backlinks | Drafts Directory
- Check Wikilinks | Drafts Directory
- Insert Wikilink | Drafts Directory
- New draft from selection/line with back-link | Drafts Directory
- Search for Back Links | Drafts Directory
模版写作
草稿引用
在版本 29 更新中,更新了一个名为「Insert Full Text of Other Drafts」的功能,翻译过来就是草稿全文的引用。它的语法和标准 Markdown 有些类似,在 Markdown 中引用是一个 >,而 Drafts 中如果需要对某个草稿进行全文引用,可以输入 << 进行选择引用。输入两个 < 之后,Drafts 弹出了草稿选择列表,选择需要引用插入的草稿,Drafts 就会直接将这段文本复制进来,而不用手动切会草稿列表,复制之后再粘贴过来。如果在 Drafts 中之前有很多零碎的想法,在需要将这些想法汇总,写成具有条理性的文章,那么这个功能就可以帮用户快速引用其他草稿。
动作收集
md格式化
只支持macOS
- Is there anyway to format the markdown? - General Discussion - Drafts Community
- Format Markdown | Drafts Directory
npm install -g prettier
preview
自定义: 需要pro版本
打开开发者模式
自定义语法高亮
自定义主题
// See online documentation for examples // https://docs.getdrafts.com/docs/actions/scripting String.prototype.format = function () { if (arguments.length == 0) return this; var param = arguments[0]; var s = this; if (typeof (param) == 'object') { for (var key in param) s = s.replace(new RegExp("\{" + key + "\}", "g"), param[key]); return s; } else { for (var i = 0; i < arguments.length; i++) s = s.replace(new RegExp("\{" + i + "\}", "g"), arguments[i]); return s; } } const addToc = content => { const headerLines = content.split('\n').filter(line => /^#+\s+1+/.test(line)) if (headerLines.length == 0) { alert("No Markdown headers (e.g. ## Header) found") return } const tocLines = [] let lastLevel = 0 for (let i = 0; i < headerLines.length; i++) { const splitMatch = headerLines[i].match(/^(#+)\s+(.)$/) // - 2 assumes the first header is h2 const level = splitMatch[1].length - 2 if (level < 0) { alert("h1 headers (#) are not compatible with Table of Contents. Please use h2 headers (##) and below.") return null } if (level > lastLevel + 1) { alert("Cannot make a table of contents if header levels are skipped, e.g. ## followed by ####") return } lastLevel = level const headerText = splitMatch[2] // tocLines.push(" ".repeat(level) + " " + headerText + "test_toc") tocLines.push("{0}* {1}".format(" ".repeat(level), headerText, headerText)) } if (tocLines[0][0] != "*") { alert("The first header must be a h2 (##)") return }
// 为了和github上传自动添加toc的脚本一致
let startMatch = content.match(/<!--ts-->/)
let endMatch = content.match(/<!--te-->/)
if (startMatch == null && endMatch == null) {
    const firstHeaderMatch = content.match(/^(#+)\s+(.*)$/m)
    content = `${content.substring(0, firstHeaderMatch.index)}<!--ts--><!--te-->\n\n${content.substring(firstHeaderMatch.index)}`
    startMatch = content.match(/<!--ts-->/)
    endMatch = content.match(/<!--te-->/)
}
if (startMatch == null || endMatch == null) {
    alert("You need both <!--ts--> and <!--te--> in your draft to place a table of contents")
    return
}
if (endMatch.index < startMatch.index) {
    alert("<!--ts--> must come before <!--te-->")
    return
}
const startPos = startMatch.index + startMatch[0].length
const endPos = endMatch.index
return `${content.substring(0, startPos)}\n${tocLines.join("\n")}\n${content.substring(endPos)}`
}
const newBody = addToc(draft.lines.slice(1).join("\n"))
if (newBody != null) {
draft.content = ${draft.lines[0]}\n${newBody}
draft.update()
}
sigil epub 编辑器
来源
- Releases · Sigil-Ebook/Sigil
- Release Sigil User Guide (2022.05.17) for forthcoming Sigil-1.9.10+ · Sigil-Ebook/sigil-user-guide
- Sigil Plugin Index - MobileRead Forums
- What is Sigil? - Sigil-Ebook
karabiner配置说明
路径
~/.config/karabiner
karabiner.json
- Disable command + Q in web browser
- Change right_option to shift+control+command
- Change right_command to command+control+option+shift, press alone be escape
- Change left_cotnril+hjkl to arrow keys
- Change left_control+0/$/d/u to home/end/page_down/page_up
- Mapping
[left_option={1-0,-,=}]to {F1-F10, F11, F12}
{
"global": {
"check_for_updates_on_startup": true,
"show_in_menu_bar": true,
"show_profile_name_in_menu_bar": false
},
"profiles": [
{
"complex_modifications": {
"parameters": {
"basic.simultaneous_threshold_milliseconds": 50,
"basic.to_delayed_action_delay_milliseconds": 500,
"basic.to_if_alone_timeout_milliseconds": 1000,
"basic.to_if_held_down_threshold_milliseconds": 500,
"mouse_motion_to_scroll.speed": 100
},
"rules": [
{
"description": "Disable command + Q in web browser",
"manipulators": [
{
"conditions": [
{
"bundle_identifiers": [
"^org\\.mozilla\\.firefox$",
"^com\\.google\\.Chrome$",
"^com\\.apple\\.Safari$"
],
"type": "frontmost_application_if"
}
],
"from": {
"key_code": "q",
"modifiers": {
"mandatory": [
"command"
],
"optional": [
"caps_lock"
]
}
},
"to": [
{
"key_code": "vk_none"
}
],
"type": "basic"
}
]
},
{
"description": "Change right_option to shift+control+command",
"manipulators": [
{
"from": {
"key_code": "right_option"
},
"to": [
{
"key_code": "left_shift",
"modifiers": [
"left_control",
"left_command"
]
}
],
"type": "basic"
}
]
},
{
"description": "Change right_command to command+control+option+shift,press alone be escape",
"manipulators": [
{
"from": {
"key_code": "right_command",
"modifiers": {
"optional": [
"any"
]
}
},
"to": [
{
"key_code": "left_option",
"modifiers": [
"left_command",
"left_control",
"left_shift"
]
}
],
"to_if_alone": [
{
"key_code": "escape"
}
],
"type": "basic"
}
]
},
{
"description": "Change left_control+hjkl to arrow keys",
"manipulators": [
{
"from": {
"key_code": "h",
"modifiers": {
"mandatory": [
"left_control"
],
"optional": [
"any"
]
}
},
"to": [
{
"key_code": "left_arrow"
}
],
"type": "basic"
},
{
"from": {
"key_code": "j",
"modifiers": {
"mandatory": [
"left_control"
],
"optional": [
"any"
]
}
},
"to": [
{
"key_code": "down_arrow"
}
],
"type": "basic"
},
{
"from": {
"key_code": "k",
"modifiers": {
"mandatory": [
"left_control"
],
"optional": [
"any"
]
}
},
"to": [
{
"key_code": "up_arrow"
}
],
"type": "basic"
},
{
"from": {
"key_code": "l",
"modifiers": {
"mandatory": [
"left_control"
],
"optional": [
"any"
]
}
},
"to": [
{
"key_code": "right_arrow"
}
],
"type": "basic"
}
]
},
{
"description": "Change left_control+0/$/d/u to home/end/page_down/page_up (rev 2)",
"manipulators": [
{
"from": {
"key_code": "0",
"modifiers": {
"mandatory": [
"left_control"
],
"optional": [
"any"
]
}
},
"to": [
{
"key_code": "home"
}
],
"type": "basic"
},
{
"from": {
"key_code": "$",
"modifiers": {
"mandatory": [
"left_control"
],
"optional": [
"any"
]
}
},
"to": [
{
"key_code": "end"
}
],
"type": "basic"
},
{
"from": {
"key_code": "d",
"modifiers": {
"mandatory": [
"left_control"
],
"optional": [
"any"
]
}
},
"to": [
{
"key_code": "page_down"
}
],
"type": "basic"
},
{
"from": {
"key_code": "u",
"modifiers": {
"mandatory": [
"left_control"
],
"optional": [
"any"
]
}
},
"to": [
{
"key_code": "page_up"
}
],
"type": "basic"
}
]
},
{
"description": "Mapping [left_option-{1-0,-,=} to {F1-F10,F11,F12}",
"manipulators": [
{
"from": {
"key_code": "1",
"modifiers": {
"mandatory": [
"left_option"
],
"optional": [
"any"
]
}
},
"to": [
{
"key_code": "f1"
}
],
"type": "basic"
},
{
"from": {
"key_code": "2",
"modifiers": {
"mandatory": [
"left_option"
],
"optional": [
"any"
]
}
},
"to": [
{
"key_code": "f2"
}
],
"type": "basic"
},
{
"from": {
"key_code": "3",
"modifiers": {
"mandatory": [
"left_option"
],
"optional": [
"any"
]
}
},
"to": [
{
"key_code": "f3"
}
],
"type": "basic"
},
{
"from": {
"key_code": "4",
"modifiers": {
"mandatory": [
"left_option"
],
"optional": [
"any"
]
}
},
"to": [
{
"key_code": "f4"
}
],
"type": "basic"
},
{
"from": {
"key_code": "5",
"modifiers": {
"mandatory": [
"left_option"
],
"optional": [
"any"
]
}
},
"to": [
{
"key_code": "f5"
}
],
"type": "basic"
},
{
"from": {
"key_code": "6",
"modifiers": {
"mandatory": [
"left_option"
],
"optional": [
"any"
]
}
},
"to": [
{
"key_code": "f6"
}
],
"type": "basic"
},
{
"from": {
"key_code": "7",
"modifiers": {
"mandatory": [
"left_option"
],
"optional": [
"any"
]
}
},
"to": [
{
"key_code": "f7"
}
],
"type": "basic"
},
{
"from": {
"key_code": "8",
"modifiers": {
"mandatory": [
"left_option"
],
"optional": [
"any"
]
}
},
"to": [
{
"key_code": "f8"
}
],
"type": "basic"
},
{
"from": {
"key_code": "9",
"modifiers": {
"mandatory": [
"left_option"
],
"optional": [
"any"
]
}
},
"to": [
{
"key_code": "f9"
}
],
"type": "basic"
},
{
"from": {
"key_code": "0",
"modifiers": {
"mandatory": [
"left_option"
],
"optional": [
"any"
]
}
},
"to": [
{
"key_code": "f10"
}
],
"type": "basic"
},
{
"from": {
"key_code": "hyphen",
"modifiers": {
"mandatory": [
"left_option"
],
"optional": [
"any"
]
}
},
"to": [
{
"key_code": "f11"
}
],
"type": "basic"
},
{
"from": {
"key_code": "equal_sign",
"modifiers": {
"mandatory": [
"left_option"
],
"optional": [
"any"
]
}
},
"to": [
{
"key_code": "f12"
}
],
"type": "basic"
}
]
}
]
},
"devices": [],
"fn_function_keys": [
{
"from": {
"key_code": "f1"
},
"to": [
{
"key_code": "display_brightness_decrement"
}
]
},
{
"from": {
"key_code": "f2"
},
"to": [
{
"key_code": "display_brightness_increment"
}
]
},
{
"from": {
"key_code": "f3"
},
"to": [
{
"key_code": "mission_control"
}
]
},
{
"from": {
"key_code": "f4"
},
"to": [
{
"key_code": "launchpad"
}
]
},
{
"from": {
"key_code": "f5"
},
"to": [
{
"key_code": "illumination_decrement"
}
]
},
{
"from": {
"key_code": "f6"
},
"to": [
{
"key_code": "illumination_increment"
}
]
},
{
"from": {
"key_code": "f7"
},
"to": [
{
"key_code": "rewind"
}
]
},
{
"from": {
"key_code": "f8"
},
"to": [
{
"key_code": "play_or_pause"
}
]
},
{
"from": {
"key_code": "f9"
},
"to": [
{
"key_code": "fastforward"
}
]
},
{
"from": {
"key_code": "f10"
},
"to": [
{
"key_code": "mute"
}
]
},
{
"from": {
"key_code": "f11"
},
"to": [
{
"key_code": "volume_decrement"
}
]
},
{
"from": {
"key_code": "f12"
},
"to": [
{
"key_code": "volume_increment"
}
]
}
],
"name": "Default profile",
"parameters": {
"delay_milliseconds_before_open_device": 1000
},
"selected": true,
"simple_modifications": [
{
"from": {
"key_code": "caps_lock"
},
"to": [
{
"key_code": "left_control"
}
]
}
],
"virtual_hid_keyboard": {
"caps_lock_delay_milliseconds": 0,
"country_code": 0,
"indicate_sticky_modifier_keys_state": true,
"keyboard_type": "ansi",
"mouse_key_xy_scale": 100
}
}
]
}
参考资源
- The location of the configuration file | Karabiner-Elements
- Karabiner God Mode. Use Karabiner to take your use of mac… | by Nikita | Medium
关于分层
缘起
对于一些核心主力深度使用的app,比如Omni系列,Jetbrains系列,我觉得完全值得专门设置一层按键
关于分层
Hyper 键只有一颗,用久了总有键位冲突不够用的那天,比如我既想用 S 键触发 Search,又想用它激活 Sorted 3。利用层(layer)的概念,可以让键盘上的每个键都能成为独一无二的修饰键。
参考资源
goodnotes小技巧
添加超链接
Adding external links – GoodNotes Support
- 使用文本框工具输入文本
- 在编辑状态下选中链接文本
- 弹出菜单中会出现链接选项
在浏览器随时查看
Marginnote深度使用整理
小技巧
朗读模式
MN的朗读模式本质上是对划选高亮内容形成的卡片进行朗读,这样就有许多细节操作可以添加。比如给卡片添加标题、添加评论、修改卡片内容等。
Marginnote支持将勾画的重点进行朗读,并且可以后台运行并朗读。这一点在iPhone上尤为令我动心。之前我主要用微信读书听书,但是微信读书在朗读技术书籍的时候有个问题,总要将代码部分内容也读出来,这就让我不容易抓住重点。
到了Marginnote这里就巧妙地将这个问题解决:只朗读勾画的重点内容。
要注意选左边的三个小点
- macOS:
- iOS:
多屏模式
打开定位功能
cmd + n 打开新窗口
多屏功能无法将卡片集中在当前焦点
裁边要点
在使用marginnote制作卡片时,由于页头的文字会被选进去,可以使用裁边功能去掉
卡片制作规范
卡片标题
- 需要加上编号
卡片内容
-
全部识别为文本
-
使用md语法改写:主要为了导出到Anki之后,可以直接用自制md卡牌模版渲染
卡片评论
卡片追加
Mdbook电子书发布工具使用说明
使用要点
基本结构
tree -L 2                                                                                                                                                                                                                              ─╯
.
├── README.md # 项目基本说明
├── bin # mdbook可执行文件
│   └── mdbook
├── book.toml # 书籍基本信息配置
├── mermaid-init.js # mermaid用到的js文件
├── mermaid.min.js # mermaid用到的js文件
├── mytheme # 书籍用到的主题
│   ├── FontAwesome
│   ├── ayu-highlight.css
│   ├── book.js
│   ├── clipboard.min.js
│   ├── css
│   ├── favicon.png
│   ├── favicon.svg
│   ├── fonts
│   ├── head.hbs
│   ├── header.hbs
│   ├── highlight.css
│   ├── highlight.js
│   ├── index.hbs
│   ├── mod.rs
│   ├── playground_editor
│   ├── redirect.hbs
│   ├── searcher
│   └── tomorrow-night.css
├── scripts # 一些文章里面提及的脚本文件
│   ├── anki_md_js
│   ├── gh-md-toc
│   ├── toc_generator.sh
│   ├── update_toc
│   └── update_toc_raw
├── smart-anchor.js
└── src # 书籍内容主体
    ├── SUMMARY.md # 目录页,唯一可以添加跳转的地方
    ├── app_deepin
    ├── app_extensions
    ├── app_plugin_list.md
    ├── imgs
    ├── macos_essentials.md
    ├── macos_ios_tips.md
    ├── overview.md
    └── shortcuts_keymaps_config.md

13 directories, 29 files
Summary
要注意,mdbook中所有文章跳转链接只能放在Summary中。
图片资源与git lfs
git lfs使用场景

Git LFS 是 Github 开发的一个 Git 的扩展,用于实现 Git 对大文件的支持. 比如在游戏开发过程中,设计资源占用了很大一部分空间. 像png,psd等文件是二进制(blob) 的,体积也很庞大.但git的diff/patch等是基于文件行的.对于二进制文件来说. git需要存储每次commit的改动.每次当二进制文件修改,发生变化的时候. 都会产生额外的提交量.导致clone和pull的数据量大增.在线仓库的体积也会迅速增长.

LFS(Large File Storage) 就是为了解决这一问题而产生的工具.
- 它将你所标记的大文件保存至另外的仓库,而在主仓库仅保留其轻量级指针.
- 那么在你检出版本时,根据指针的变化情况下更新对应的大文件.而不是在本地保存所有版本的大文件

对mdbook的影响
因为mdbook默认是在src里面直接引用静态资源,所以如果用git lfs打开对应的资源存储就会导致发布后的github pages找不到静态资源。
Rust特供功能
隐藏代码行
fn main() {
    let x = 5;
    let y = 6;

    println!("{}", x + y);

}
Rust Playground页面执行
默认支持
#![allow(unused)]

fn main() {
    println!("Hello, World!");
}
指定不支持
let mut name = String::new();
std::io::stdin().read_line(&mut name).expect("failed to read line");
println!("Hello {}!", name);
包含文件自动渲染为md
全文件包含
```
{{#include ../../scripts/update_toc_raw}}
```
渲染后:
find . -type f -name '*.md' > temp
mds=`sort temp | uniq`
for md in $mds:
do
  if echo $md | grep -q -E '\.md$'
  then
    echo $md
    scripts/gh-md-toc --insert --no-backup $md
  else
    echo $md' not md'
  fi
done
rm temp
指定行数
- 指定一行
```
{{#include ../../scripts/update_toc_raw:1}}
```
渲染后:
find . -type f -name '*.md' > temp
- 指定一行开始
```
{{#include ../../scripts/update_toc_raw:1:}}
```
渲染后:
find . -type f -name '*.md' > temp
mds=`sort temp | uniq`
for md in $mds:
do
  if echo $md | grep -q -E '\.md$'
  then
    echo $md
    scripts/gh-md-toc --insert --no-backup $md
  else
    echo $md' not md'
  fi
done
rm temp
- 指定范围
```
{{#include ../../scripts/update_toc_raw:1:5}}
```
渲染后:
find . -type f -name '*.md' > temp
mds=`sort temp | uniq`
for md in $mds:
do
  if echo $md | grep -q -E '\.md$'
- 指定到某行
```
{{#include ../../scripts/update_toc_raw::6}}
```
渲染后:
find . -type f -name '*.md' > temp
mds=`sort temp | uniq`
for md in $mds:
do
  if echo $md | grep -q -E '\.md$'
  then
指定锚点部分
打开行数
[output.html.playground]
editable = false         # allows editing the source code
copyable = true          # include the copy button for copying code snippets
copy-js = true           # includes the JavaScript for the code editor
line-numbers = false     # displays line numbers for editable code
runnable = true          # displays a run button for rust code
line-numbers Display line numbers on editable sections of code. Requires both editable and copy-js to be true. Defaults to false.
插入代码
插入可运行代码: 只支持rust
页面直接编辑代码: *, editable
mdbook主题修改
基本页面介绍
 tree mytheme -L 1                                                                                                                                ─╯
mytheme
├── FontAwesome
├── ayu-highlight.css
├── book.js
├── clipboard.min.js
├── css
├── favicon.png
├── favicon.svg
├── fonts
├── head.hbs
├── header.hbs
├── highlight.css
├── highlight.js
├── index.hbs
├── mod.rs
├── playground_editor
├── redirect.hbs
├── searcher
└── tomorrow-night.css

5 directories, 13 files
- index.hbs is the handlebars template.
- head.hbs is appended to the HTML section.
- header.hbs content is appended on top of every book page.
- css/ contains the CSS files for styling the book.
- css/chrome.css is for UI elements.
- css/general.css is the base styles.
- css/print.css is the style for printer output.
- css/variables.css contains variables used in other CSS files.
- book.js is mostly used to add client side functionality, like hiding / un-hiding the sidebar, changing the theme, ...
- highlight.js is the JavaScript that is used to highlight code snippets, you should not need to modify this.
- highlight.css is the theme used for the code highlighting.
- favicon.svg and favicon.png the favicon that will be used. The SVG version is used by newer browsers.
mdbook高级用法
关于book
- 首先,这是mdbook serve/build之后生成的静态网站目录
- src,和Summary同级的目录,就是网站根目录
- src之外的内容不会被自动加入到book,所以无法访问。
- 这里有三个办法解决静态文件访问的问题:
- 生成book之后再复制进去,不过每次都需要重新复制
- 把静态文件放在src里面,将会自动复制进去
- 只对于js和css文件,可以用book的additional-css/js参数配置进去
关于mdbook serve panit-失败
这可能是由于本地电脑开了太多程序占用资源,mdbook serve资源不足,重启电脑可解决
关于主题修改(theme)
- 在book.toml指定主题路径
- 只有指定文件名才会被用来渲染网页
关于markdown table
可以添加preprocessor:mdbook-extended-markdown
- 其实就是类似ASCII渲染,所见即所得
- 每一行长度需要一致, 所以注意不要中英文混合
- 每一行之间要有分割线
```extended-markdown-table
|          |                                      Tool                                   |
|          |------------------|----------------------|-----------------------------------|
|          |                  | Markdown Tables      | Extended Markdown Tables          |
| Feature  |------------------|----------------------|-----------------------------------|
| Support  |                  |                      | Horizontal      |        ✓        |
|          | Merged cells     |          ✗           |-----------------|-----------------|
|          |                  |                      | Vertical        |        ✓        |
```
```extended-markdown-table
| Macros                     | Define                                                         | Usage                | note   | Example    |
|----------------------------|----------------------------------------------------------------|----------------------|--------|------------|
| Declarative Macro          | #[macro_export]/macro_rules! macro_name{}                      | macro_name!()        |        | println!   |
|----------------------------|----------------------------------------------------------------|----------------------|--------|------------|
| Function Macro             | #[proc_macros]/pub fn macro_name                               | macro_name!()        |        |            |
|----------------------------|----------------------------------------------------------------|----------------------|--------|------------|
| Derive Macro               | #[proc_macros_derive(DeriveMacroName)]/pub  fn other_fn_name   | DeriveMacroName!()   |        |            |
|----------------------------|----------------------------------------------------------------|----------------------|--------|------------|
| Attritubte Macro           |                                                                |                      |        |            |
```
mdbook插件推荐
自动检查
MDBook Link-Check
Michael-F-Bryan/mdbook-linkcheck: A backend for mdbook which will check your links for you.
自动生成
global-search
mattico/global-search: Global search for a collection of MDBooks
mdbook-toc
badboy/mdbook-toc: A preprocessor for mdbook to add inline Table of Contents support.
mdbook-pagetoc: 添加页内侧边栏toc
JorelAli/mdBook-pagetoc: A page table of contents for mdBook
 Chapter 1 - Sample
mdbook-open-on-gh
badboy/mdbook-open-on-gh: mdbook preprocessor to add a open-on-github link on every page
book-summary
Automatically creates a SUMMARY.md file for your book (
mdbook/gitbook)
dvogt23/book-summary: 📔Book auto-summary 🦀🖤 (gitbook/mdBook)
mdbook-suto-gen-summary
knightflower1989/mdbook-auto-gen-summary: mdbook auto-gen-summary
mdbook-transcheck
dalance/mdbook-transcheck: Checker for translated mdbook
mdbook-man
vv9k/mdbook-man: Generate manual pages from mdBooks!
mdbook-bookimport: 使用标记块引入其他文件内容
mdbook自带的include语法同时支持行数和标记来引入文件内容
md2tex
A small utility to convert markdown files to tex. Forked from md2pdf, with an added focus on mdbook conversions. Also with the goal of eventually contributing back upstream.
- Used by mdbook-latex to generate PDF's.
lbeckman314/md2tex: A fork of tforgione's awesome md2pdf library, catered for mdbook.
mdbook-checklist
ANSSI-FR/mdbook-checklist: mdbook preprocessor for generating checklists and indexes
mdbook-chapter-path: 可以用来生成面包屑导航
mdBook Tag
mdbook toc: 自动生成toc
- mdbook-toc - crates.io: Rust Package Registry
- badboy/mdbook-toc: A preprocessor for mdbook to add inline Table of Contents support.
cargo install mdbook-toc
mdbook-footnote: 可以用于生成引用内容
mdBook-template: 不需要,直接修改主题
trpl-zh-cn-pdf
me1ting/trpl-zh-cn-pdf: trpl-zh-cn的mdBook风格的pdf,带全书签
mdbook-cms: 自动生成Summary
this will also walk your mdbook src dir and generate the book summary in /path/to/your/mdbook/src/SUMMARY.md
AlongWY/mdbook-cms: A preprocessor bring cms to mdbook.
mdbook-open-on-gh: 添加打开github分支的功能
可以在页面底部添加对应源文件的超链接
mdbook-readme: 解决readme与index不一致的问题
mdbook-readme - crates.io: Rust Package Registry
mdbook-cmdrun: 提供强悍的终端执行功能
该插件内置了下列编译器,可以直接执行代码
- Shell
total 88K
drwxr-xr-x 4 runner runner 4.0K Dec 19 17:17 .
drwxr-xr-x 4 runner runner 4.0K Dec 19 17:17 ..
-rw-r--r-- 1 runner runner 1.2K Dec 19 17:17 IINA_deepin.md
drwxr-xr-x 2 runner runner 4.0K Dec 19 17:17 OmniGroups
-rw-r--r-- 1 runner runner 1.1K Dec 19 17:17 alfred.md
-rw-r--r-- 1 runner runner   23 Dec 19 17:17 app_deepin.md
-rw-r--r-- 1 runner runner 2.9K Dec 19 17:17 drafts.md
-rw-r--r-- 1 runner runner  716 Dec 19 17:17 goodnotes.md
-rw-r--r-- 1 runner runner 1.7K Dec 19 17:17 jetbrains_ide.md
drwxr-xr-x 2 runner runner 4.0K Dec 19 17:17 karabiner
-rw-r--r-- 1 runner runner 2.1K Dec 19 17:17 marginnote_deepin.md
-rw-r--r-- 1 runner runner  27K Dec 19 17:17 mdbook_deepin.md
-rw-r--r-- 1 runner runner  238 Dec 19 17:17 picGo_deepin.md
-rw-r--r-- 1 runner runner  611 Dec 19 17:17 sigil_epub_editor.md
-rw-r--r-- 1 runner runner 2.5K Dec 19 17:17 tampermonkey.md
-rw-r--r-- 1 runner runner  677 Dec 19 17:17 typora_deepin.md
- Bash Script
<!-- cmdrun ../../materials/cmdrun/script.sh>
- Python3
Generated subtitle
This comes from the script.py file
Since I'm at in a scripting language,
I can compute whatever I want
- Rust
#![allow(unused)]
fn main() {
/ < / ! / - / - / cmdrun cmdrun/script.rs - ->
}
配置与替换
mdbook-fluent: 可以用配置文件进行整理
fluent主要是用来本地化配置
- book.toml可以用dir参数配置查找fluent文件的目录路径
- 目前暂未试验成功
\{\{\#\fluent ../../../materials/global.motto}}
\{\{\#\fluent global.hello}}
mdbook-variables: 在book.toml配置全局变量
# book.toml
[preprocessor.variables.variables]
motto = "保持批判,有所取舍,知行合一,方见真我"
# here
\{\{motto}}
保持批判,有所取舍,知行合一,方见真我
mdbook-regex: 对内容进行正则替换
可以看作是mdbook-variables的升级版
绘图
mdBook Graphviz: 支持graphviz的dot语言
https://github.com/badboy/mdbook-open-on-gh)
svgbob plugin for mdbook
boozook/mdbook-svgbob: SvgBob mdbook preprocessor which swaps code-blocks with neat SVG.
mdbook-skill-tree: 添加技能树渲染
mdbook-chart: 添加c3.js图表渲染功能
主要是通过添加额外js、css文件
mdbook-puml: plantuml渲染
不再使用,会导致markdown无法渲染表格;其功能可以被mdbook-kroki覆盖
比mdbook-plantuml更好用 mdbook-puml - crates.io: Rust Package Registry
绘图合集:kroki
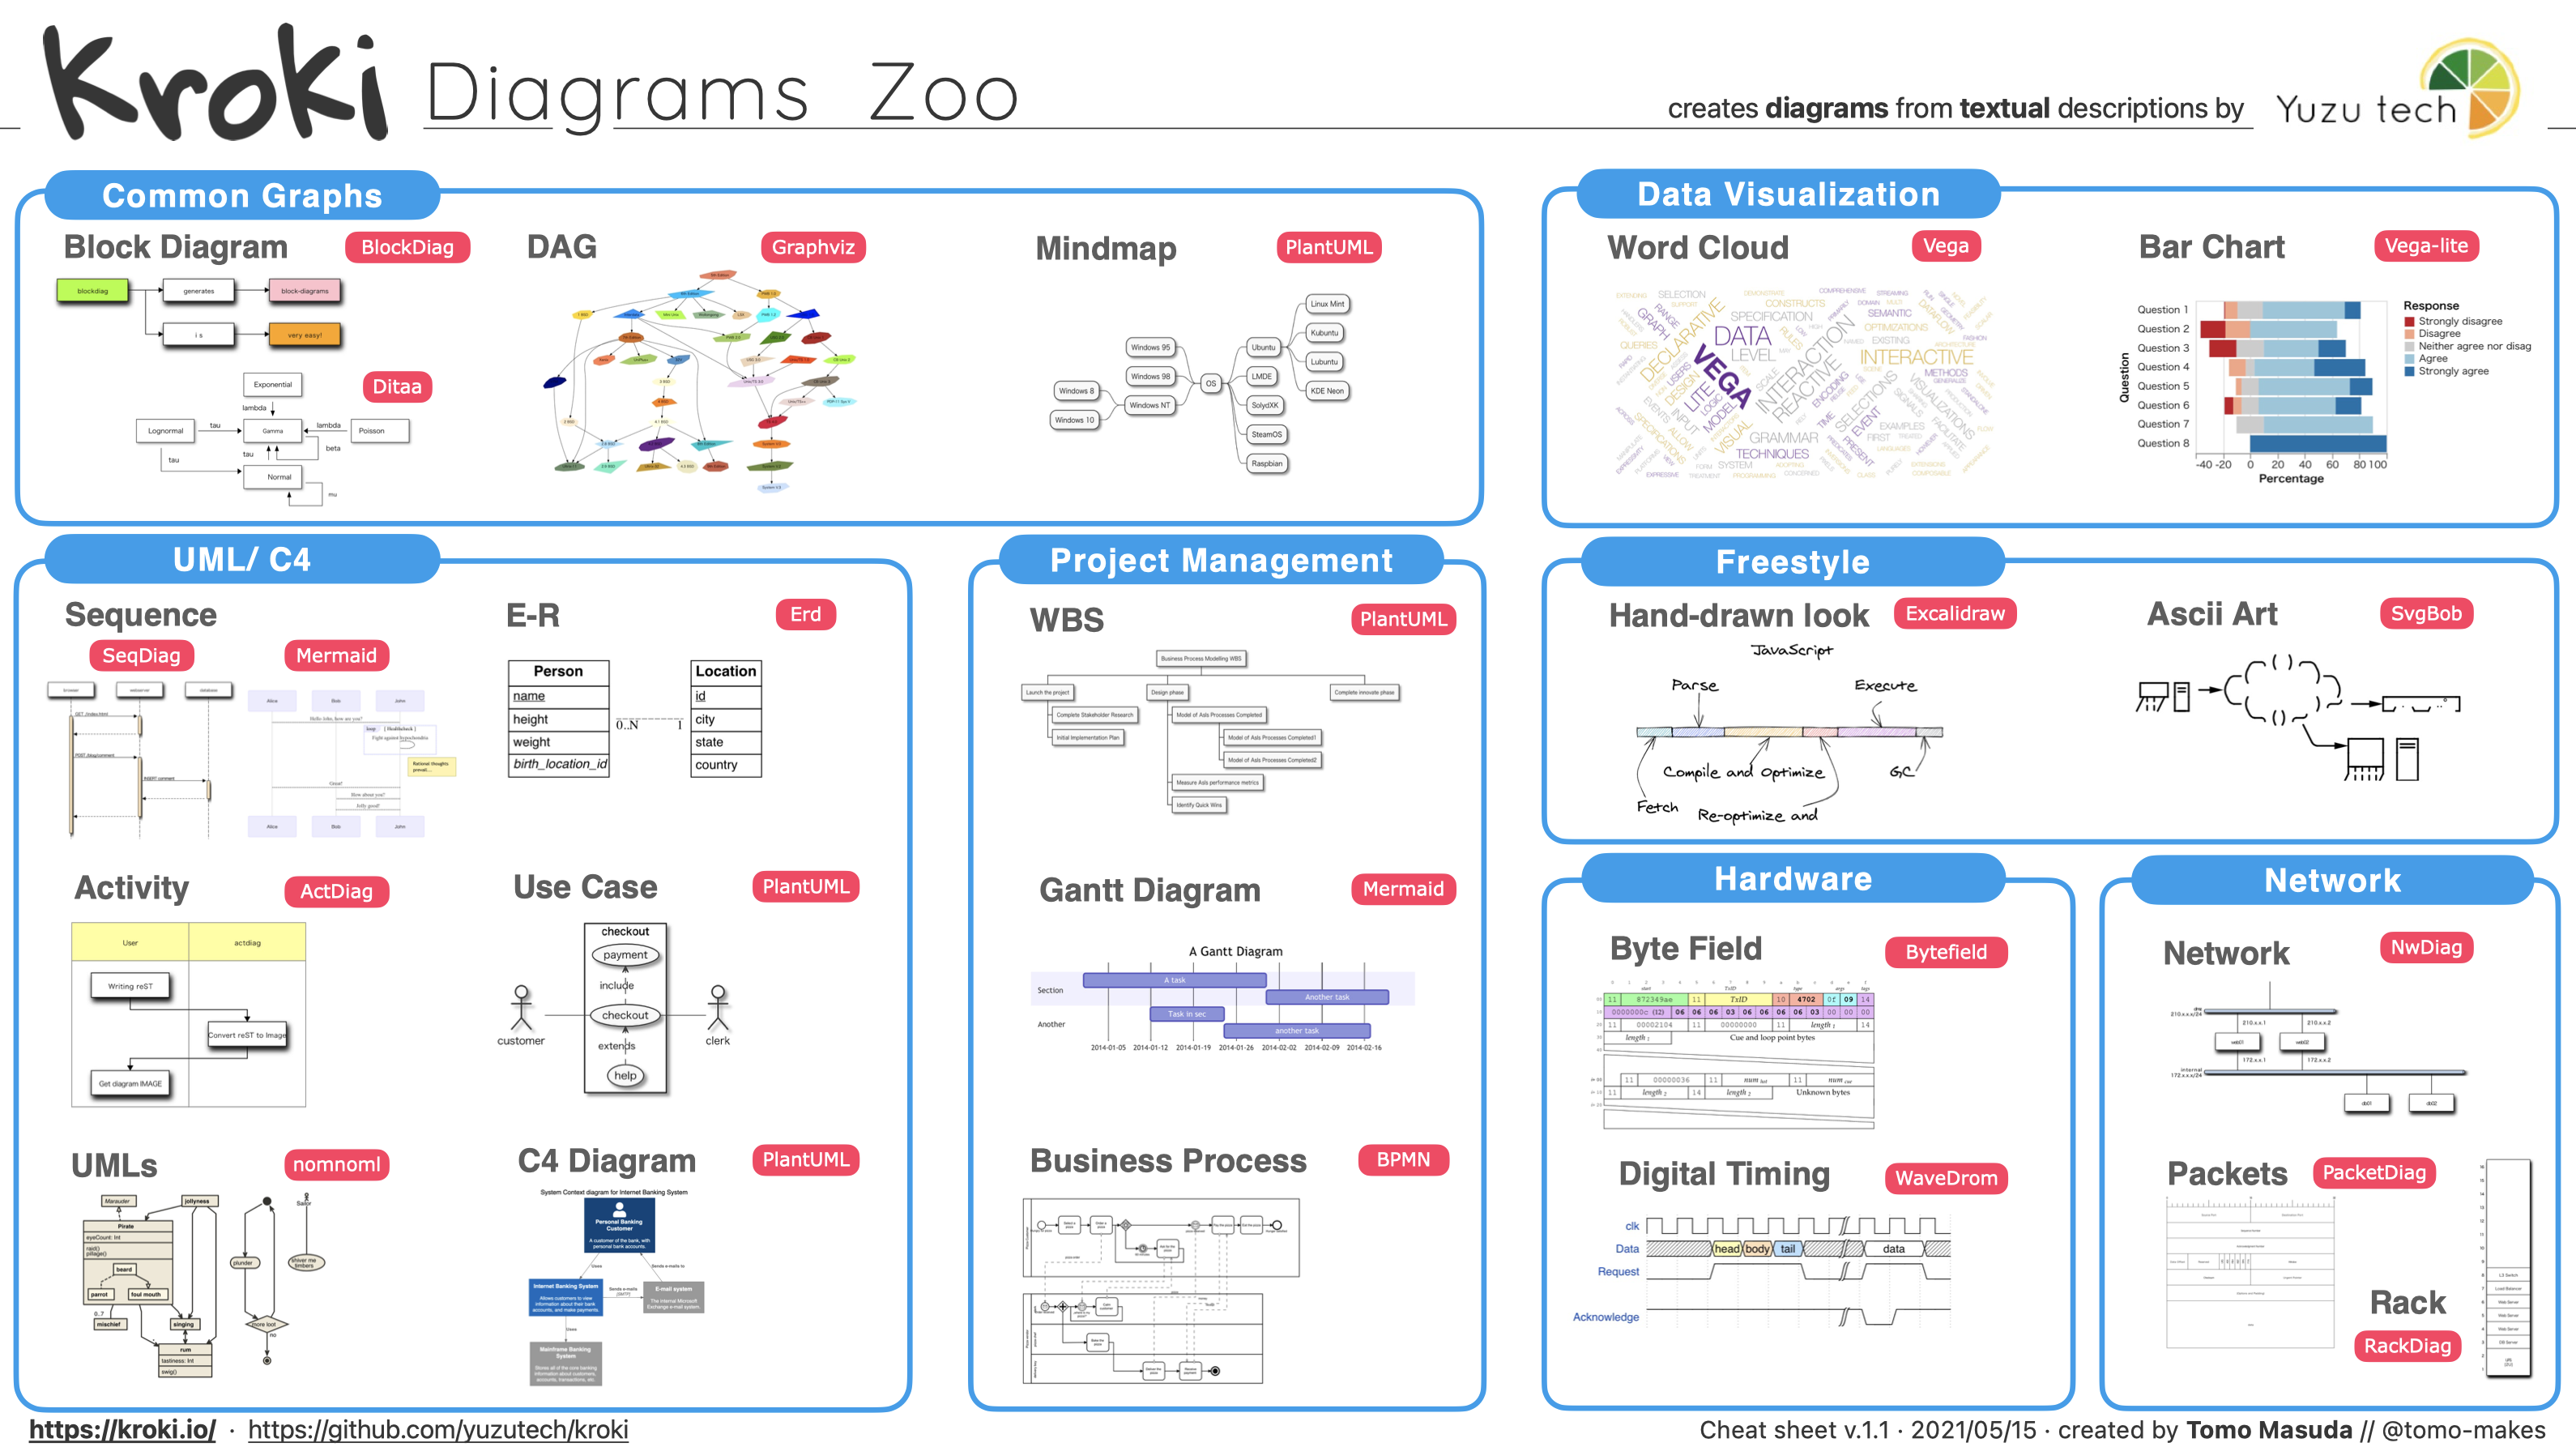
IntelliPikchr: IDEA内置插件
Split editor with preview pane for .pikchr files, using kroki.io or self-hosted server for rendering
mdbook-kroki-preprocessor: 支持kroki渲染
kroki可以看作多种图表语言的统一接口
cargo install mdbook-kroki-preprocessor
自动渲染
mdbook-admonish
tommilligan/mdbook-admonish: A preprocessor for mdbook to add Material Design admonishments.
mdbook-curly-quotes
mdBook preprocessor that replaces straight quotes with curly quotes, except within code blocks or code spans. It does the same as the curly-quotes option of the mdBook HTML renderer. The only advantage is that it can be applied to any renderer. arminha/mdbook-curly-quotes: mdBook preprocessor that replaces straight quotes with curly quotes
mdbook-tera
基于tera模版引擎渲染 avitex/mdbook-tera: Tera preprocessor for mdBook Keats/tera: A template engine for Rust based on Jinja2/Django
sgoudham/mdbook-template
可以自定义页脚的图像
zjp-CN/mdbook-theme
提供更多主题自定义选项
- zjp-CN/mdbook-template: Yield a mdbook demo with mdbook-theme and a yml file for github action automation and page publication.
- mdbook-theme - crates.io: Rust Package Registry
mdbook-mark: 渲染高亮标签
blazood/mdbook-mark: this is a mdbook preprocessor which can render ==== to
mdbook-all-the-markdowns

bombsimon/mdbook-all-the-markdowns: 🗃️ Preprocessor for mdbook to render all the markdowns!
mdbook-wikilink
NOBLES5E/mdbook-wikilink: Support for wikilinks on mdBook.
mdbook-page-styles
ABCsOf/mdbook-page-styles: An mdbook preprocessor to apply styles to specific pages and elements.
mdbook-note
mdbook-section-validator
younata/mdbook-section-validator: mdBook preprocessor for defining conditionally valid sections
mdbook-quiz: 添加在线测验功能
cargo install mdbook-quiz
git clone https://github.com/willcrichton/mdbook-quiz
cd mdbook-quiz
cargo install --path .
配置方式
You can configure mdbook-quiz by adding options to the [preprocessor.quiz] section of book.toml. The options are:
- validate (boolean): If true, then mdbook-quiz will validate your quiz TOML files using the validator.js script installed with mdbook-quiz. You must have NodeJS installed on your machine and PATH for this to work.
- fullscreen (boolean): If true, then a quiz will take up the web page's full screen during use.
- cache-answers (boolean): If true, then the user's answers will be saved in their browser's localStorage. Then the quiz will show the user's answers even after they reload the page.
注意⚠️
- 该插件默认只是在src里面自动生成mdbook-quiz, 里面包含必须但js和css文件
- 默认情况下只能在src目录下生效,与mdbook-quiz同级。
- 目前改成直接从book.toml引入,就可以全局使用
- 注意引入测试文件的代码行上下需要为空行
\{\{\#\quiz ../../materials/quizzes/rust-variables.toml}}

\{\{\#\quiz ../../materials/quizzes/quiz.toml}}
题型说明
[[questions]]
type = "MultipleChoice"
prompt.prompt = "What does it mean if a variable `x` is immutable?"
prompt.choices = [
  "`x` is stored in the immutable region of memory.",
  "After being defined, `x` can be changed at most once.",
  "`x` cannot be changed after being assigned to a value.",
  "You cannot create a reference to `x`."
]
answer.answer = 2
context = """
Immutable means "not mutable", or not changeable.
"""

[[questions]]
type = "ShortAnswer"
prompt.prompt = "What is the keyword used after `let` to indicate that a variable can be mutated?"
answer.answer = "mut"
context = """
For example, you can make a mutable variable `x` by writing: `let mut x = 1`.
"""

[[questions]]
type = "Tracing"
prompt.program = """
fn main() {
  let x = 1;
  println!("{x}");
  x += 1;
  println!("{x}");
}
"""
answer.doesCompile = false
answer.lineNumber = 4
context = """
This is a compiler error because line 4 tries to mutate `x` when `x` is not marked as `mut`.
"""
{{#quiz ../../materials/quizzes/rust-variables.toml}}
{{#quiz ../../materials/quizzes/quiz.toml}}
其他格式
playscript: 戏剧脚本格式
unevil-rs: 与mdbook无关,只是单独用来写ppt
Gooseberry - a Knowledge Base for the Lazy
一个很棒的工具,可以直接将mdbook转为知识库

ppt: 可以切换ppt还是markdown
这个插件将html算是玩的比较深入
举例(windows-alt+p|osx-option+p切换)
An Interesting Thing
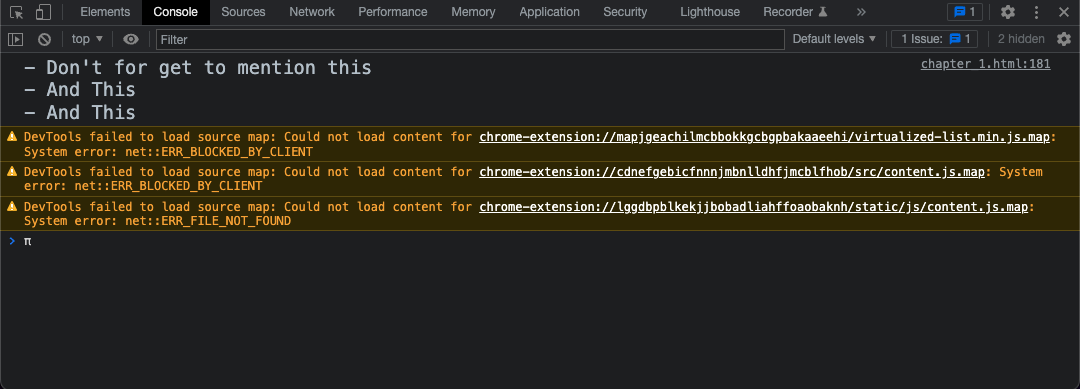
Press
alt+pto toggle which version is displayed. Open the console to see the notes printed there
Here is a much longer explanation about what this interesting thing is and how interesting you might find it.
To elaborate, it is extremely interesting.
A list of things
- Fact one is intriguing
- Fact two is piquing my interest
- Fact three has me down right flabbergasted
- Fact four is almost obscene
- web-only
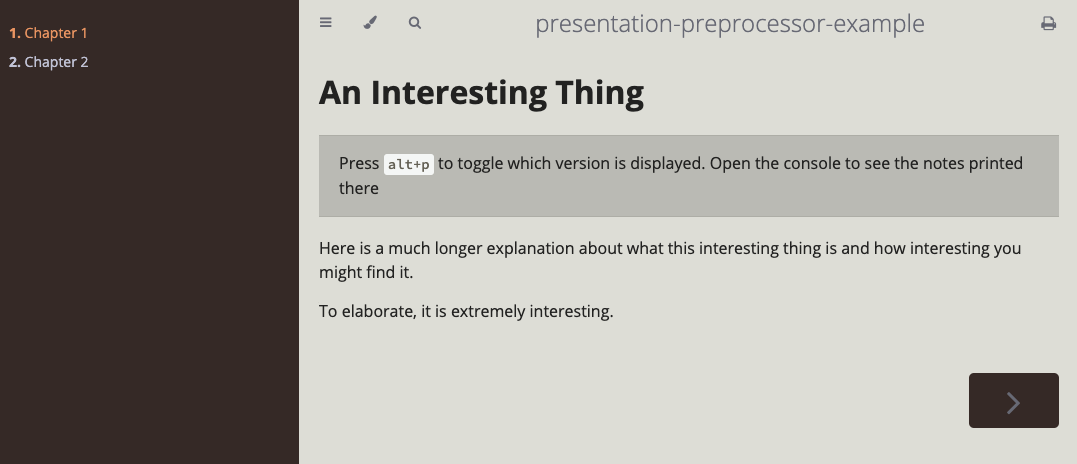
-
Slides-only
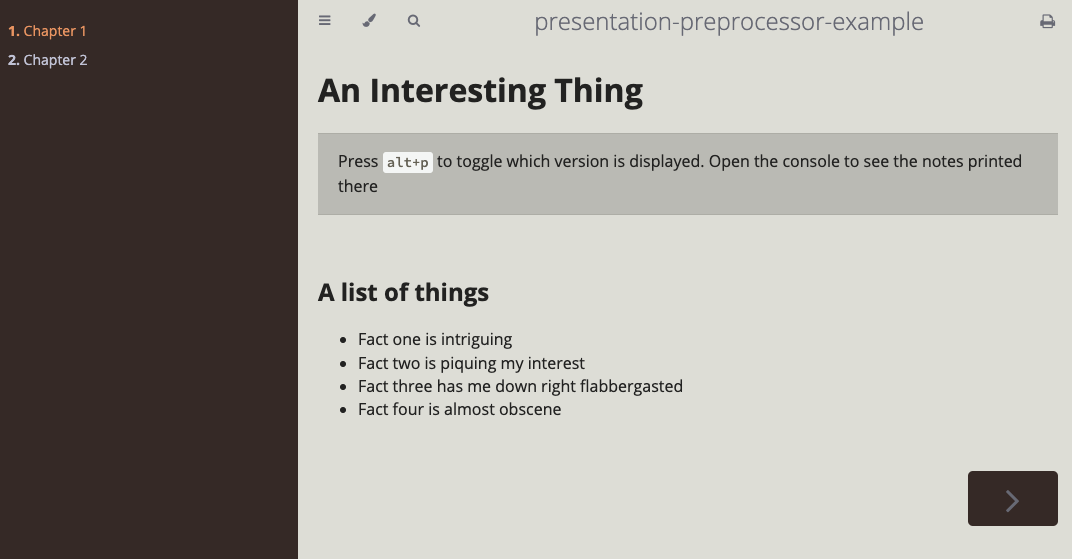
-
notes
本地示例
这里是默认内容,web-only
这里是slides-only: 待完成内容
- Fact one is intriguing
- Fact two is piquing my interest
- Fact three has me down right flabbergasted
- Fact four is almost obscene
资源链接
picGo设置指南
github图床设置
- 新建一个仓库
仓库必须为public,否则只能存储不能外部访问
- 生成访问token: 点击右上角用户头像 > Developer settings > Personal access tokens
- 配置PicGo
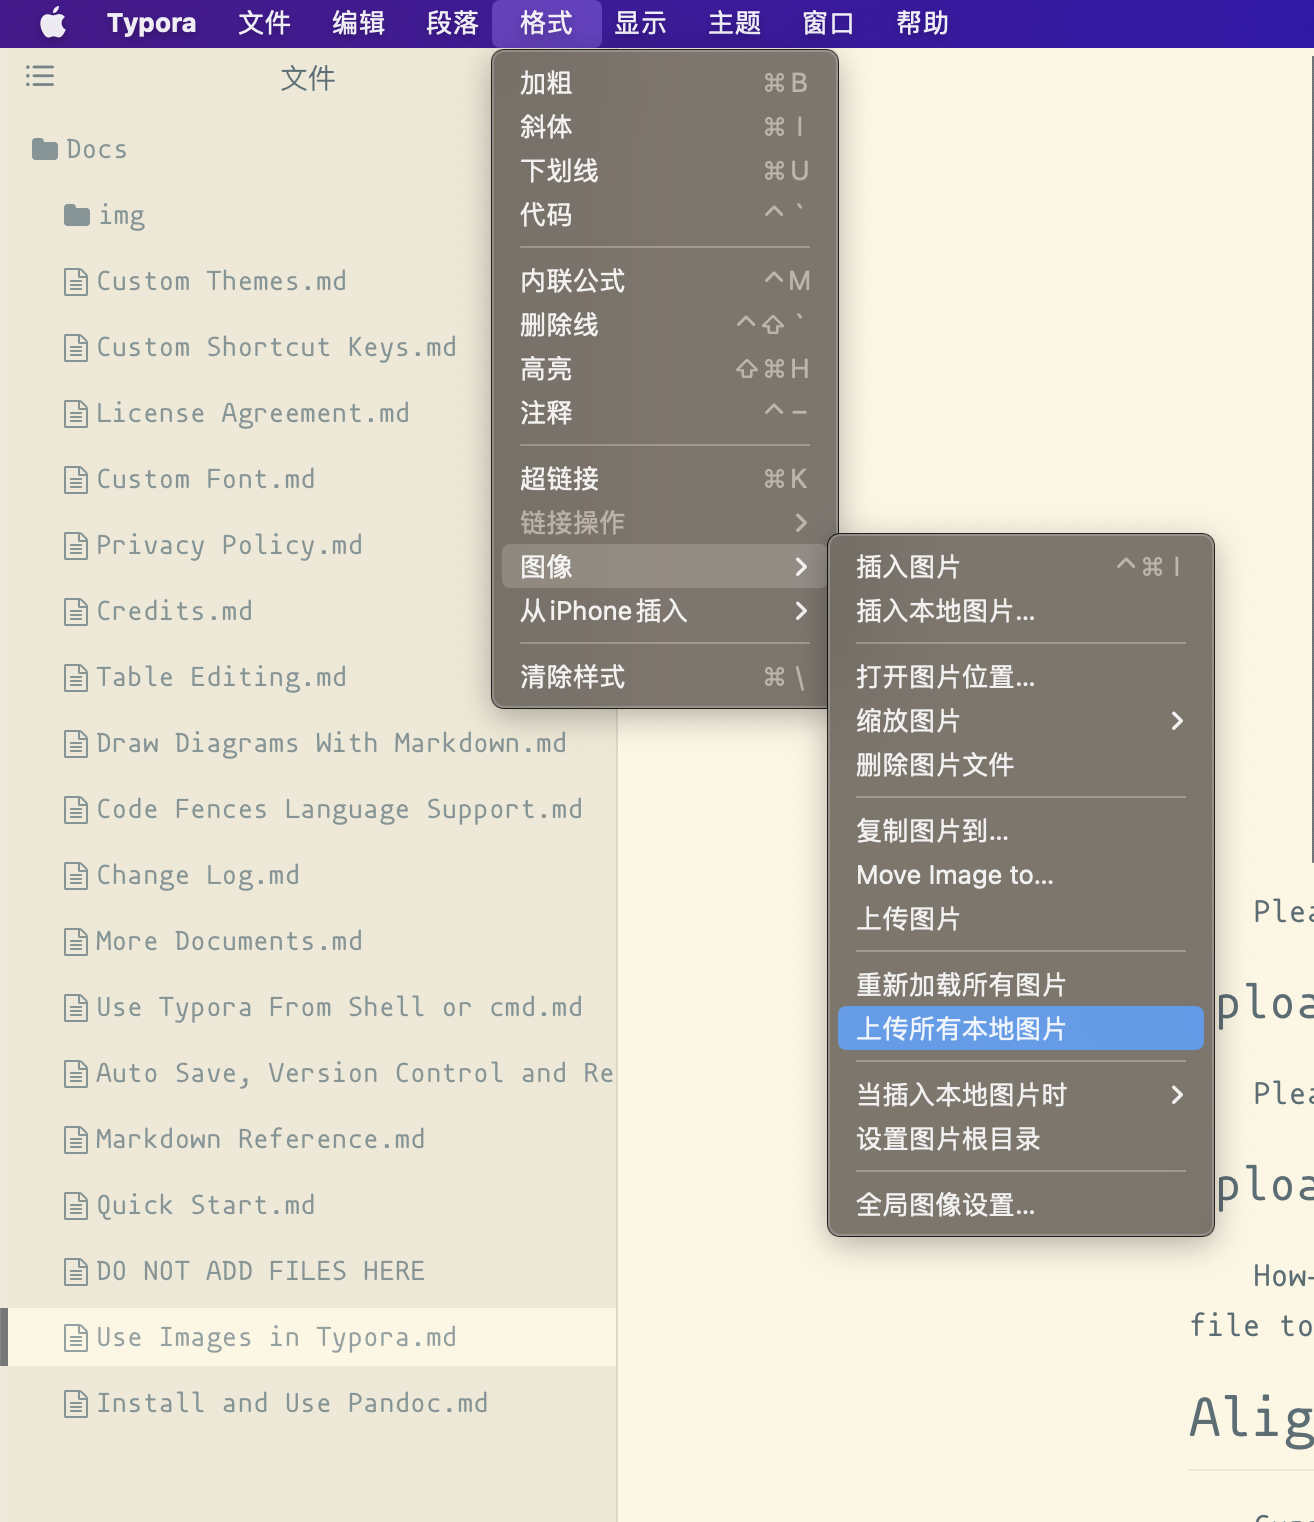
typora使用规范
图片管理
考虑到隐私和公共写作需求,对于文章内的图片管理主要分成两种:
- 首先全部默认放在本地
- 准备发布之前将文章内的图片上传一下并切换为线上地址
如何批量上传本地图片
Upload Images - Typora Support
下列操作将会将当前文章里面的图片全部上传,但是不影响其他文章的图片
使用mermaid绘图
typora内置了mermaid绘图的支持。
iTerm2配置
Status Bar: 很多内容,值得管理
下载并设置环境变量
git clone git@github.com:KuanHsiaoKuo/apple_power_user.git
cd apple_power_user
pwd # 输出的值用于配置环境变量
# ~/.bashrc 或者 ~/.zshrc
export APU=<pwd value>
export VC=$APU/src/app_extensions/iterm2_around/vim_config
export ZC=$APU/src/app_extensions/iterm2_around/zsh_config
由于我用的是zsh,所以这里就修改~/.zshrc
iterm2同步配置方式
设置同步方式
iTerm2 >> Preferences >> General >> Preferences >> Load prefernces from a custom folder or URL
注意选择手动保存。
指向下载的文件夹
同步范围
- 基础颜色配置
- profiles自动登陆服务器配置
但是自动输入密码的文件在~/.ssh/logins,需要另外同步
环境套件资料
iTerm2 + config + plugins
+----------------------------------------------------+
|                                                    |
|                HomeBrew + Plugins                  |
|      +-----------------------------------+         |
|      |                                   |         |
|      |      Tmux + config + plugins      |         |
|      |       +---------------------+     |         |
|      |       |                     |     |         |
|      |       |    zsh/Oh my zsh    |     |         |
|      |       |    +----------+     |     |         |
|      |       |    |    vim   |     |     |         |
|      |       |    +----------+     |     |         |
|      |       |                     |     |         |
|      |       +---------------------+     |         |
|      |                                   |         |
|      |                                   |         |
|      +-----------------------------------+         |
|                                                    |
+----------------------------------------------------+
A. Homebrew Around
/bin/bash -c "$(curl -fsSL https://raw.githubusercontent.com/Homebrew/install/HEAD/install.sh)"
- Around: brew install xxx
osx系统更新了clang++, 一些老版本的python无法安装,比如3.7.5。 pyenv install 3.10.3就没问题
B. tmux配置:tmux_config.md
C. zsh/Oh my zsh + plugins
- tldr-pages/tldr: 📚 Collaborative cheatsheets for console commands
- Peltoche/lsd: The next gen ls command(需配合nerd-fonts)
- ryanoasis/nerd-fonts: Iconic font aggregator, collection, & patcher. 3,600+ icons, 50+ patched fonts: Hack, Source Code Pro, more. Glyph collections: Font Awesome, Material Design Icons, Octicons, & more
- Oh My Zsh - a delightful & open source framework for Zsh
- zsh-syntax-highlighting/INSTALL.md at master · zsh-users/zsh-syntax-highlighting
- zsh-users/zsh-completions: Additional completion definitions for Zsh.
- zsh-users/zsh-history-substring-search: 🐠 ZSH port of Fish history search (up arrow)
- romkatv/powerlevel10k: A Zsh theme(需配合nerd-fonts)
- zsh config
- iterm_around.sh未完善,请一条条执行
python3 -m pip install --upgrade pip
/bin/bash -c "$(curl -fsSL https://raw.githubusercontent.com/Homebrew/install/HEAD/install.sh)"
echo 'eval "$(/opt/homebrew/bin/brew shellenv)"' >> /Users/kuanhsiaokuo/.zprofile
eval "$(/opt/homebrew/bin/brew shellenv)"
brew tap homebrew/cask-fonts
# 下方指令比较耗时,安装之后如果没有生效,就修改Iterm2的fonts为Meslo
# Profiles >> Open Profiles >> Edit Profiles... >> Text >> Fonts
brew install --cask font-hack-nerd-font
brew install tmux
brew install lsd
pip3 install tldr
brew install graphviz
cpan
sudo cpan Graph:Easy
sh -c "$(curl -fsSL https://raw.github.com/ohmyzsh/ohmyzsh/master/tools/install.sh)"
git clone https://github.com/zsh-users/zsh-syntax-highlighting.git ${ZSH_CUSTOM:-~/.oh-my-zsh/custom}/plugins/zsh-syntax-highlighting
git clone https://github.com/zsh-users/zsh-autosuggestions ${ZSH_CUSTOM:-~/.oh-my-zsh/custom}/plugins/zsh-autosuggestions
git clone https://github.com/zsh-users/zsh-history-substring-search ${ZSH_CUSTOM:-~/.oh-my-zsh/custom}/plugins/zsh-history-substring-search
git clone https://github.com/zsh-users/zsh-completions ${ZSH_CUSTOM:-${ZSH:-~/.oh-my-zsh}/custom}/plugins/zsh-completions
git clone --depth=1 https://github.com/romkatv/powerlevel10k.git ${ZSH_CUSTOM:-$HOME/.oh-my-zsh/custom}/themes/powerlevel10k
echo "source $ZC/custom_config" >> ~/.zshrc
source ~/.zshrc
p10k configure
D. vim配置
修改vimrc
sh $VC/source_vimrc.sh
# $VC/source_vimrc.sh
# 在vimrc里面添加source
echo 'source $VC/basic' >> ~/.vimrc
echo 'source $VC/fold_break' >> ~/.vimrc
echo 'source $VC/leader_key' >> ~/.vimrc
echo 'source $VC/tab_key' >> ~/.vimrc
1.当shell脚本具有可执行权限时,用sh filename与./filename执行脚本是没有区别得。./filename是因为当前目录没有在PATH中,所有"."是用来表示当前目录的。
2.sh filename 重新建立一个子shell,在子shell中执行脚本里面的语句,该子shell继承父shell的环境变量,但子shell新建的、改变的变量不会被带回父shell,除非使用export。
3.source filename:这个命令其实只是简单地读取脚本里面的语句依次在当前shell里面执行,没有建立新的子shell。那么脚本里面所有新建、改变变量的语句都会保存在当前shell里面。(当这个shell关闭后就失效了)
进入vim,会自动激活~/.vimrc
关于colorscheme设置为solarized(分支已经包含,可以不用下载)
- 下载vim主题
git clone git://github.com/altercation/vim-colors-solarized.git
cp vim-colors-solarized/colors/solarized.vim ~/.vim/colors/
- 配置
colorscheme solarized
主要分为这几个部分:
- basic
- fold_break
- leader_key
- tab_key
- cscope_conf
zsh_config使用
首先安装zsh
sudo apt-get install zsh
接着安装oh my zsh
wget https://github.com/robbyrussell/oh-my-zsh/raw/master/tools/install.sh
或者安装:
chmod u+x oh_my_zsh_install.sh
./oh_my_zsh_install.sh
zsh-config
我的zsh配置,采用两层配置结构:
~/.zshrc:本地文件(不纳入 Git),只配置路径环境变量custom_config+alias_collections:通用配置(Git 管理)
配置步骤
-
在指定目录 git clone 本仓库
-
创建
~/.zshrc文件,内容如下(根据实际路径修改ZSH_CONFIG):
# ============================================
# 本地环境变量配置(根据实际路径修改)
# ============================================
export ZSH="$HOME/.oh-my-zsh"

# 指向 Git 仓库中 zsh_config 的路径
export ZSH_CONFIG="$HOME/Projects/apple_power_user/src/app_extensions/iterm2_around/zsh_config"

# ============================================
# 加载 Git 管理的通用配置
# ============================================
source "$ZSH_CONFIG/custom_config"
- 执行指令生效:
# 可能需要切换到zsh
source ~/.zshrc
文件说明
| 文件 | 管理方式 | 职责 |
|---|---|---|
~/.zshrc | 本地(不入 Git) | 定义 ZSH、ZSH_CONFIG 路径,然后 source 通用配置 |
custom_config | Git | 主题、插件、通用设置 |
alias_collections | Git | 所有 alias 定义 |
zsh-syntax-hightlighting插件安装
git clone git://github.com/zsh-users/zsh-syntax-highlighting.git $ZSH_CUSTOM/plugins/zsh-syntax-highlighting
# 然后在custom_config里面对plugins添加这个插件
zsh-autosuggestion
git clone https://github.com/zsh-users/zsh-autosuggestions $ZSH_CUSTOM/plugins/zsh-autosuggestions
安装powerlevel10k主题
- 下载主题
git clone https://github.com/romkatv/powerlevel10k.git $ZSH_CUSTOM/themes/powerlevel10k
- custom-config配置主题
ZSH_THEME="powerlevel10k/powerlevel10k"
POWERLEVEL9K_MODE="awesome-patched"
- 重新配置p10k
p10k configure
- 安装字体:默认情况下激活zshrc时会自动安装
ubuntu
apt-get install fonts-powerline
- macos
https://github.com/powerline/fonts/blob/master/SourceCodePro/Source%20Code%20Pro%20for%20Powerline.otf
https://github.com/Falkor/dotfiles/blob/master/fonts/SourceCodePro%2BPowerline%2BAwesome%2BRegular.ttf
nerd fonts使用
- 下载
git clone https://github.com/ryanoasis/nerd-fonts.git
- 安装
./install.sh
- iterm2设置喜欢的字体
一些终端小工具的安装,非zsh/oh-my-zsh
ubuntu:
wget https://github.com/Peltoche/lsd/releases/download/0.17.0/lsd_0.17.0_amd64.deb
sudo dpkg -i lsd_0.17.0_amd64.deb
tmux配置
OSX
# 解绑前缀,改为和screen一样的
unbind C-b
set -g prefix C-a
# bind a reload key
bind r source-file ~/.tmux.conf ; display-message "Config reloaded.."
# 切换分窗格方式
bind | split-window -h
bind - split-window -v
# 重新按照vi习惯定义方向键
bind h select-pane -L
bind j select-pane -D
bind k select-pane -U
bind l select-pane -R
# 交换窗格
bind ^u swapp -U
bind ^d swapp -D
# 将window的起始设置为1
set -g base-index 1
# 将pane的起始下标设为1
set -g pane-base-index 1
# 设置pane编号显示时间
set -g display-panes-time 2000 #2s
# UI 样式调整
setw -g window-status-current-fg white
setw -g window-status-current-bg red
setw -g window-status-current-attr bright
set -g status-justify left
setw -g monitor-activity on
# 开始美化状态栏

# tmux插件管理器
# List of plugins
#  要装的插件直接在这里写就可以了
set -g @plugin 'tmux-plugins/tpm'
set -g @plugin 'tmux-plugins/tmux-sensible'
set -g @plugin 'tmux-plugins/tmux-prefix-highlight'
# 这两个插件是备份tmux会话与自动备份
set -g @plugin 'tmux-plugins/tmux-resurrect'
set -g @plugin 'tmux-plugins/tmux-continuum'
# 打开会话自动保存
set -g @continuum-restore 'on'
# 默认每隔15分钟备份一次,这里改成半个小时
set -g @continuum-save-interval '30'
set -g @plugin 'tmux-plugins/tmux-online-status'
# 添加状态栏电池显示插件
set -g @plugin 'tmux-plugins/tmux-battery'
# 添加tmux侧边栏, prefix-tab
set -g @plugin 'tmux-plugins/tmux-sidebar'
# tmux窗格管理
set -g @plugin 'tmux-plugins/tmux-pain-control'

# Other examples:
# set -g @plugin 'github_username/plugin_name'
# set -g @plugin 'git@github.com/user/plugin'
# set -g @plugin 'git@bitbucket.com/user/plugin'


# 关于复制方式
#set-window-option -g mode-keys vi
#bind-key -t vi-copy 'v' begin-selection
#bind-key -t vi-copy 'y' copy-selection

# 状态栏统一设置
# Update the status line every sixty seconds
set -g status-interval 60
# Center the window list in the status line
set -g status-justify centre
# enable activity alerts
setw -g monitor-activity on
# Displays a message in the message area when there is activity in another window
set -g visual-activity on
set -g status-left-length 200
set -g status-right-length 200
##H
#Hostname of local host
##h
#Hostname of local host without the domain name
##F
#Current window flag
##I
#Current window index
##P
#Current pane index
##S
#Current session name
##T
#Current window title
##W
#Current window name
###
#A literal #
##(shell-command)
#First line of the shell command’s output
##[attributes]
#Color or attribute change
set -g status-left "session:#S window:#W pane:#P"
# 设置电量状态所用的图标
set -g @batt_charged_icon "😎"
set -g @batt_charging_icon "👍"
set -g @batt_discharging_icon "👎"
set -g @batt_attached_icon "😐"
set -g @batt_full_charge_icon "🌕 "
set -g @batt_high_charge_icon "🌖 "
set -g @batt_medium_charge_icon "🌗 "
set -g @batt_low_charge_icon "🌘 "
set -g status-right '#{battery_status_bg} Batt: #{battery_icon} #{battery_percentage} #{battery_remain} | Continuum status: #{continuum_status} | Online: #{online_status} | %a %h-%d %H:%M '
# 添加powerline支持
source "/usr/local/bin/powerline/powerline/bindings/tmux/powerline.conf"
# Initialize TMUX plugin manager (keep this line at the very bottom of tmux.conf)
run '~/.tmux/plugins/tpm/tpm'
# bind a reload key
bind r source-file ~/.tmux.conf ; display-message "Config reloaded.."
# 切换分窗格方式
bind | split-window -h
bind - split-window -v
# 重新按照vi习惯定义方向键
bind h select-pane -L
bind j select-pane -D
bind k select-pane -U
bind l select-pane -R
# 将window的起始设置为1
set -g base-index 1
# 将pane的起始下标设为1
set -g pane-base-index 1
# UI 样式调整
setw -g window-status-current-fg white
setw -g window-status-current-bg red
setw -g window-status-current-attr bright
set -g status-justify left
setw -g monitor-activity on
# 开始美化状态栏

# tmux插件管理器
# List of plugins
#  要装的插件直接在这里写就可以了
set -g @plugin 'tmux-plugins/tpm'
set -g @plugin 'tmux-plugins/tmux-sensible'
set -g @plugin 'tmux-plugins/tmux-prefix-highlight'
# 这两个插件是备份tmux会话与自动备份
set -g @plugin 'tmux-plugins/tmux-resurrect'
set -g @plugin 'tmux-plugins/tmux-continuum'
# 打开会话自动保存
set -g @continuum-restore 'on'
# 默认每隔15分钟备份一次,这里改成半个小时
set -g @continuum-save-interval '30'
set -g @plugin 'tmux-plugins/tmux-online-status'
# 添加状态栏电池显示插件
set -g @plugin 'tmux-plugins/tmux-battery'
# 添加tmux侧边栏, prefix-tab
set -g @plugin 'tmux-plugins/tmux-sidebar'
# tmux窗格管理
set -g @plugin 'tmux-plugins/tmux-pain-control'

# Other examples:
# set -g @plugin 'github_username/plugin_name'
# set -g @plugin 'git@github.com/user/plugin'
# set -g @plugin 'git@bitbucket.com/user/plugin'


# 关于复制方式
#set-window-option -g mode-keys vi
#bind-key -t vi-copy 'v' begin-selection
#bind-key -t vi-copy 'y' copy-selection

# 状态栏统一设置
# Update the status line every sixty seconds
set -g status-interval 60
# Center the window list in the status line
set -g status-justify centre
# enable activity alerts
setw -g monitor-activity on
# 设置窗口名字不再自动变化
set-option -g allow-rename off
# 设置窗格名字
set-option -g pane-border-format " #P: #{pane_current_command} "
# Enable names for panes
set -g pane-border-status top
# Displays a message in the message area when there is activity in another window
set -g visual-activity on
set -g status-left-length 100
set -g status-right-length 200
set -g status-left "session:#S window:#I pane:#P"
# 设置电量状态所用的图标
set -g @batt_charged_icon "😎"
set -g @batt_charging_icon "👍"
set -g @batt_discharging_icon "👎"
set -g @batt_attached_icon "😐"
set -g @batt_full_charge_icon "🌕 "
set -g @batt_high_charge_icon "🌖 "
set -g @batt_medium_charge_icon "🌗 "
set -g @batt_low_charge_icon "🌘 "
set -g status-right '#{battery_status_bg} Batt: #{battery_icon} #{battery_percentage} #{battery_remain} | Continuum status: #{continuum_status} | Online: #{online_status} | %a %h-%d %H:%M '
# 添加powerline支持
#source "/usr/local/lib/python3.6/site-packages/powerline/bindings/tmux/powerline.conf"
# Initialize TMUX plugin manager (keep this line at the very bottom of tmux.conf)
run '~/.tmux/plugins/tpm/tpm'

# 设置resurrect保存窗格的内容page
set -g @resurrect-capture-pane-contents 'on'
# for vim
set -g @resurrect-strategy-vim 'session'

# ----------------------------tricks-------------
# displays "prefix" (in red) in statusline when prefix is pressed
set -g status-left "#[bg=red]#{s/root//:client_key_table}"
# view current pane history (including colors) with "less" in new window
bind-key u capture-pane -S - -E - -e -b lesshist \; new-window -n "history" 'tmux show-buffer -b lesshist| less -R +G'
Linux(Simplified)
# 解绑前缀,改为和screen一样的
unbind C-b
set -g prefix C-a
# 切换分窗格方式
bind | split-window -h
bind - split-window -v
# 重新按照vi习惯定义方向键
bind h select-pane -L
bind j select-pane -D
bind k select-pane -U
bind l select-pane -R
# 交换窗格
bind ^u swapp -U
bind ^d swapp -D
# 将window的起始设置为1
set -g base-index 1
# 将pane的起始下标设为1
set -g pane-base-index 1
# 设置pane编号显示时间
set display-panes-time 2000 #2s
# UI 样式调整
setw -g window-status-current-fg white
setw -g window-status-current-bg red
setw -g window-status-current-attr bright
set -g status-justify left
setw -g monitor-activity on
vim专业使用
Macros
对于临时的复杂操作,可以使用宏。这里举例一下
- 浏览模式下按 q
- 选择一个 mark, 比如 e
- 开始记录批量操作
- 按 q 退出宏记录
- :echo @e 或者:reg @e 可以查看宏记录
- 编辑修改:打开新的 vim,"ep, 编辑修改,复制,"eyy
- 列出所有的宏::reg
- 清除指定宏::let @e=''
相关资料
VimScript
vim本身提供一种脚本语言,帮助进行个性化操作。
相关资料
- Tutorial: vimscript
- Vimscript functions cheatsheet
- VimScript 五分钟入门(翻译) - 知乎
- Five Minute Vimscript
- Vim documentation: usr_41
场景一:繁琐内容处理
我比较喜欢在idea里面写markdown文档,但是idea格式化mdbook的include语法时会出现问题, 自动添加空格导致语法失效。
这里自己写了一个vimscript解决这个问题,正好举例如何使用。
代码内容
function! MdbookIncludeSyntaxFormatInWholeBuffer()
    let include_replace = {
      \ '{{ #': '{{#',
      \ '# include': '#include',
      \ 'include\.\.': 'include\ \.\.',
      \ '\/ ': '\/',
      \ ' \/': '\/',
      \ ': ': ':',
      \ ' }}': '}}'
    \ }
    let l = 1
    for line in getline(1,"$")
        if stridx(line,  'include') > -1
            let replaced_line = line
            for [substitute_key, substituted] in items(include_replace)
                "echo l.replaced_line
                "echo l.substitute_key.substituted
                "call setline(l, substitute(line, substitute_key, substituted, "g"))
                let replaced_line = substitute(replaced_line, substitute_key, substituted, "g")
            endfor
            call setline(l, replaced_line)
        endif
        let l = l + 1
    endfor
    "保存文件
    write
    "退出vim
    exit
endfunction
"将会在source的时候直接执行
"call AddSpaceBeforeEqualInWholeBuffer()
"source之后将会自定义一个指令
command Ir call MdbookIncludeSyntaxFormatInWholeBuffer()
使用说明
- vim内:命令模式输入
Ir - 终端内:
vim -c 'Ir' <target_file>
MacOS X 专用命令行梳理
open
pbcopy and pbpaste
tree -L 1 | pbcopy
mdfind
screencapture
launchctl
say
diskutil
brew
列表清单
快捷操作
| Tab | Auto-complete file and folder names |
|---|---|
| Ctrl + A | Go to the beginning of the line you're currently typing on |
| Ctrl + E | Go to the end of the line you're currently typing on |
| Ctrl + U | Clear the line before the cursor |
| Ctrl + K | Clear the line after the cursor |
| Ctrl + W | Delete the word before the cursor |
| Ctrl + T | Swap the last two characters before the cursor |
| Esc + T | Swap the last two words before the cursor |
| Ctrl + L | Clear the screen |
| Ctrl + C | Kill whatever you're running |
| Ctrl + D | Exit the current shell |
| Option + → | Move cursor one word forward |
| Option + ← | Move cursor one word backward |
| Ctrl + F | Move cursor one character forward |
| Ctrl + B | Move cursor one character backward |
| Ctrl + Y | Paste whatever was cut by the last command |
| Ctrl + Z | Puts whatever you're running into a suspended background process |
| Ctrl + _ | Undo the last command |
| Option + Shift + Cmd + C | Copy plain text |
| Shift + Cmd + V | Paste the selection |
| exit | End a shell sessio |
基础操作
| / (Forward Slash) | Top level directory |
|---|---|
| . (Single Period) | Current directory |
| .. (Double Period) | Parent directory |
| ~ (Tilde) | Home directory |
| sudo [command] | Run command with the security privileges of the super user |
| nano [file] | Opens the Terminal editor |
| open [file] | Opens a file |
| [command] -h | Get help about a command |
| man [command] | Show the help manual of the command |
| Change Directory | |
| cd | Home directory |
| cd [folder] | Change directory, e.g. cd Documents |
| cd ~ | Home directory |
| cd/ | Root of the drive |
| cd - | Previous directory or folder you last browsed |
| pwd | Show your working directory |
| cd.. | Move up to the parent directory |
| cd../.. | Move up two levels |
list
| ls | Display the name of files and subdirectories in the directory |
|---|---|
| ls -C | Force multi-column output of the listing |
| ls -a | List all entries including those with .(period) and ..(double period) |
| ls -1 | Output the list of files in one entry per line format |
| ls -F | Display a / (slash) immediately after each path that is a directory, * (asterisk) after executable programs or scripts, and @ after a symbolic link |
| ls -S | Sort files or entries by size |
| ls -l | List in a long format. Includes file mode, owner and group name, date and time file was modified, pathname, and more |
| ls -l / | List of the file system from root with symbolic links |
| ls -lt | List the files sorted by time modified (most recent first) |
| ls -lh | Long listing with human readable file sizes in KB, MB, or GB |
| ls -lo | List the file names with size, owner, and flags |
| ls -la | List detailed directory contents, including hidden files |
文件磁盘
| du | List usage for each subdirectory and its contents |
|---|---|
| du -sh [folder] | Human readable output of all files in a directory |
| du -s | Display an entry for each specified file |
| du -sk* | sort -nr | List files and folders, totaling the size including the subfolders. Replace sk* with sm* to list directories in MB |
| df -h | Calculate your system's free disk space |
| df -H | Calculate free disk space in powers of 1,000 (as opposed to 1,024) |
参考资源
- Eight Terminal Utilities Every OS X Command Line User Should Know · mitchchn.me
- The Mac Terminal Commands Cheat Sheet
- An A-Z Index of the Apple macOS command line - SS64 Command line reference
IINA深度使用
简介
Project IINA,是一个基于 mpv、契合 macOS 设计风格、力求做到最佳用户体验、轻便且功能强大的视频播放器项目。
MPV指令定制与配置文件
截图格式自定义
screenshot-template: %{filename}-%p
- 按照视频文件名先分段,方便统一存放
本来打算用screenshot-directory参数,但是要报错,就算了
- %p: 截屏的时间,可以排序。这样方便后续按时间插入新章节。
设置播放速度
Meta+[ multiply speed 0.5 Meta+] add speed 0.25 Alt+Meta+[ multiply speed 0.9091 Alt+Meta+] multiply speed 1.1 Meta+\ set speed 1.0
- 非关键内容快速过
- 关键内容放慢速度
完整配置文件
Jetbrains系列IDE共性与特性介绍
共性
快捷键整理
python配置虚拟环境
- cmd+; -> 新增虚拟环境
- add configuration -> 将虚拟环境配置给当前项目
可以配置远程虚拟环境/docker环境
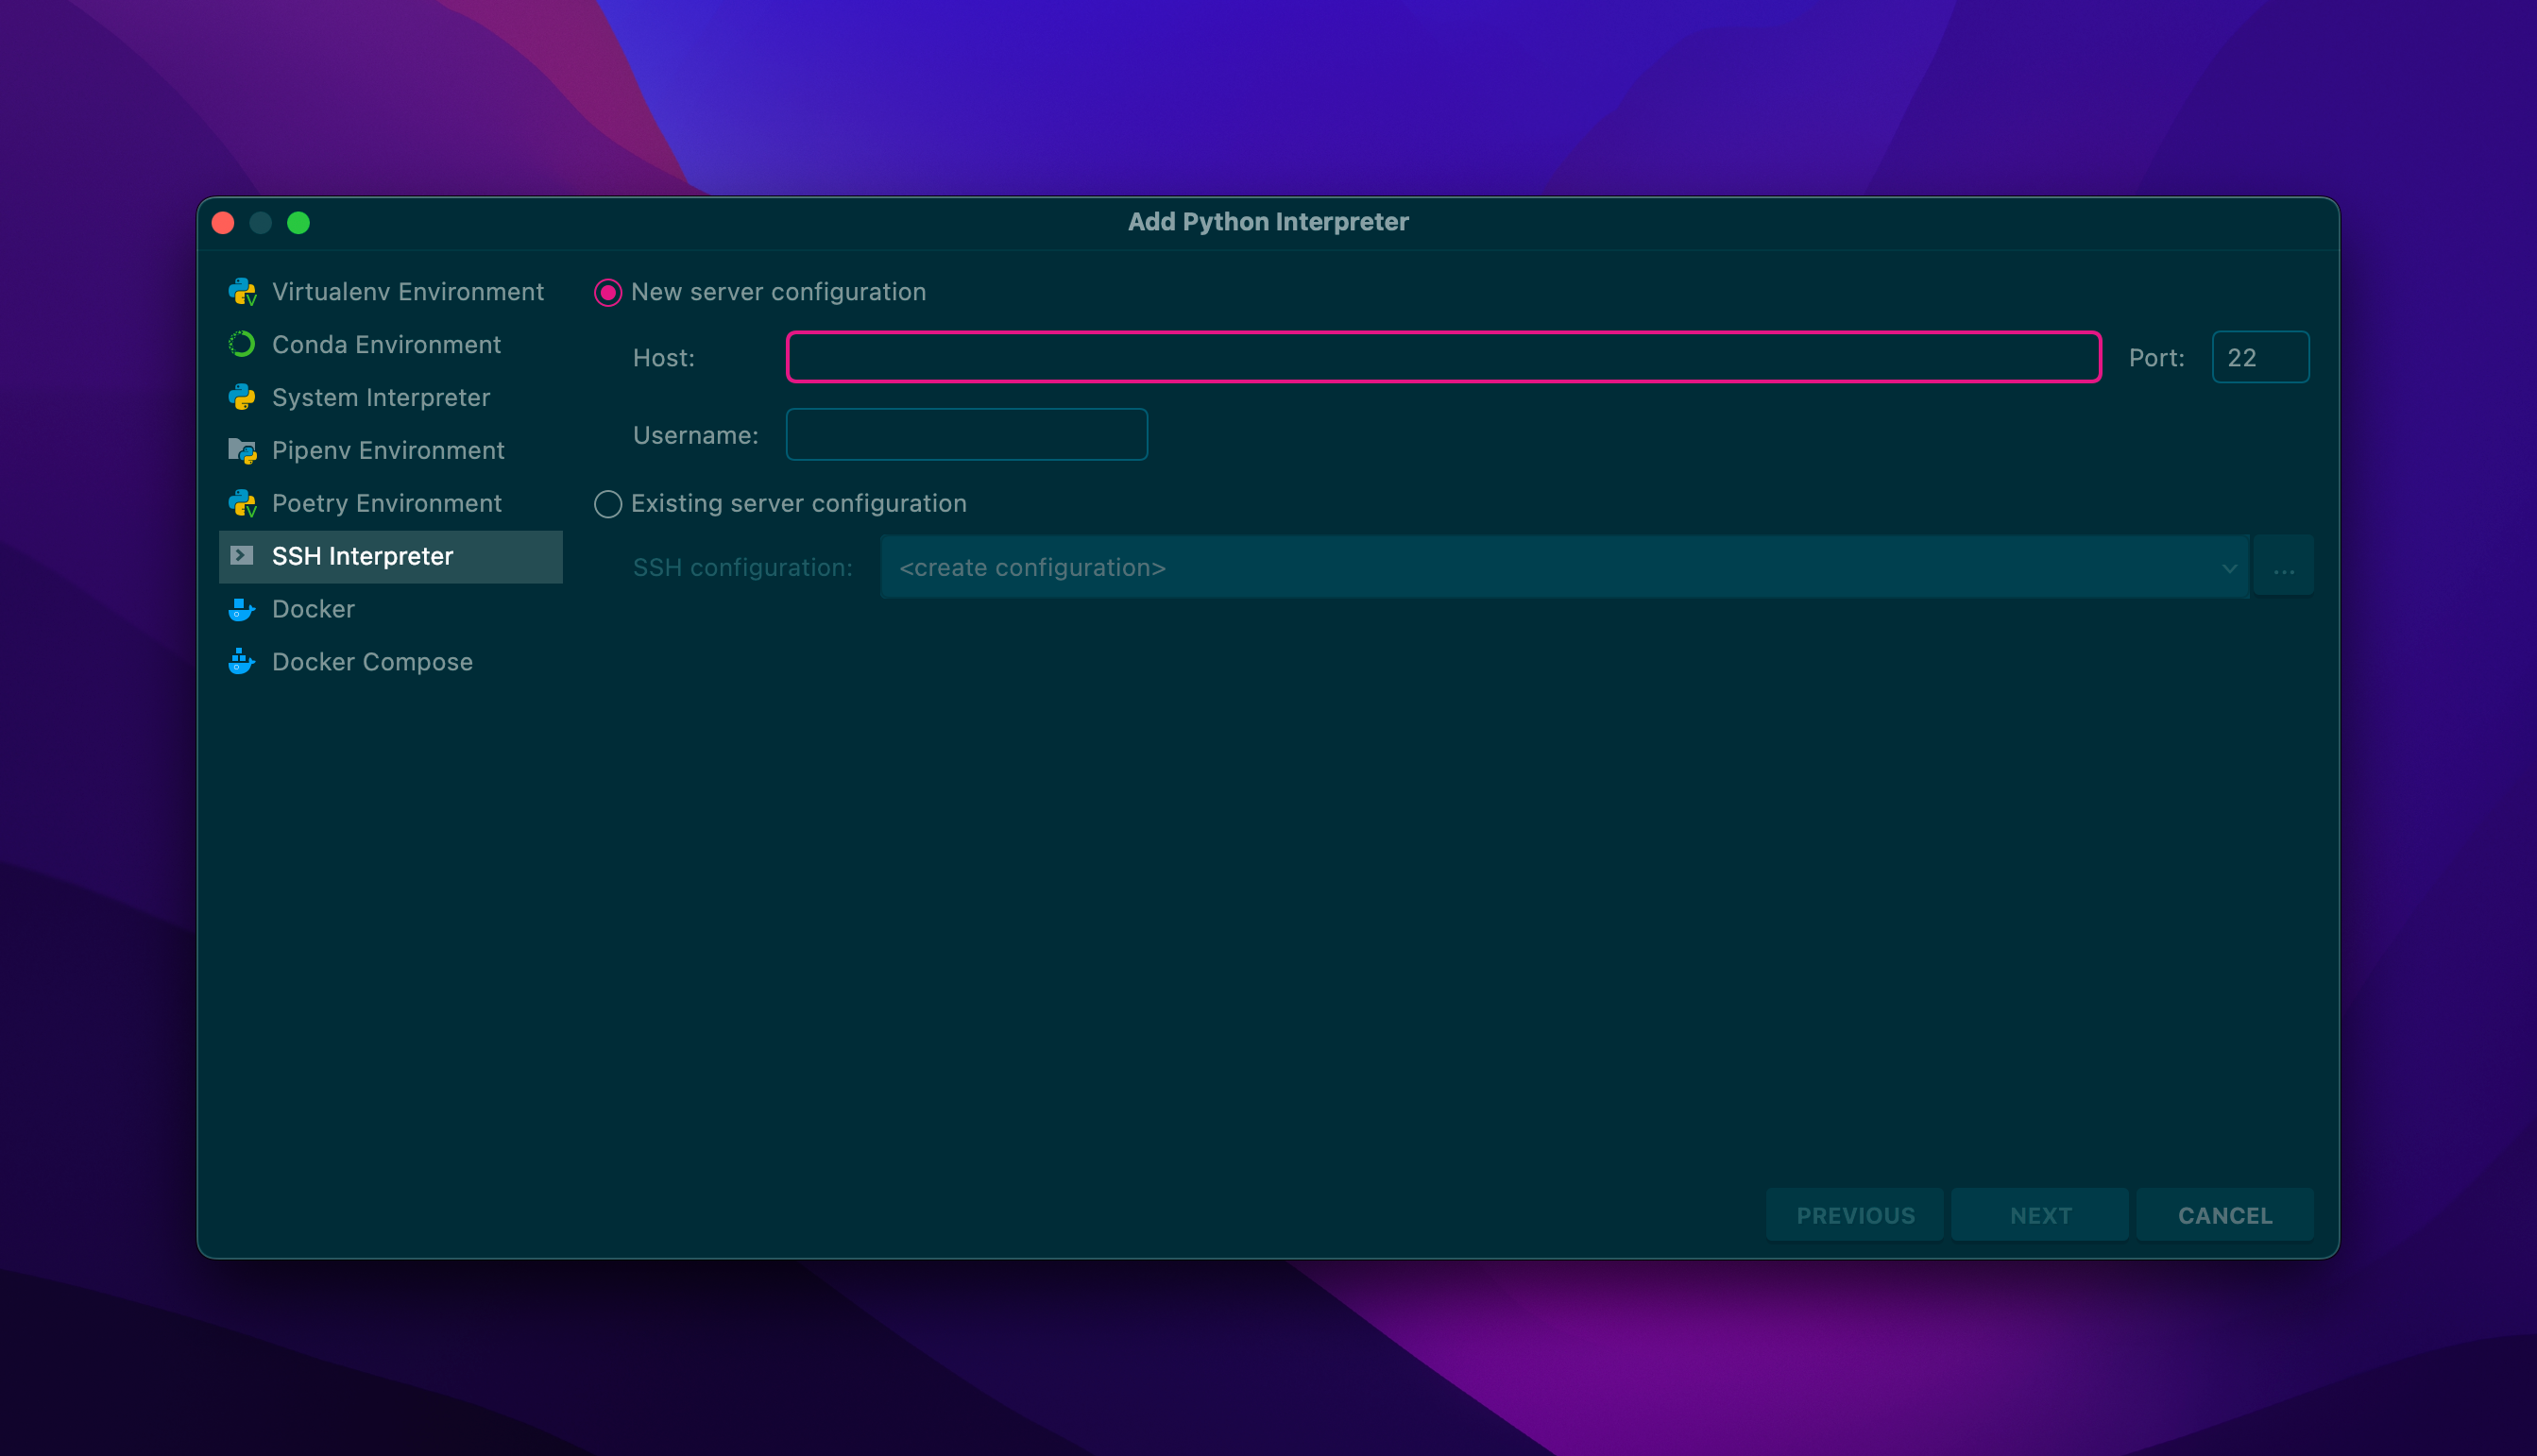
Tab方式打开项目
由于本人喜欢一个窗口打开多个项目,然后用tab方式来进行项目切换,所以专门找了一下设置方式:
- macOS设置:系统偏好设置 > 通用 > 首选以标签页方式打开 > 始终
- Jetbrains设置是否新窗口打开
配置代理
指定项目root
由于idea等默认需要一个source root,所以有时候打开项目的路径不是它可用的,就可以自己右键指定文件目录设置为source root
Omni系列产品介绍
参考资源
OmniPlan介绍
基础流程
- 确定项目的基本信息和控制项
- 编写任务分解
- 为每一个任务确定他的投人
- 添加资源,把资源分配到任务中去
- 确定每一项工作任务的先后顺序和关系
- 自动排程后检查每一项资源的使用倩况
完善/维护流程
复查
- 检查任务间的关联是否符合预期一一网络视图
- 使用“显示安排影响因素”和“检查器"确认调整后的任务关联
- 计划是否有优化空间一一甘特图直接调整任务
增加注释
- 补充说明任务是什么
- 多方合作时,标明需要其他方的何种资源的支持
常用快捷键
- 切换检查视图:cmd+shift+i(info)
小技巧
导出选择
主要还是按照任务、资源、项目大纲、网络图这四块分别导出后再合并
任务安排
资源使用
大纲视图
网络视图
容忍期
报告选择
参考资源
-
【OmniPlan系列】2_创建新的项目计划(1)_: 任务分解
- 项目大纲介绍
-
- 任务(甘特)视图介绍: gantt-view
- 设置任务时间, 任务时间显示,资源分配,任务关联关系
- 任务类型:任务、里程碑(确定两个任务的先后关系)、吊床、群组
- 自动排程
- 检查任务关系:顺序是否错乱、每个资源的任务是否线性安排、资源视图查看是否有重合(两个资源做同一件事)
- 基础流程
- 导出方式
-
- 资源视图使用
- 考虑国家假期、节假日安排等
- 调整工作时间、工作日
- 添加加班时间,比如周末
- 去掉休息日:在资源界面按住shift拖拽
- 可以针对项目、单个资源设置
-
[【OmniPlan教程】4 完善项目进度计划(https://www.bilibili.com/video/BV1bV411h7oE)
- 复查工作任务:网络视图, 可以直接拖拽连接快速安排任务关联
- 显示安排影响因素:暂未找到,只能在右侧任务检查器菜单看到
- 任务优化:鼠标拖拽+任务锁定
- 为工作任务添加注释
- 如何完善项目计划
-
【OmniPlan教程】5_资源视图与资源使用方法-1_哔哩哔哩_bilibili
- 资源视图的组成:人员、设备、素材、群组
- 任务检查器 > 更改资源分配时: 任务持续时间、任务工作量、已分配额度(可多人协作完成任务)
-
【OmniPlan教程】6_跟踪项目执行_哔哩哔哩_bilibili
- 尽量不要让一个任务多人参与,如果确实需要,可以考虑拆解为更细的任务
- 关键路径:显示甘特 > 重要路径
- 自定义工具栏可以设置重要路径
- 跟踪项目执行:对应设置基线,一般在确认之后建立,创建基线之后就可以将实际完成情况与计划进行对比
- 设置任务完成进度
- 任务进度有变化之后,可以选择重新排程
- 拆分任务:当投入资源中途被调用,比如出差,紧急处理其他任务
- 过滤任务:可以指定查看某些状态下的任务
-
【OmniPlan教程】7_调整项目显示样式_哔哩哔哩_bilibili
- 项目字体、项目颜色等
- 自定义特殊任务样式
-
【OmniPlan教程】8_资源分级及其影响因素_哔哩哔哩_bilibili
- 介绍自动排程的作用
- 影响资源分级的因素(可以☑️自动资源分级)
- 资源
- 任务间的关联关系
- 安排:尽早安排/尽晚安排
- 优先级:数值越高越优先
- 时限(容忍期):在某个时间段内完成,按住shift键拖动任务两端即可
-
【OmniPlan系列】9 OmniPlan最后一课_哔哩哔哩_bilibili
- 回顾前面8集内容
- 如何输出当前项目进度:可以自定义输出模版
- 文件 》新建仪表盘:可以拖入多个项目的计划统一查看
OmniFocus介绍
参考资源
OmniGraffle介绍
参考资源
OmniOutliner介绍
参考资源
油猴深度使用
精选脚本
Userscript-plus: 显示当前网站可用油猴脚本
- Automatically appear in the lower right corner, recommend scripts for you, and will automatically disappear after 10 seconds
- Filter the top 50 script with the highest score
- The script list supports search filtering
- The script list supports custom sorting
- Supports one-click installation script
- Support for viewing script details
- Support access to the script home page and author home page
- Click the close button, the current site this session all the pages will no longer appear prompt box
- A prompt box is displayed only when found available script for the current site
- i18n international multilingual support.(Locale contributions are welcomed!)
- Vue + iView UI design smooth and beautiful
集锦
- Toc Bar, 自动生成文章大纲。知乎、微信公众号等阅读好伴侣
- Azero-NG/csdnRemoveAd: csdn极致去广告
- soscripted/sox: Stack Overflow Extras: a userscript for the Stack Exchange websites to add a bunch of optional toggle-able features
参考资源
- Greasy Fork: 用户脚本
- 首页 | Userscript.Zone
- Search · "==UserScript=="
- OpenUserJS
- Tampermonkey • 常问问题
- Tampermonkey • 文档
- tampermonkey-script · GitHub Topics
工作流整理
主要介绍多app之间如何协同工作
关于marginnote使用自定义模版
由于marginnote自带的模版太简单,所以找了一下如何使用自定义模版导出
一、自定义模版导出:不可行
二、自动在anki中修改模版
- 对照字段更换模版可行
- 需要解决MNLink的超链接问题
- HTML Window source - AnkiWeb
- showdown卡片模版添加MNLink字段
- 只要卡片标题不修改,就不会覆盖更新
- 正面备注都会出现在标题
- 背面备注都在back里面
最终结果放在《自定义anki模版》
多媒体资料章节化工作流
缘起
一直以来我主要倾向于读文本资料来学习,其实人的接收讯息方式还有视觉和听觉,遂决定整理出一套将多媒体资料进行管理的想法。
这里的多媒体主要指视频、音频和图片,其中图片的管理主要是用github图床+eagle。而视频和音频一旦过长,在寻找知识点的时候就很麻烦,经过验证,发现可以用ffmpeg给多媒体文件的方式添加章节。
Step1. 相关视频/音频合并-ffmpeg
Step2. 使用IINA结合MPV的指令自动化创建章节
Step3. 将章节文本压入到多媒体文件-ffmpeg
Step4. 播放工具选择
- 电脑端可以选择IINA,基于MPV
- 移动端选择VLC Player
这里再放一下二者的区别:
关于音频文件处理
可以添加图片,将mp3转为mp4
# 转化图片格式
ffmpeg -i 07.ownership.webp 07.ownership.jpg
# 提取mp3
ffmpeg -i 07.ownership.mp4 -f mp3 -vn 07.ownership.mp3
# 合并为mp4
ffmpeg -loop 1 -i 07.ownership.jpg -i 07.ownership.mp3 -c:a copy -c:v libx264 -shortest out.mp4