PlantUML
plantuml & Graphviz
示例
添加超链接、提示、标签
```kroki-plantuml
@startmindmap
* Build a local blockchain [[#build-a-local-blockchain jump]]
@endmindmap
```
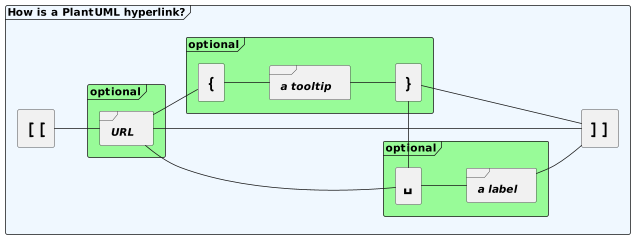
超链接
@startuml
[[link{with_bracket}&id=10]]:Some activity\n(with link with brackets)\n""link{with_bracket}&id=10"";
[["link{with_bracket}"{}]]:Some activity\n(with link with brackets and empy tooltip)\n"""link{with_bracket}"{}"";
[["link{with_bracket}"{with tooltip}]]:Some activity\n(with link finished by brackets and tooltip)\n"""link{with_bracket}"{with tooltip}"";
[["link{with_bracket}&id=10"{with tooltip}]]:Some activity\n(with link with brackets and tooltip)\n"""link{with_bracket}&id=10"{with tooltip}"";
@enduml
思维导图
OrgMode 语法
@startmindmap
'orgmode
* Debian
** Ubuntu
*** Linux Mint
*** Kubuntu
*** Lubuntu
*** KDE Neon
** LMDE
** SolydXK
** SteamOS
** Raspbian with a very long name
*** <s>Raspmbc</s> => OSMC
*** <s>Raspyfi</s> => Volumio
@endmindmap
Markdown语法
@startmindmap
* root node
	* some first level node
		* second level node
		* another second level node
	* another first level node
@endmindmap
运算符决定方向
@startmindmap
+ OS
++ Ubuntu
+++ Linux Mint
+++ Kubuntu
+++ Lubuntu
+++ KDE Neon
++ LMDE
++ SolydXK
++ SteamOS
++ Raspbian
-- Windows 95
-- Windows 98
-- Windows NT
--- Windows 8
--- Windows 10
@endmindmap
多行表示
@startmindmap
* Class Templates
**:Example 1
<code>
template <typename T>
class cname{
void f1()<U+003B>
...
}
</code>
;
**:Example 2
<code>
other template <typename T>
class cname{
...
</code>
;
@endmindmap
多根节点
@startmindmap
* Root 1
** Foo
** Bar
* Root 2
** Lorem
** Ipsum
@endmindmap
改变节点颜色
@startmindmap
*[#Orange] Colors
**[#lightgreen] Green
**[#FFBBCC] Rose
**[#lightblue] Blue
@endmindmap
移除方框
@startmindmap
* root node
** some first level node
***_ second level node
***_ another second level node
***_ foo
***_ bar
***_ foobar
** another first level node
@endmindmap
指定左右方向
@startmindmap
* count
** 100
*** 101
*** 102
** 200

left side

** A
*** AA
*** AB
** B
@endmindmap
带标签的完整示例
@startmindmap
caption figure 1
title My super title

* <&flag>Debian
** <&globe>Ubuntu
*** Linux Mint
*** Kubuntu
*** Lubuntu
*** KDE Neon
** <&graph>LMDE
** <&pulse>SolydXK
** <&people>SteamOS
** <&star>Raspbian with a very long name
*** <s>Raspmbc</s> => OSMC
*** <s>Raspyfi</s> => Volumio

header
My super header
endheader

center footer My super footer

legend right
  Short
  legend
endlegend
@endmindmap
应用:rust的模块系统整理
@startmindmap
scale 900 width
skinparam monochrome reverse
skinparam classFontName ttf-wqy-zenhei
*[#lightblue] Rust模块系统
**[#FFBBCC] 两种视角
*** 程序猿
**** 文件结构
*** rustc:module tree
****:可执行root
<code>
src/main.rs
-> binary crate(默认与cargo.toml->[package].name同名)
</code>;
****:库root
<code>
src/lib.rs
-> lib crate(默认与cargo.toml->[package].name同名)
</code>;
****:crate
<code>编译的最小基本单位</code>;
**[#FFBBCC] project的五个层级
*** workspace
*** package
*** crates
*** modules
*** paths
**[#FFBBCC] bin文件夹:可以直接使用src/lib.rs
**[#lightgreen] crates.io保存的什么?
*** 发布流程
**** cargo login
****[#lightgreen]:cargo package
<code>
$ cargo help package
从帮助信息结合substrate源码实验🧪可知:
1. 从当前目录开始执行路径开始,首先去父文件夹找Cargo.toml,
然后找当前目录的Cargo.toml,找不到就报错
2. 找到的Cargo.toml如果有workspace配置,
就按照workspace里面的subpackage顺序来依次打包
3. 每次打包的标志为src/main.rs或者src/lib.rs,
且src同级存在Cargo.toml,Cargo.toml里面有[package]
4. 开始打包为上传到crate.io的格式
5. 依次打包
6. 所有依赖必须是在crate.io可以找到的,找不到就报错
7. 以包含Cargo.toml父文件夹为项目根目录,
放在target/package里面
</code>;
**** cargo publish
**** cargo yank
**** cargo owner
***[#lightgreen]:crate.io包含代码总结
<code>
1. 只包含最小crate内容,也就是src/main.rs或者src/lib.rs + Cargo.toml
2. rust只能允许一级嵌套,使用workspace分出subpackage
</code>;
@endmindmap
使用skinparam进行样式设置
颜色
@startuml
colors
@enduml
字体与大小
- skinparam classFontColor red
- skinparam classFontSize 10
- skinparam classFontName Aapex
文本对齐
- skinparam sequenceMessageAlign center/right/left
@startuml
skinparam sequenceMessageAlign center
Alice -> Bob : Hi
Alice -> Bob : This is very long
@enduml
手写体
下面罗列当前版本plantuml可用样式
调整生成图片大小
scale 900 width/height
语法概览
语法全览
- Ascii Math syntax for complex formulas
- Archimate Support
- Activity Diagram syntax and features
- Class Diagram syntax and features
- Component Diagram syntax and features
- Use creole syntax to style your texts
- Deployment Diagram syntax and features
- Draw GUI mockup with Salt
- Define graphical sprites
- Customize your diagrams with themes
- Gantt Diagram syntax and features
- Timing Diagram syntax and features
- Use of Openiconic
- nwdiag
- State Diagram syntax and features
- PlantUML Standard Library
高级使用
标题、页脚与分页
高级语法:Preprocessing
参考资源
-
在线服务:PlantUML Web Server
-
本来选用这个crate, 但是安装太麻烦: -
plantuml-stdlib/Azure-PlantUML: PlantUML sprites, macros, and other includes for Azure services
-
plantuml-stdlib/Archimate-PlantUML: PlantUML macros and other includes for Archimate Diagrams
-
选用这个mdbook插件:
I created this preprocessor because mdbook-plantuml wasn’t working for me—specifically, mdbook-plantuml is currently incompatible with mdbook watch and mbbook serve because it triggers a rebuild loop.
This crate is quite simple and non-customizable at this point as it does all that I need it to for my own purposes. Feel free to fork and/or PR away though, and I’ll be happy to include changes.
小插曲一:给mdbook-puml安装合适的plantuml
- plantuml是基于graphviz的一个工具, Graphviz 是一个开源的图可视化工具,非常适合绘制结构化的图标和网络。它使用一种叫 DOT 的语言来表示图形。
官网可以看到,官方不再提供编译好的各个平台版本,现在都是第三方编译好保存的。这也难怪ubuntu的版本那么低。
-
plantuml的uml图生成需要的graphviz版本较低
-
plantuml新出的非uml图,比如思维导图,需要较新的plantuml才能支持
-
osx的brew可以安装3.0版本graphviz,plantuml的版本也比较新,支持思维导图渲染
- plantuml版本:1.2022.4, graphviz版本:3.0.0
brew install plantuml                                                                                                                            ─╯
Warning: plantuml 1.2022.4 is already installed and up-to-date.
To reinstall 1.2022.4, run:
  brew reinstall plantuml

brew install graphviz                                                                                                                            ─╯
Warning: graphviz 3.0.0 is already installed and up-to-date.
To reinstall 3.0.0, run:
  brew reinstall graphviz
- ubuntu的apt只能安装2.x版本graphviz,这个没关系,但是plantuml是2017年的,不支持思维导图渲染
成功:plantuml test_uml
失败: plantuml test_mindmap
plantuml版本过老:1.2017.15-1
sudo apt-get install plantuml
[work] 0:vim- 1:bash*Z                                                                                                 "ip-172-26-8-185" 13:22 09-Jul-22
Reading package lists... Done
Building dependency tree
Reading state information... Done
plantuml is already the newest version (1:1.2017.15-1).
The following package was automatically installed and is no longer required:
  linux-aws-5.4-headers-5.4.0-1075
Use 'sudo apt autoremove' to remove it.
0 upgraded, 0 newly installed, 0 to remove and 123 not upgraded
目前apt-get安装的graphviz为2.40.1-2
sudo apt-get install graphviz
Reading package lists... Done
Building dependency tree
Reading state information... Done
The following package was automatically installed and is no longer required:
  linux-aws-5.4-headers-5.4.0-1075
Use 'sudo apt autoremove' to remove it.
Suggested packages:
  gsfonts graphviz-doc
The following NEW packages will be installed:
  graphviz
0 upgraded, 1 newly installed, 0 to remove and 123 not upgraded.
Need to get 0 B/601 kB of archives.
After this operation, 3076 kB of additional disk space will be used.
Selecting previously unselected package graphviz.
(Reading database ... 142532 files and directories currently installed.)
Preparing to unpack .../graphviz_2.40.1-2_amd64.deb ...
Unpacking graphviz (2.40.1-2) ...
Setting up graphviz (2.40.1-2) ...
Processing triggers for man-db (2.8.3-2) ...
- 最后找到一个专门下载安装最新版本plantuml的脚本,才成功安装
我把这个脚本放在.github/workflows里面。
IDEA自带plantuml语法插件:PlantUML Integration
- PlantUML Integration - IntelliJ IDEs Plugin | Marketplace
- esteinberg/plantuml4idea: Intellij IDEA plugin for PlantUML
支持新建plantuml文件
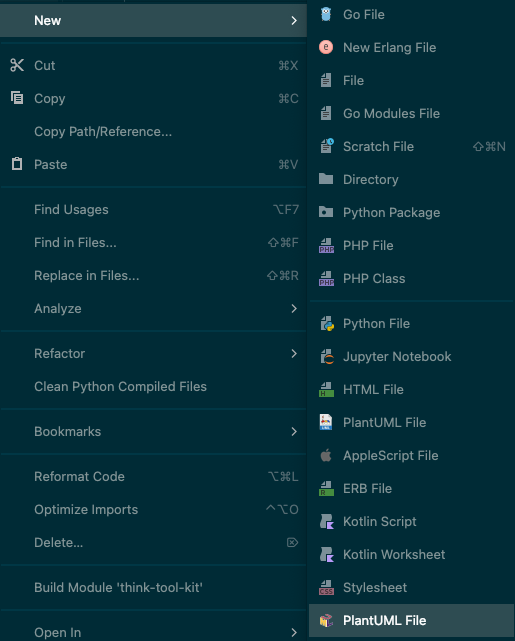
除了默认的指定文件名后缀,还可以新建文件名指定用plantuml studio打开
比如还没有mindmap类型,但是新版plantuml已经支持这个语法
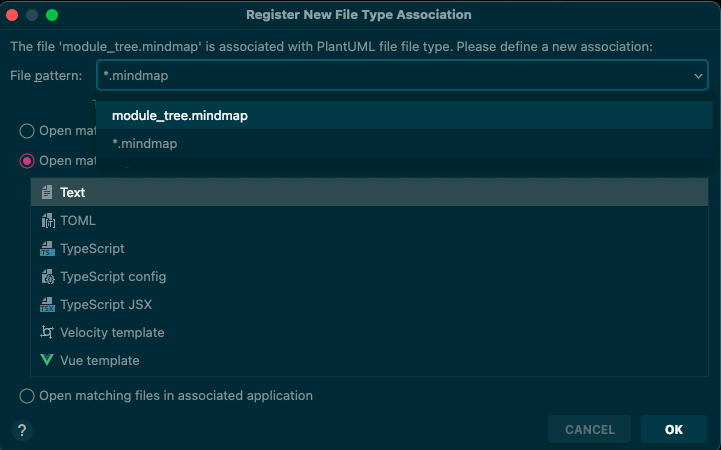
注意到,这里可以选择指定文件或者文件名后缀的打开方式
进入方式:file -> Associate With File Type File type associations | IntelliJ IDEA
还可以用mdbook的include语法嵌入:
@startmindmap
scale 900 width
skinparam monochrome reverse
skinparam classFontName ttf-wqy-zenhei
*[#lightblue] Rust模块系统
**[#FFBBCC] 两种视角
*** 程序猿
**** 文件结构
*** rustc:module tree
****:可执行root
src/main.rs
-> binary crate(默认与cargo.toml->[package].name同名)
;
****:库root
src/lib.rs
-> lib crate(默认与cargo.toml->[package].name同名)
;
****:crate
编译的最小基本单位;
**[#FFBBCC] project的五个层级
*** workspace
*** package
*** crates
*** modules
*** paths
**[#FFBBCC] bin文件夹:可以直接使用src/lib.rs
**[#lightgreen] crates.io保存的什么?
*** 发布流程
**** cargo login
****[#lightgreen]:cargo package
$ cargo help package 从帮助信息结合substrate源码实验🧪可知:
-
从当前目录开始执行路径开始,首先去父文件夹找Cargo.toml, 然后找当前目录的Cargo.toml,找不到就报错
-
找到的Cargo.toml如果有workspace配置, 就按照workspace里面的subpackage顺序来依次打包
-
每次打包的标志为src/main.rs或者src/lib.rs, 且src同级存在Cargo.toml,Cargo.toml里面有[package]
-
开始打包为上传到crate.io的格式
-
依次打包
-
所有依赖必须是在crate.io可以找到的,找不到就报错
-
以包含Cargo.toml父文件夹为项目根目录, 放在target/package里面 ; **** cargo publish **** cargo yank **** cargo owner ***[#lightgreen]:crate.io包含代码总结
-
只包含最小crate内容,也就是src/main.rs或者src/lib.rs + Cargo.toml
-
rust只能允许一级嵌套,使用workspace分出subpackage ; @endmindmap
关于设置plantuml_limit_size
- Open the option ‘Help->Edit custom VM option’
- add ‘-DPLANTUML_LIMIT_SIZE=8192’ on the last line
- It can be work after restart idea. how to set PLANTUML_LIMIT_SIZE when running intellij idea plugin - PlantUML Q&A
Failed with: TOML parsing error: expected an equals, found a newline at line 1 column 6
Original markdown input:
```admonish info title='方法二:preference
1. Open Preferences/Languages & Frameworks/PlantUML
2. Change the target option
[Where to define plantuml limit size environment variable when using PlantUML integration plugin with IntelliJ? - PlantUML Q&A](https://forum.plantuml.net/11078/plantuml-environment-variable-plantuml-integration-intellij)
```
关于scale缩放语法失效

关于高级语法:导入文件、定义变量
-
!define, !undef
-
including files
- can .zip a file and include it
- You can use system environment variable or constant definition when using include
!include %windir%/test1.txt !define PLANTUML_HOME /home/foo !include PLANTUML_HOME/test1.txt
-
include URL
-
constants
-
date and time
Draw.io可以用插入plantuml/mermaid
- Blog - Create a mindmap from text with PlantUML
- 调整图形 -> 插入 -> 高级 -> Mermaid/PlantUML
- 在线版是v20,支持plantUML
- 桌面版是v19,还不支持plantUML: Releases · jgraph/drawio-desktop