think-tool-kit
TTK: 保持批判,有所取舍,知行合一, 方见真我

用意
在多方面整理自己掌握的内容时,一再感受到思维工具的重要性,而这才是核心本质所在,因而起了这本书。
关于puml->data.json->html的转换
- 执行scripts/puml_midmap_json.py获取data.json
- 在data.vg.json中使用data.json
- 在data.html中使用data.vg.json
- 如果相对路径有变化,需要多往上走一级来验证,比如:
../../../../../layer1_visual_tools/map_tools/vega/collections/data_json/rust.json
- 向上走到src那个目录
- 然后一步步定位到文件
puml与vega语法映射
*->#: name- 链接: link
- 悬浮弹窗注释: note, 格式为
<code>note content</code>
- 要有
: - 要以
;结尾
**:node name
<code>
note content
</code>;
- 节点颜色
  {
  "id": 3,
  "color": "",
  "name": "",
  "link": "",
  "parent": 1,
  "note": ""
}
- 考虑到plantuml的’;‘是元素结束符,所以这里将’“;”‘换成’;’
notes = [note.replace('";"', ';') for note in notes]
关于快速本地实时查看vega网页
- 执行
./scripts/local_proxy_server.js - 命令行启动静态服务
为了和mdbook的路径一致,在src目录下执行
npm install -g http-server
http-server -c-1
mdbook的定位是从src目录下开始的
- 相对路径:需要向上一直走到src目录,然后再一步步定位到文件
- 绝对路径:直接从src目录开始定位
关于修改路径后兼容http-server本地和mdbook在线链接的流程图。
目前已知mdbook在github page发布后使用静态资源需要从src目录开始定位,而且要加上项目名称。也就是
/<项目名称>/<从src开始的定位>
为了本地的http-server可以兼容这个路径(因为http-server在本地的src根目录运行,静态资源不带<项目名>)
这里使用http-proxy写了一个代理:
┌─────────────┐                  ┌─────────────┐
│             │   Proxy Request  │             │
│  Client     ├─────────────────►│  Proxy      │
│             │                  │             │
└───────┬─────┘                  └───────┬─────┘
        │                                │
        │                                │
        ▼                                ▼
┌─────────────┐                  ┌─────────────┐
│             │Proxy Request with│             │
│  Proxy      │ modified req.url │  Server     │
│             ├─────────────────►│             │
└───────┬─────┘                  └───────┬─────┘
        │                                │
        │                                │
        ▼                                ▼
┌─────────────┐                  ┌─────────────┐
│             │ Server Response  │             │
│  Proxy      │◄─────────────────┤  Server     │
│             │                  │             │
└─────────────┘                  └─────────────┘
        │                                │
        │                                │
        ▼                                ▼
┌─────────────┐                  ┌─────────────┐
│             │ Proxy Response   │             │
│  Client     │◄─────────────────┤  Proxy      │
│             │                  │             │
└─────────────┘                  └─────────────┘
- /scripts/local_proxy_server.js
vega强化
悬浮弹窗
          "tooltip": {
"signal": "{'相关笔记': datum.note}"
}
markdown渲染
- 按住shift可以一直保持弹窗
- 支持kroki系列图表渲染
def get_kroki_preprocessors():
    preprocessors = {
        "puml": "plantuml",
        "seqdiag": "sequediag",
        "svgbob": "svgbob",
        "ditaa": "ditaa",

    }
    return preprocessors


# 将puml/mermaid等内容提交给kroki获取在线图片链接
def get_kroki_link(file_path, preprocessor):
    with open(file_path, 'r') as f:
        content = f.read()
        encoded_cotnent = base64.urlsafe_b64encode(zlib.compress(content.encode('utf8'))).decode('utf8')
        return f"https://kroki.io/{preprocessor}/svg/{encoded_cotnent}"
可以去kroki在线编辑网站测试好后保存文本在本地:Kroki!
网页JS优化
异步核心
executor 还是 reactor?
- executor: 在 Rust 中,调度 Future 对象的是一个 Executor 线程,它会不停地轮询 Future 的状态,一旦 Future 对象的状态由 “就绪” 变为 “完成”,Executor 就会把结果返回给调用方。异步计算需要包含可中止、存储当前状态和恢复状态这些特征,这些特征都是由 Future trait 统一实现的,这样在使用时避免了许多重复性的工作。Future trait 的 poll 方法会返回一个 Poll 枚举,它包含两个成员:Ready 和 Pending。
- Reactor: 在 Reactor 模型中,主线程通过事件循环来监听异步事件,并在事件发生时调用相应的回调函数。和任务执行不同,整个异步过程是由事件驱动的,主线程会等待事件发生,并且不断轮询异步事件队列。当异步操作完成并返回结果时,主线程会在回调函数中处理结果。Reactror 模型的一个关键点是将事件相关联的回调函数保存在异步队列中,当事件被触发时,会根据事件类型将对应的回调函数压入事件循环队列,然后一次性地调用所有的回调函数。这样做的好处是可以减少线程切换的开销,但也会引入一些问题,比如回调函数的执行时间过长, 会导致其他回调函数的执行被阻塞。为了解决这个问题,可以将回调函数的执行放到线程池中,这样就可以避免阻塞主线程。
Executor 模式和 Reactor 模式本质上都是为了实现异步编程而设计的模式,它们使用不同的机制来处理异步调用。尽管都涉及多线程,但它们的实现方式有很大的不同,不应简单地认为是多线程的组合。
Executor 模式是采用线程池的方式管理多个子线程来执行异步任务,并在主线程上等待所有的任务完成。在 Rust 的 Executor 模式中,主线程通过轮询 Future 对象的方式等待异步任务完成,并不涉及多线程的处理,I/O 操作使用了操作系统提供的异步调用方式,通过信号通知主线程任务完成。在其他编程语言中,Executor 模式可能需要使用多个线程来处理任务执行。
而 Reactor 模式采用了单线程的方式,在主线程上监听异步事件以及相应的回调函数,并在事件触发后调用回调函数来处理异步任务。Reactror 模式的优势在于不会引入线程切换的开销,当然也存在处理IO密集型任务的性能瓶颈,但异步执行的优势在于任务不需要等待,可以使用事件驱动时间进行并行处理。
所以,Executor 模式和 Reactor 模式是两种不同的异步编程模型,它们在实现方面有明显的不同。虽然它们都涉及多线程,但其中 Executor 模式使用线程池管理多个异步任务,而 Reactor 模式使用事件循环监听异步事件并调用相应的回调函数,具体实现上不尽相同。
你只管调用,与系统交互交给异步运行时
在 Rust 中,异步运行时是一个独立的运行时环境,它负责管理异步任务的执行,包括任务的调度、线程池的管理、任务的执行等。
Rust 的异步运行时并没有直接暴露出创建底层线程的接口,而是提供了一些抽象接口和默认实现,以方便用户创建和管理异步任务。如果需要深入了解 Rust 异步运行时的具体实现方式,可以参考 tokio 等库的源码。
在 tokio 的运行时中,线程的创建和销毁、任务的调度和执行都是在 runtime 自己的线程池中完成的。具体流程如下:
- 创建 runtime:在 Builder::new() 方法中调用一系列方法,比如 num_threads()、threaded_scheduler(),以设置线程池大小和线程调度器类型等属性。最终通过 build() 方法创建 runtime 对象。
- 获取 handle:通过 handle() 方法获取 runtime handle,用于在运行时中 spawn 新的 future 和执行异步操作。
- Spawn future:通过 spawn() 方法异步地启动一个 future,并返回一个 JoinHandle,用于跟踪 future 的执行状态。此时 future 并不会被直接执行,而是进入到待执行队列中。
- Run tasks:在 block_on() 方法中,runtime 会持续地从待执行队列中取出 future 并执行,直到所有任务都完成为止。
- Shutdown runtime:通过 drop(rt) 方法关闭 runtime,释放所有资源,包括线程池、任务队列、调度器等。
异步运行时与系统交互
下面是一个概括性的异步运行时如何与系统底层交互的流程:
-
创建运行时对象:在运行时初始化过程中,需要创建并初始化一些系统资源,比如文件描述符、线程池、事件循环等。在这个过程中,需要调用系统底层接口来申请和释放这些资源,并设置相应的事件处理器(比如 epoll 或 kqueue)。
-
注册/注销事件:在执行异步任务的过程中,需要对文件 IO 或网络 IO 等事件进行处理。为了实现高效地异步 IO,可以使用系统底层提供的事件处理器来监听文件描述符和网络端口等事件,并在事件发生时及时通知异步运行时。这个过程需要调用系统底层标准库方法,比如 epoll_ctl 等。
-
调用异步模块:当程序使用异步模块来发起异步操作请求时,通常是将请求的状态信息(比如回调函数、数据缓冲区等)传递给异步运行时。异步运行时会将这些状态信息保存到一个任务队列中,以便在事件就绪后及时调用相应的回调函数进行异步操作。
-
处理异步事件:当异步请求的 IO 事件发生时,事件处理器会向异步运行时发送通知,并触发异步事件处理函数的执行。在这个过程中,异步运行时需要调用系统底层提供的标准库方法,比如 poll 等,来获取异步 IO 事件的状态和数据,并将其传递给相应的回调函数。如果异步请求执行完毕,异步运行时也需要从任务队列中移除对应的状态信息,以释放底层资源并回收内存。
对比python和golang
future对比
异步运行时特点
Python、Golang和Rust在异步运行时的实现上有以下不同:
- Python使用协程实现异步编程,其异步运行时基于asyncio库。
asyncio库通过事件循环和协程实现异步编程,该库在事件循环中注册了协程,当有IO时,事件循环会自动执行协程。Python的异步运行时是单线程的,通过在事件循环中切换协程实现异步操作。
-
Golang的异步编程模型是基于并发的原语 Goroutine 和 Channel。 Goroutine是一种轻量级线程,Channel是一种线程间的通信机制,通过Goroutine和Channel可以实现非阻塞的异步编程。Golang的异步运行时是通过调度器(Scheduler)在多个Goroutine之间进行调度。
-
Rust的异步编程模型是通过Future和Async/Await实现的。 Future是异步计算的结果,而Async函数返回一个Future类型的值,表示异步计算的进程。Rust的异步运行时通过块级任务调度器实现,可以在同一线程上执行,也可以在多个线程上执行。
rust代码编译过程与宏展开过程
rust代码编译过程
声明宏展开
Rust 的声明宏在编译时对代码进行转换,因此其展开过程是在编译期间完成的。展开过程可以分为三个阶段:
- Tokenization:解析输入的 Rust 代码,将其转换成一个个 token(如标识符、关键字、符号等)。
- Parsing:将 token 转化成语法树,用于对代码进行进一步处理。
- Expansion:对语法树进行处理,生成最终的代码。
在第三个阶段,宏会根据语法树中的特定模式对代码进行重构。这些模式可以是任何 Rust 代码片段,包括类型、结构体、函数、表达式等。宏甚至可以递归地展开自己。
展开过程中,宏的实现代码可以使用标准的 Rust 代码编写,包括控制结构和函数调用等。
展开后的代码与宏的实现代码完全一样,因此对于用户而言,使用宏和使用函数没有什么区别。
过程宏展开
属性宏和类型宏展开过程的流程较为相似,都需要解析宏参数、生成新的属性或类型、修改原有属性或类型,并返回属性或类型等步骤。但是由于其作用的范围不同,展开过程中需要解析的内容也不尽相同。例如,类型宏需要解析的是类型参数,用于生成新的类型;而属性宏需要解析的是属性参数,用于生成新的属性。
- 函数宏和其他两种宏不同的是,函数宏需要对整个函数体进行处理,并生成新的代码。在执行完预处理逻辑和解析函数体后,需要判断是否需要进行额外处理,然后才能最终生成新代码并返回。
对比
- 作用于某个规模较小的表达式或语句
- 可以在声明中使用
- 作用于属性/类型
- 可以在声明中使用
- 不能修改原有代码
- 作用于整个函数体
- 不能在声明中使用
- 生成器语法扩展
- DRY原则
- 自定义标记
- 序列化/反序列化
- 实现嵌套参数模板
- repr
- allow
- compiler_builtins
- link
idea自带插件:
Excalidraw Integration - IntelliJ IDEs Plugin | Marketplace
更正:目前新版的Excalidraw Integration已经修复,修改后会直接更新源文件!
- Excalidraw Integration只是一个画图工具:
- 没有保存文件按钮,只能导出为图片
- 哪怕打开画好的文件,也只能预览,修改之后不能保存更新源文件
那还不如用在线app
- 在线excalidraw的文件才是kroki-excalidraw可用的
- 可以载入第三方组件库
在线绘制工具
excalidraw/excalidraw: Virtual whiteboard for sketching hand-drawn like diagrams
将绘制步骤动态化
dai-shi/excalidraw-animate: A tool to animate Excalidraw drawings
好用的库
excalidraw/excalidraw-libraries: Collection of publicly available libraries
创建幻灯片
dai-shi/excalidraw-claymate: A tool based on Excalidraw to create stop motion animations and slides.
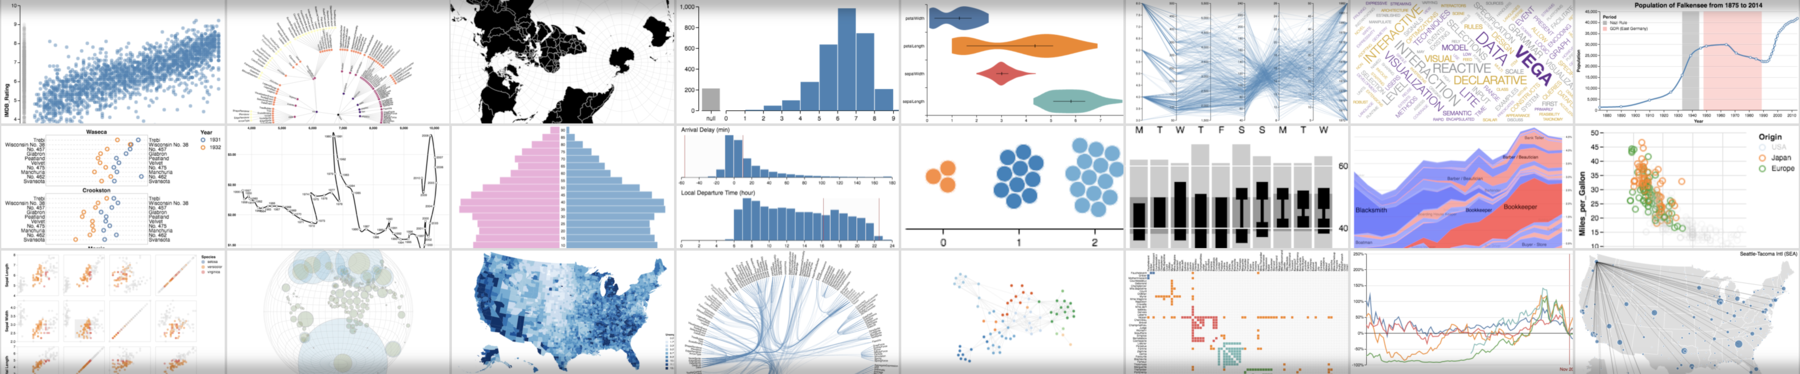
vega
kroki-vega/vegalite
相关资源
- 在线编辑器
- Word Cloud Example | Vega
- 还支持许多其他格式: Example Gallery | Vega
word cloud
Diverging Stacked Bar Chart
Ditaa: Conjugate prior relationships
支持ascii图像渲染 kroki-ditaa
相关资源
- ditaa
- plantuml支持使用ditaa语法:Integration of Ditaa
- 前言 · ditaa 學習筆記
- 【图形描述语言】ditaa | 知行近思
- 字符画——ditaa使用指南,文本格式下作图 - 知乎
Mermaid
kroki-mermaid
Sequence diagram
Gantt
Nomnoml: UML diagram
kroki-nomnoml
相关资源
BPMN
-
业务流程模型和标记法是一套图形化表示法,用于以业务流程模型详细说明各种业务流程。
-
它最初由业务流程管理倡议组织开发,名称为“Business Process Modeling Notation“,
即“业务流程建模标记法”。
kroki-bpmn
相关资源
- 企业业务流程建模——BPMN - 知乎
- Web-based tooling for BPMN, DMN, CMMN, and Forms | bpmn.io
- BPMN Editor | bpmn-js modeler Demo | demo.bpmn.io
Bytefield
kroki-bytefield, 不支持引入
WaveDrom: Digital Timing diagram
kroki-wavedrom
Svgbob
kroki-svgbob
connected Servers
UMlet
UMLet is a free, open-source UML tool with a simple user interface: draw UML diagrams fast, build sequence and activity diagrams from plain text, export diagrams to eps, pdf, jpg, svg, and clipboard, share diagrams using Eclipse, and create new, custom UML elements. UMLet runs stand-alone or as Eclipse plug-in on Windows, OS X and Linux.
kroki-umlet
State machine
VEGA深度使用
缘起
一直以来,mindmap、UML(plantuml)、excalidraw这些工具只能表达少量概念之间的联系,缺少可以看到更加全面知识点联系的工具。
在尝试scapple之后,它的局限性太明显,无法和在线文档结合起来。这时候我在学习kroki的使用时,发现vege这个工具。

基础使用方法(基于kroki-vega)
编写好的py脚本
"""
主要将plantuml的mindmap写法转为vega可用的json文件
"""
import sys
import re
import json
import os
import base64
import zlib
def converter(puml_path: str):
"""
传入puml文件路径进行解析转化
1. 标题都是以*开头, 且一个*的都是根节点
2. 父级节点只会比子级节点少一个*,如果当前节点比下一个节点少于超过一个*,puml就无法通过
3. 如果下一个节点比上一个节点少*,就去对应列表里面找最后一个
:param puml_path:
:return:
"""
print(f"开始处理{puml_path}...")
levels = {}
json_results = []
# 找到同级的md文档目录
md_dir_path = f"{puml_path.replace(puml_path.split('/')[-1], '')}md"
data_json_path = f"{puml_path.replace(puml_path.split('/')[-1], '')}data.json"
with open(puml_path, 'r') as f:
notes = extract_notes(md_dir_path, f.read())
with open(puml_path, 'r') as f:
lines = [line for line in f.readlines()]
title_index = 1
for index, line in enumerate(lines):
# 标题的*后面只会出现三种情况:空格、:、[
if line.startswith('*'):
stars, name, color, links = extract_stars_name_links_color(line)
levels[stars] = (line, title_index)
parent = levels.get(stars[:-1])
node = {
"id": title_index,
"name": name,
# "size": len(name)
# "link": 'https://www.google.com'
}
if parent:
node["parent"] = parent[1]
if links:
# 如果是有链接,就变成子节点
link_count = 1
for link_name, link in links.items():
title_index += 1
wrap_link_name = get_wrap_name(f"链接{link_count}: {link_name}")
child_node = {
"id": title_index,
"name": wrap_link_name,
"link": link,
"parent": node['id'],
"note": f'[来自{node["name"]}的链接]({link})'
}
json_results.append(child_node)
link_count += 1
if color:
node["color"] = '#' + color
if index < len(lines) and lines[index + 1].startswith('<code>'):
note = notes.pop(0)
# print(f"弹出的注释:{note}")
node['note'] = note
json_results.append(node)
title_index += 1
result_path = puml_path.replace('.puml', '.json')
with open(data_json_path, 'w') as f:
f.write(json.dumps(json_results))
def extract_stars_name_links_color(line=''):
color = None
links = re.findall('\[\[(.*?)\]\]', line)
link_dict = {}
for link in links:
href, title = link.split(' ', 1)
line = line.replace(f"[[{href} {title}]]", f" {title}")
link_dict[title] = href
try:
stars = re.split('[ :\[]', line)[0]
name = line[len(stars):]
if name.startswith('[#'): # 如果有颜色
color = re.findall('\[#(.*?)\]', name)[0]
name = name.split(']')[1]
if name.startswith(':'): # 如果有注释
name = name[1:]
except:
print(line)
wrap_name = get_wrap_name(name)
return stars, wrap_name, color, link_dict
def get_wrap_name(name):
# 统一添加换行符
wrap_name = []
space_count = 0
for char in name:
if char == ' ':
space_count += 1
if space_count == 3:
char = '\n'
space_count = 0
wrap_name.append(char)
return ''.join(wrap_name)
# [Kroki!](https://kroki.io/)
def get_kroki_preprocessors():
preprocessors = {
"puml": "plantuml",
"seqdiag": "sequediag",
"svgbob": "svgbob",
"ditaa": "ditaa",
}
return preprocessors
# 将puml/mermaid等内容提交给kroki获取在线图片链接
def get_kroki_link(file_path, preprocessor):
with open(file_path, 'r') as f:
content = f.read()
encoded_cotnent = base64.urlsafe_b64encode(zlib.compress(content.encode('utf8'))).decode('utf8')
return f"https://kroki.io/{preprocessor}/svg/{encoded_cotnent}"
# 1. 提取内容
# 2. 如果是md文档地址,就取文档地址内容为note
# 3. 对note的内容进行处理
def extract_notes(md_dir_path, text=''):
# text = '''
# ****:tail -n 80 customSpec.json
# <code>
#
# 此命令显示 Wasm 二进制字段后面的最后部分,
# 包括运行时使用的几个托盘的详细信息,
# 例如 sudo 和 balances 托盘。
# </code>;
# ****:Modify the name field to identify this chain specification as a custom chain specification.
# <code>
#
# "name": "My Custom Testnet",
# </code>
# ****:Modify aura field to specify the nodes
# <code>
# '''
# 同时匹配换行符
# (?:pattern) 来解决方括号不适用的场景
# [正则匹配所有字符(包括换行)_尐东东的博客-CSDN博客_正则匹配所有字符](https://blog.csdn.net/u011158908/article/details/105666329)
notes = re.findall('\<code\>((?:.|\n)*?)\</code\>', text)
# 考虑到html默认只支持br换行,所以这里统一替换成br
# notes = [note.replace('\n', '<br>') for note in notes]
preprocessors = get_kroki_preprocessors()
def inner_note_replace(note):
# 如果是md文件地址,就替换
if note.startswith("md_file:"):
md_file = note.replace("md_file:", "")
with open(f"{md_dir_path}/{md_file}", 'r') as f:
note = f.read()
# 考虑到plantuml的';'是元素结束符,所以这里将'";"'换成';'
note = note.replace('";"', ';')
# 提取其中的markdown图片链接,如果是puml后缀,就单独处理
#  -> 
img_links = re.findall('!\[(.*?)\]\((.*?)\)', note)
for img_link in img_links:
img_name, img_path = img_link
suffix = img_path.split('.')[-1]
if suffix in preprocessors.keys():
kroki_link = get_kroki_link(img_path, preprocessors[suffix])
file_name = img_path.split('/')[-1]
note = note.replace(f"",
f"- [{file_name}点开大图]({kroki_link})\n")
return note
notes = [inner_note_replace(note.strip()) for note in notes]
return notes
def extract_links(text=''):
links = re.findall('\[\[(.*?)\]\]', text)
link_dict = {}
for link in links:
href, title = link.split(' ', 1)
link_dict[title] = href
return link_dict
if __name__ == "__main__":
if len(sys.argv) != 2:
print("请传入puml文件路径...")
else:
puml_path = sys.argv[1]
puml_paths = []
if os.path.isdir(puml_path):
puml_paths = [f"{puml_path}/{item}" for item in os.listdir(puml_path) if item.endswith('.puml')]
elif not puml_path.endswith('.puml'):
print("请传入puml文件...")
else:
puml_paths.append(puml_path)
for puml_path in puml_paths:
converter(puml_path)
两种格式:svg和canvas
- svg本质上是xml数据,它渲染的可视化图片会分成很多节点DOM。好处在于节点操作更顺畅,坏处在于更加占资源
- canvas只有一个DOM,正好与svg相反。
- 二者互补,节点多优先选canvas
两种渲染方式
<head>
    <script src="https://cdn.jsdelivr.net/npm/vega@5"></script>
    <script src="https://cdn.jsdelivr.net/npm/vega-lite@5"></script>
    <script src="https://cdn.jsdelivr.net/npm/vega-embed@6"></script>
</head>
<body>
<div id="vis"/>
</code>
<script>
    vegaEmbed(
        '#vis',
        'vega/tree.vg.json'
    );
</script>
</body>
<head>
    <script src="https://cdn.jsdelivr.net/npm/vega@5"></script>
</head>
<body>
<div id="view"></div>
<script type="text/javascript">
    var view;

    fetch('vega/circle_packing.vg.json')
        .then(res => res.json())
        .then(spec => render(spec))
        .catch(err => console.error(err));

    function render(spec) {
        view = new vega.View(vega.parse(spec), {
            renderer:  'svg',  // renderer (canvas or svg)
            container: '#view',   // parent DOM container
            hover:     true       // enable hover processing
        });
        return view.runAsync();
    }
</script>
</body>
参考资源
yarn
yarn start
-
vega的底层是d3:D3.js - Data-Driven Documents
-
MakingDataVisual/makingdatavisual.github.io: Executable Examples for Making Data Visual
- Four Views of the Same Data: Scatterplot, Clustered Barchart, Clustered Barchart, Stacked Barchart
- Question: How Is a Value Distributed?: Categorical Histogram , Quantitative Histogram , Smoothed Histogram , Box Plot, Categorical Density Plot, Continuous Density Plot
- Question: How Do Groups Differ from Each Other?: Bar Chart, Paired (or Multiple) Series Bar Chart, Pie (or Doughnut ) Chart, Heatmap
- Question: Do Invidual Items Fall Into Groups? Is There a Relationship Between Attributes of Items?: Scatterplot, Line Chart, Stacked Area Chart
- Question: How Are Objects Related To Each Other in a Network or Hierarchy?: Node-Link View (Force-Directed Layout), Circular Network Layout, Adjacency Matrix, Tree View, Treemap, Sunburst plot
- Question: Where Are Objects Located?: Choropleth, Dotplot map
- Question: What Is In This Text?: Word Cloud
- Chapter 6: Multiviews: Small Multiples, Split by Dimension, Small Multiples, Showing Different Measures, SPLOM, Cross-Selection
mermaid使用示例
介绍

示例
思维导图
默认不支持,虽然Mermaid本身暂未支持思维导图的绘制,但是考虑到Mermaid对流程图的支持,可以用Mermaid绘制极简单的思维导图
graph TD
A(工业用地效率)-->B1(土地利用强度)
A-->B2(土地经济效益)
B1-->C1(容积率)
B1-->C2(建筑系数)
B1-->C3(亩均固定资本投入)
B2-->D1(亩均工业产值)
B2-->D2(亩均税收)
`
流程图
flowchart LR

A[Hard] -->|Text| B(Round)
B --> C{Decision}
C -->|One| D[Result 1]
C -->|Two| E[Result 2]
`
时序图
sequenceDiagram
Alice->>John: Hello John, how are you?
loop Healthcheck
    John->>John: Fight against hypochondria
end
Note right of John: Rational thoughts!
John-->>Alice: Great!
John->>Bob: How about you?
Bob-->>John: Jolly good!
`
甘特图
gantt
    section Section
    Completed :done,    des1, 2014-01-06,2014-01-08
    Active        :active,  des2, 2014-01-07, 3d
    Parallel 1   :         des3, after des1, 1d
    Parallel 2   :         des4, after des1, 1d
    Parallel 3   :         des5, after des3, 1d
    Parallel 4   :         des6, after des4, 1d
`
类图
classDiagram
Class01 <|-- AveryLongClass : Cool
<<Interface>> Class01
Class09 --> C2 : Where am i?
Class09 --* C3
Class09 --|> Class07
Class07 : equals()
Class07 : Object[] elementData
Class01 : size()
Class01 : int chimp
Class01 : int gorilla
class Class10 {
  <<service>>
  int id
  size()
}
`
状态图
stateDiagram-v2
[*] --> Still
Still --> [*]
Still --> Moving
Moving --> Still
Moving --> Crash
Crash --> [*]
`
饼图
pie
"Dogs" : 386
"Cats" : 85.9
"Rats" : 15
`
gitgraph(experimental in v9)
  gitGraph
    commit
    commit
    branch develop
    checkout develop
    commit
    commit
    checkout main
    merge develop
    commit
    commit
`
日记图
  journey
    title My working day
    section Go to work
      Make tea: 5: Me
      Go upstairs: 3: Me
      Do work: 1: Me, Cat
    section Go home
      Go downstairs: 5: Me
      Sit down: 3: Me
`
C4架构图(experimental in v9)
C4Context
title System Context diagram for Internet Banking System

Person(customerA, "Banking Customer A", "A customer of the bank, with personal bank accounts.")
Person(customerB, "Banking Customer B")
Person_Ext(customerC, "Banking Customer C")
System(SystemAA, "Internet Banking System", "Allows customers to view information about their bank accounts, and make payments.")

Person(customerD, "Banking Customer D", "A customer of the bank, <br/> with personal bank accounts.")

Enterprise_Boundary(b1, "BankBoundary") {

  SystemDb_Ext(SystemE, "Mainframe Banking System", "Stores all of the core banking information about customers, accounts, transactions, etc.")

  System_Boundary(b2, "BankBoundary2") {
    System(SystemA, "Banking System A")
    System(SystemB, "Banking System B", "A system of the bank, with personal bank accounts.")
  }

  System_Ext(SystemC, "E-mail system", "The internal Microsoft Exchange e-mail system.")
  SystemDb(SystemD, "Banking System D Database", "A system of the bank, with personal bank accounts.")

  Boundary(b3, "BankBoundary3", "boundary") {
    SystemQueue(SystemF, "Banking System F Queue", "A system of the bank, with personal bank accounts.")
    SystemQueue_Ext(SystemG, "Banking System G Queue", "A system of the bank, with personal bank accounts.")
  }
}

BiRel(customerA, SystemAA, "Uses")
BiRel(SystemAA, SystemE, "Uses")
Rel(SystemAA, SystemC, "Sends e-mails", "SMTP")
Rel(SystemC, customerA, "Sends e-mails to")
`
参考资源
-
mermaid-js/mermaid: Generation of diagram and flowchart from text in a similar manner as markdown
-
OS Awards 2019 得奖 🏆 : JavaScript Open Source Awards - GitNation
-
gitgraph从v9.0.0开始被支持:Releases · mermaid-js/mermaid
此处是源码
-
编译好的js文件下载:
- 下载好对应版本的mermaid.min.js文件
- 替换book.toml中对应的additional-js中的mermaid.min.js文件
- 注意要多刷新两次才能更新缓存
PlantUML
plantuml & Graphviz
示例
添加超链接、提示、标签
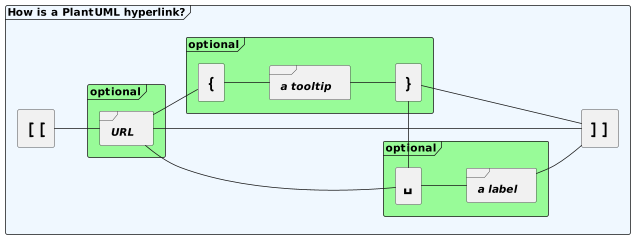
```kroki-plantuml
@startmindmap
* Build a local blockchain [[#build-a-local-blockchain jump]]
@endmindmap
```
超链接
@startuml
[[link{with_bracket}&id=10]]:Some activity\n(with link with brackets)\n""link{with_bracket}&id=10"";
[["link{with_bracket}"{}]]:Some activity\n(with link with brackets and empy tooltip)\n"""link{with_bracket}"{}"";
[["link{with_bracket}"{with tooltip}]]:Some activity\n(with link finished by brackets and tooltip)\n"""link{with_bracket}"{with tooltip}"";
[["link{with_bracket}&id=10"{with tooltip}]]:Some activity\n(with link with brackets and tooltip)\n"""link{with_bracket}&id=10"{with tooltip}"";
@enduml
思维导图
OrgMode 语法
@startmindmap
'orgmode
* Debian
** Ubuntu
*** Linux Mint
*** Kubuntu
*** Lubuntu
*** KDE Neon
** LMDE
** SolydXK
** SteamOS
** Raspbian with a very long name
*** <s>Raspmbc</s> => OSMC
*** <s>Raspyfi</s> => Volumio
@endmindmap
Markdown语法
@startmindmap
* root node
	* some first level node
		* second level node
		* another second level node
	* another first level node
@endmindmap
运算符决定方向
@startmindmap
+ OS
++ Ubuntu
+++ Linux Mint
+++ Kubuntu
+++ Lubuntu
+++ KDE Neon
++ LMDE
++ SolydXK
++ SteamOS
++ Raspbian
-- Windows 95
-- Windows 98
-- Windows NT
--- Windows 8
--- Windows 10
@endmindmap
多行表示
@startmindmap
* Class Templates
**:Example 1
<code>
template <typename T>
class cname{
void f1()<U+003B>
...
}
</code>
;
**:Example 2
<code>
other template <typename T>
class cname{
...
</code>
;
@endmindmap
多根节点
@startmindmap
* Root 1
** Foo
** Bar
* Root 2
** Lorem
** Ipsum
@endmindmap
改变节点颜色
@startmindmap
*[#Orange] Colors
**[#lightgreen] Green
**[#FFBBCC] Rose
**[#lightblue] Blue
@endmindmap
移除方框
@startmindmap
* root node
** some first level node
***_ second level node
***_ another second level node
***_ foo
***_ bar
***_ foobar
** another first level node
@endmindmap
指定左右方向
@startmindmap
* count
** 100
*** 101
*** 102
** 200

left side

** A
*** AA
*** AB
** B
@endmindmap
带标签的完整示例
@startmindmap
caption figure 1
title My super title

* <&flag>Debian
** <&globe>Ubuntu
*** Linux Mint
*** Kubuntu
*** Lubuntu
*** KDE Neon
** <&graph>LMDE
** <&pulse>SolydXK
** <&people>SteamOS
** <&star>Raspbian with a very long name
*** <s>Raspmbc</s> => OSMC
*** <s>Raspyfi</s> => Volumio

header
My super header
endheader

center footer My super footer

legend right
  Short
  legend
endlegend
@endmindmap
应用:rust的模块系统整理
@startmindmap
scale 900 width
skinparam monochrome reverse
skinparam classFontName ttf-wqy-zenhei
*[#lightblue] Rust模块系统
**[#FFBBCC] 两种视角
*** 程序猿
**** 文件结构
*** rustc:module tree
****:可执行root
<code>
src/main.rs
-> binary crate(默认与cargo.toml->[package].name同名)
</code>;
****:库root
<code>
src/lib.rs
-> lib crate(默认与cargo.toml->[package].name同名)
</code>;
****:crate
<code>编译的最小基本单位</code>;
**[#FFBBCC] project的五个层级
*** workspace
*** package
*** crates
*** modules
*** paths
**[#FFBBCC] bin文件夹:可以直接使用src/lib.rs
**[#lightgreen] crates.io保存的什么?
*** 发布流程
**** cargo login
****[#lightgreen]:cargo package
<code>
$ cargo help package
从帮助信息结合substrate源码实验🧪可知:
1. 从当前目录开始执行路径开始,首先去父文件夹找Cargo.toml,
然后找当前目录的Cargo.toml,找不到就报错
2. 找到的Cargo.toml如果有workspace配置,
就按照workspace里面的subpackage顺序来依次打包
3. 每次打包的标志为src/main.rs或者src/lib.rs,
且src同级存在Cargo.toml,Cargo.toml里面有[package]
4. 开始打包为上传到crate.io的格式
5. 依次打包
6. 所有依赖必须是在crate.io可以找到的,找不到就报错
7. 以包含Cargo.toml父文件夹为项目根目录,
放在target/package里面
</code>;
**** cargo publish
**** cargo yank
**** cargo owner
***[#lightgreen]:crate.io包含代码总结
<code>
1. 只包含最小crate内容,也就是src/main.rs或者src/lib.rs + Cargo.toml
2. rust只能允许一级嵌套,使用workspace分出subpackage
</code>;
@endmindmap
使用skinparam进行样式设置
颜色
@startuml
colors
@enduml
字体与大小
- skinparam classFontColor red
- skinparam classFontSize 10
- skinparam classFontName Aapex
文本对齐
- skinparam sequenceMessageAlign center/right/left
@startuml
skinparam sequenceMessageAlign center
Alice -> Bob : Hi
Alice -> Bob : This is very long
@enduml
手写体
下面罗列当前版本plantuml可用样式
调整生成图片大小
scale 900 width/height
语法概览
语法全览
- Ascii Math syntax for complex formulas
- Archimate Support
- Activity Diagram syntax and features
- Class Diagram syntax and features
- Component Diagram syntax and features
- Use creole syntax to style your texts
- Deployment Diagram syntax and features
- Draw GUI mockup with Salt
- Define graphical sprites
- Customize your diagrams with themes
- Gantt Diagram syntax and features
- Timing Diagram syntax and features
- Use of Openiconic
- nwdiag
- State Diagram syntax and features
- PlantUML Standard Library
高级使用
标题、页脚与分页
高级语法:Preprocessing
参考资源
-
在线服务:PlantUML Web Server
-
本来选用这个crate, 但是安装太麻烦: -
plantuml-stdlib/Azure-PlantUML: PlantUML sprites, macros, and other includes for Azure services
-
plantuml-stdlib/Archimate-PlantUML: PlantUML macros and other includes for Archimate Diagrams
-
选用这个mdbook插件:
I created this preprocessor because mdbook-plantuml wasn’t working for me—specifically, mdbook-plantuml is currently incompatible with mdbook watch and mbbook serve because it triggers a rebuild loop.
This crate is quite simple and non-customizable at this point as it does all that I need it to for my own purposes. Feel free to fork and/or PR away though, and I’ll be happy to include changes.
小插曲一:给mdbook-puml安装合适的plantuml
- plantuml是基于graphviz的一个工具, Graphviz 是一个开源的图可视化工具,非常适合绘制结构化的图标和网络。它使用一种叫 DOT 的语言来表示图形。
官网可以看到,官方不再提供编译好的各个平台版本,现在都是第三方编译好保存的。这也难怪ubuntu的版本那么低。
-
plantuml的uml图生成需要的graphviz版本较低
-
plantuml新出的非uml图,比如思维导图,需要较新的plantuml才能支持
-
osx的brew可以安装3.0版本graphviz,plantuml的版本也比较新,支持思维导图渲染
- plantuml版本:1.2022.4, graphviz版本:3.0.0
brew install plantuml                                                                                                                            ─╯
Warning: plantuml 1.2022.4 is already installed and up-to-date.
To reinstall 1.2022.4, run:
  brew reinstall plantuml

brew install graphviz                                                                                                                            ─╯
Warning: graphviz 3.0.0 is already installed and up-to-date.
To reinstall 3.0.0, run:
  brew reinstall graphviz
- ubuntu的apt只能安装2.x版本graphviz,这个没关系,但是plantuml是2017年的,不支持思维导图渲染
成功:plantuml test_uml
失败: plantuml test_mindmap
plantuml版本过老:1.2017.15-1
sudo apt-get install plantuml
[work] 0:vim- 1:bash*Z                                                                                                 "ip-172-26-8-185" 13:22 09-Jul-22
Reading package lists... Done
Building dependency tree
Reading state information... Done
plantuml is already the newest version (1:1.2017.15-1).
The following package was automatically installed and is no longer required:
  linux-aws-5.4-headers-5.4.0-1075
Use 'sudo apt autoremove' to remove it.
0 upgraded, 0 newly installed, 0 to remove and 123 not upgraded
目前apt-get安装的graphviz为2.40.1-2
sudo apt-get install graphviz
Reading package lists... Done
Building dependency tree
Reading state information... Done
The following package was automatically installed and is no longer required:
  linux-aws-5.4-headers-5.4.0-1075
Use 'sudo apt autoremove' to remove it.
Suggested packages:
  gsfonts graphviz-doc
The following NEW packages will be installed:
  graphviz
0 upgraded, 1 newly installed, 0 to remove and 123 not upgraded.
Need to get 0 B/601 kB of archives.
After this operation, 3076 kB of additional disk space will be used.
Selecting previously unselected package graphviz.
(Reading database ... 142532 files and directories currently installed.)
Preparing to unpack .../graphviz_2.40.1-2_amd64.deb ...
Unpacking graphviz (2.40.1-2) ...
Setting up graphviz (2.40.1-2) ...
Processing triggers for man-db (2.8.3-2) ...
- 最后找到一个专门下载安装最新版本plantuml的脚本,才成功安装
我把这个脚本放在.github/workflows里面。
IDEA自带plantuml语法插件:PlantUML Integration
- PlantUML Integration - IntelliJ IDEs Plugin | Marketplace
- esteinberg/plantuml4idea: Intellij IDEA plugin for PlantUML
支持新建plantuml文件
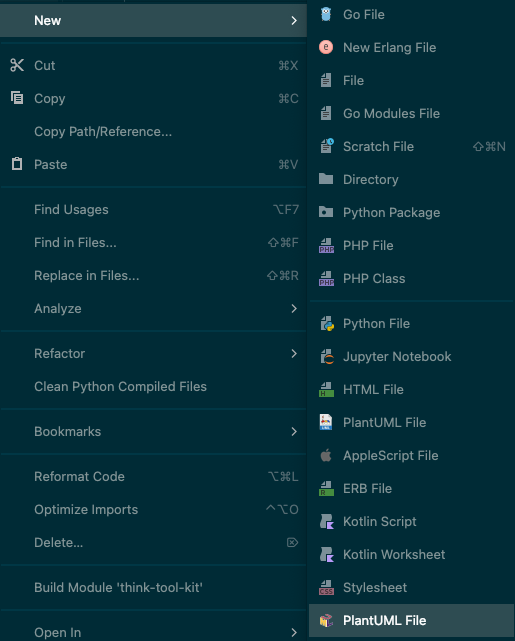
除了默认的指定文件名后缀,还可以新建文件名指定用plantuml studio打开
比如还没有mindmap类型,但是新版plantuml已经支持这个语法
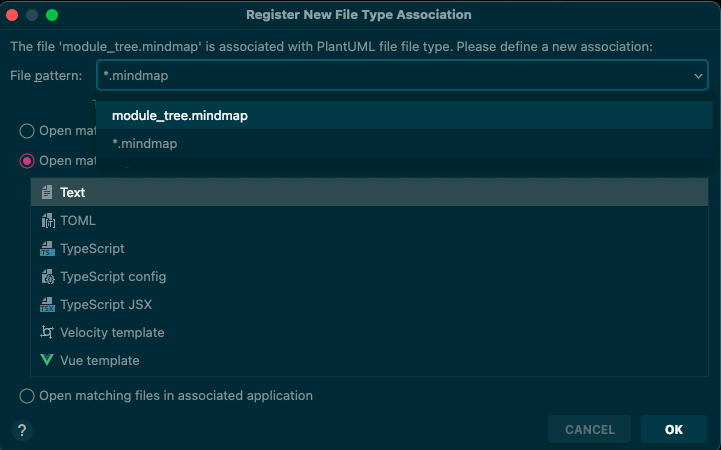
注意到,这里可以选择指定文件或者文件名后缀的打开方式
进入方式:file -> Associate With File Type File type associations | IntelliJ IDEA
还可以用mdbook的include语法嵌入:
@startmindmap
scale 900 width
skinparam monochrome reverse
skinparam classFontName ttf-wqy-zenhei
*[#lightblue] Rust模块系统
**[#FFBBCC] 两种视角
*** 程序猿
**** 文件结构
*** rustc:module tree
****:可执行root
src/main.rs
-> binary crate(默认与cargo.toml->[package].name同名)
;
****:库root
src/lib.rs
-> lib crate(默认与cargo.toml->[package].name同名)
;
****:crate
编译的最小基本单位;
**[#FFBBCC] project的五个层级
*** workspace
*** package
*** crates
*** modules
*** paths
**[#FFBBCC] bin文件夹:可以直接使用src/lib.rs
**[#lightgreen] crates.io保存的什么?
*** 发布流程
**** cargo login
****[#lightgreen]:cargo package
$ cargo help package 从帮助信息结合substrate源码实验🧪可知:
-
从当前目录开始执行路径开始,首先去父文件夹找Cargo.toml, 然后找当前目录的Cargo.toml,找不到就报错
-
找到的Cargo.toml如果有workspace配置, 就按照workspace里面的subpackage顺序来依次打包
-
每次打包的标志为src/main.rs或者src/lib.rs, 且src同级存在Cargo.toml,Cargo.toml里面有[package]
-
开始打包为上传到crate.io的格式
-
依次打包
-
所有依赖必须是在crate.io可以找到的,找不到就报错
-
以包含Cargo.toml父文件夹为项目根目录, 放在target/package里面 ; **** cargo publish **** cargo yank **** cargo owner ***[#lightgreen]:crate.io包含代码总结
-
只包含最小crate内容,也就是src/main.rs或者src/lib.rs + Cargo.toml
-
rust只能允许一级嵌套,使用workspace分出subpackage ; @endmindmap
关于设置plantuml_limit_size
- Open the option ‘Help->Edit custom VM option’
- add ‘-DPLANTUML_LIMIT_SIZE=8192’ on the last line
- It can be work after restart idea. how to set PLANTUML_LIMIT_SIZE when running intellij idea plugin - PlantUML Q&A
Failed with: TOML parsing error: expected an equals, found a newline at line 1 column 6
Original markdown input:
```admonish info title='方法二:preference
1. Open Preferences/Languages & Frameworks/PlantUML
2. Change the target option
[Where to define plantuml limit size environment variable when using PlantUML integration plugin with IntelliJ? - PlantUML Q&A](https://forum.plantuml.net/11078/plantuml-environment-variable-plantuml-integration-intellij)
```
关于scale缩放语法失效

关于高级语法:导入文件、定义变量
-
!define, !undef
-
including files
- can .zip a file and include it
- You can use system environment variable or constant definition when using include
!include %windir%/test1.txt !define PLANTUML_HOME /home/foo !include PLANTUML_HOME/test1.txt
-
include URL
-
constants
-
date and time
Draw.io可以用插入plantuml/mermaid
- Blog - Create a mindmap from text with PlantUML
- 调整图形 -> 插入 -> 高级 -> Mermaid/PlantUML
- 在线版是v20,支持plantUML
- 桌面版是v19,还不支持plantUML: Releases · jgraph/drawio-desktop
草图方法
笔记方法
思维理念
思维模型
参考书籍
- <结构化思维>
- <PDCA工作法>
WH模型
参考书籍
- 《结构化思维》